 Good Morning Everybody,
We had a great shoot yesterday wrapping about 8 p.m. Needless to say we were all wiped out. We are at it again today heading to some more gorgeous locations. I can't wait for you to see the new videos. We are running the gamut of lighting, color, composition, and technique - I think you are going to love 'em. I'll get a few images posted over these next few days.
But for now, let's get on with Technique Tuesday. I have to tell you, this was a "bear" of a post to get completed today. The original tutorial went over 30 minutes, I made the Camtasia "mistake" of trying to capture my screen size of 1680x1050 pixels. At 30 minutes, Camtasia just choked with all that data, plus, I thought 30 minutes was way too long too. I spent about 2 hours trying to save the video, but finally threw my hands up in the air and decided to re-cut it this morning. The good news is this. I packed a lot more info into the shorter tutorial which is only about 14 minutes long.
I've got two more images that deal with underexposure, with the "Save" strategies being different techniques. Look for these in upcoming Technique Tuesdays. Anyway, how about on with the show...
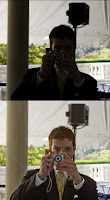
For as long as I can remember, I have always been intrigued with low light and high ISO's. Even in my film days, I loved pushing the limits with different film developer combinations. I loved seeing if I could still get a decent image from an underexposed negative. Heck, who even knows what a negative is these days? We would print on Kodak's discontinued Polycontrast paper and add the proper filter to just goose the tones a bit more. Today, we take the Levels tools in Photoshop and squish the left and right slider in to obtain a similar result.
Back in the film days, we would burn and dodge selectively and creatively in order to blend the image tonalities into something that represented a good print. Shooting digital these days has not dampened my curiosity in the least in how far I can push an image. These days with the high ISO cameras available, it just gets easier and easier.
But what do we do if that image is badly underexposed and it really needs to be in the wedding album? Can we save it? What are the noise issues involved? If there is a tremendous amount of noise, what can we do to ameliorate it?
These are the questions answered in this tutorial as I walk you through one very underexposed image. I'll show you the JPEG and RAW strategies involved, each representing a different processing challenge to obtain that final decent result. This all sounds very simple, but I think you will be surprised by the results and how I get there. Hit the PLAY button below to see the rest of the story.
Hey everybody, that's it for me today. Jason's got the video camera fired up and ready to go, models are dressed, and we need to be at the church in about an hour. See everybody tomorrow.

Hi David,
ReplyDeleteLoved your tute on recovering from a botched exposure.
Thanks too for fixing the link from the other day.
I also wanted to say how much I find your approach to lens choice so refreshing - having been a slavish seeker of 'L' series and fast lens. Your photos are proof that you know your stuff and have much to share of value. As for the 'blue', way to go!!! I'm all for creative experimentation - especially when the clients buy it :) One question as I finish. Did you ever consider the Canon 28-300 IS as a possibility on a 5D given it's range. Cheers, David
Thank you David for great titorial
ReplyDeleteWhat about underexposure for darker skin tones? I've found that Noise reduction is a bit harder. Any tips other than the obvious of getting the proper exposure every time.
ReplyDeleteWhy not just use the curves? I promise you that you'll get a result...
ReplyDelete