Saturday, April 18, 2020

WOW! Eye Opening Numbers For Wildlife Photography!

Good Morning Everybody,

Last evening we had a fun Zoom meeting with our first Safari group.  Don Dickson, who runs the "Internationally" famous Texas School [link] put the whole thing together for us.  It was a "hoot" reminiscing about the great times we all had on that trip.

Yep, we do get kind of close to the animals, lion included.  That's probably the biggest surprise for first-time safari adventurers. Thanks to Kevin Dooley of Idube Photo Safaris [link] for sending this photo over to me this morning. That's me next to the driver with LaDawn behind him. We are really only a few feet away from the lions - safaris are definitely an adventure!

We joined the Dicksons on their Safari and then were to follow up with two more of our own when the bottom dropped out of our travels. No problem though, we already have them rescheduled for about the same time next year.  I put the links at the end of this post.

Anyway, I hope you all got a chance to view the YouTube video I put up just a few days ago.  It really shows what an exciting trip it was. If you missed it, here is the [link] to the video one more time - Enjoy!  Now on with the show....
________________________________________________________________________

WOW!  Eye Opening Numbers For Wildlife Photography!

Last Thursday I did a post entitled "Camera Settings for Wildlife Photography - Mostly Manual Mode and Why" [link] which really got down to the "nitty-gritty" of my wildlife shooting strategy.  Today I want to ramp up that post with some surprising statistics about the Shutter Speeds, Apertures, and ISOs I used most often.  These numbers are based on the EXIF data of 20,179 wildlife images I made two years ago during our safaris back then.

Shutter Speed

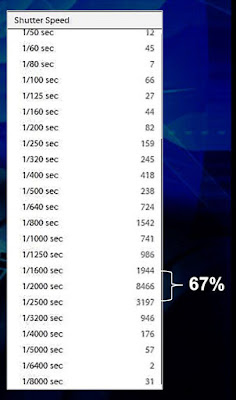
Take a look at the table to the right.  I think you will be surprised by the numbers here. As you can see, my exposures ranged from 1/50 second and lower up to 1/8000 second.  OK, how did I come up with this data?  It was easy once I really got the "hang" of some of Lightroom's EXIF data reporting features. I asked Lightroom to just report all exposure data from my Canon 5D Mk3 and my Canon 7D Mk2 and presto, the Shutter Speed info appeared!

OK, back to the numbers. Take a closer look at the chart to the right. Notice that 67% - that's 67% - of my shutter speeds were 1/1600, 1/2000, or 1/2500 second! A quick point of clarification... NOT all those exposures were made on Manual mode. A large number of them were made on Shutter Priority mode as well.  I'll cover that shooting strategy in an upcoming post next week. Needless to say, two-thirds of my photos were made at very high speeds for all the reasons stated in my post referenced above.

Keep in mind that safari shooting conditions vary widely.  Birds are flying, animals are moving, and the safari vehicle is bouncing, sometimes like crazy.  All these factors require faster shutter speeds to freeze the action.

Aperture

Now let's move on to Apertures. I used the same Lightroom reporting technique to determine my most used range of shooting apertures. Once again, check the table to the right.

In most cases, I was shooting wide open with my telephoto lenses. When shooting the Canon 5D Mk3 I mounted my Sigma 150-600mm lens with its maximum aperture of F6.3.

When shooting my Canon 7D Mk2 fitted with its 100-400mm lens (my all-time favorite wildlife shooting combo), again maximum aperture F6.3. You can see from the data that nearly 1/2 of all my exposers were at the maximum apertures of both the lenses.

If the light was bright, like at mid-day, I would stop down 1/2 to one full stop just to pick up a little more depth of field.  I found that mostly helped with my bird photography.

Still, you may be questioning my use of both lenses maximum apertures for so many of my photos.  The answer is quite simple - both of these lenses are super sharp lenses.  I never felt I was compromising the image in any way when shooting wide open.

ISO

Now on to ISOs ...  As I mentioned in my early post (referenced above), I do like to "float the ISO in these kinds of shooting conditions. I don't want the ISO to go to high, but I do want it fast enough to allow me to use the necessary shutter speeds I need for my wildlife photography. Now take a look at the ISO chart to the right. OK, OK, I did let the ISO float a little on some occasions - I'll get to that in a minute. But DO notice that 56% on my images were in the ISO 1600 - 6400 range.

The reason for the higher ISOs is accounted for by our early morning and our late afternoon/early evening shooting.  But, let's re-analyze the data differently. If you total the ISOs from ISO 400 to ISO 2000, the total number of exposures accounts for over 44% of my images.  That means that most of my images were made at very manageable ISOs.

With the use of software like Lightroom, I can easily manage the slightly higher ISOs.  Heck, back in my "wedding days"  I would routinely shoot all my reception images at ISO 3200.

Still, I think the analysis of this data is really fascinating to see.  It really shows what the Apertures, ISOs, and Shutter Speeds need to be to get the optimum photograph with the gear I was using. Had I been using a 300mm/F2.8 lens, my data would have been different, obviously.  But I was using gear that worked great for these wildlife shooting situations.  The gear is reasonably priced and gave me a great result for our Safari experiences.

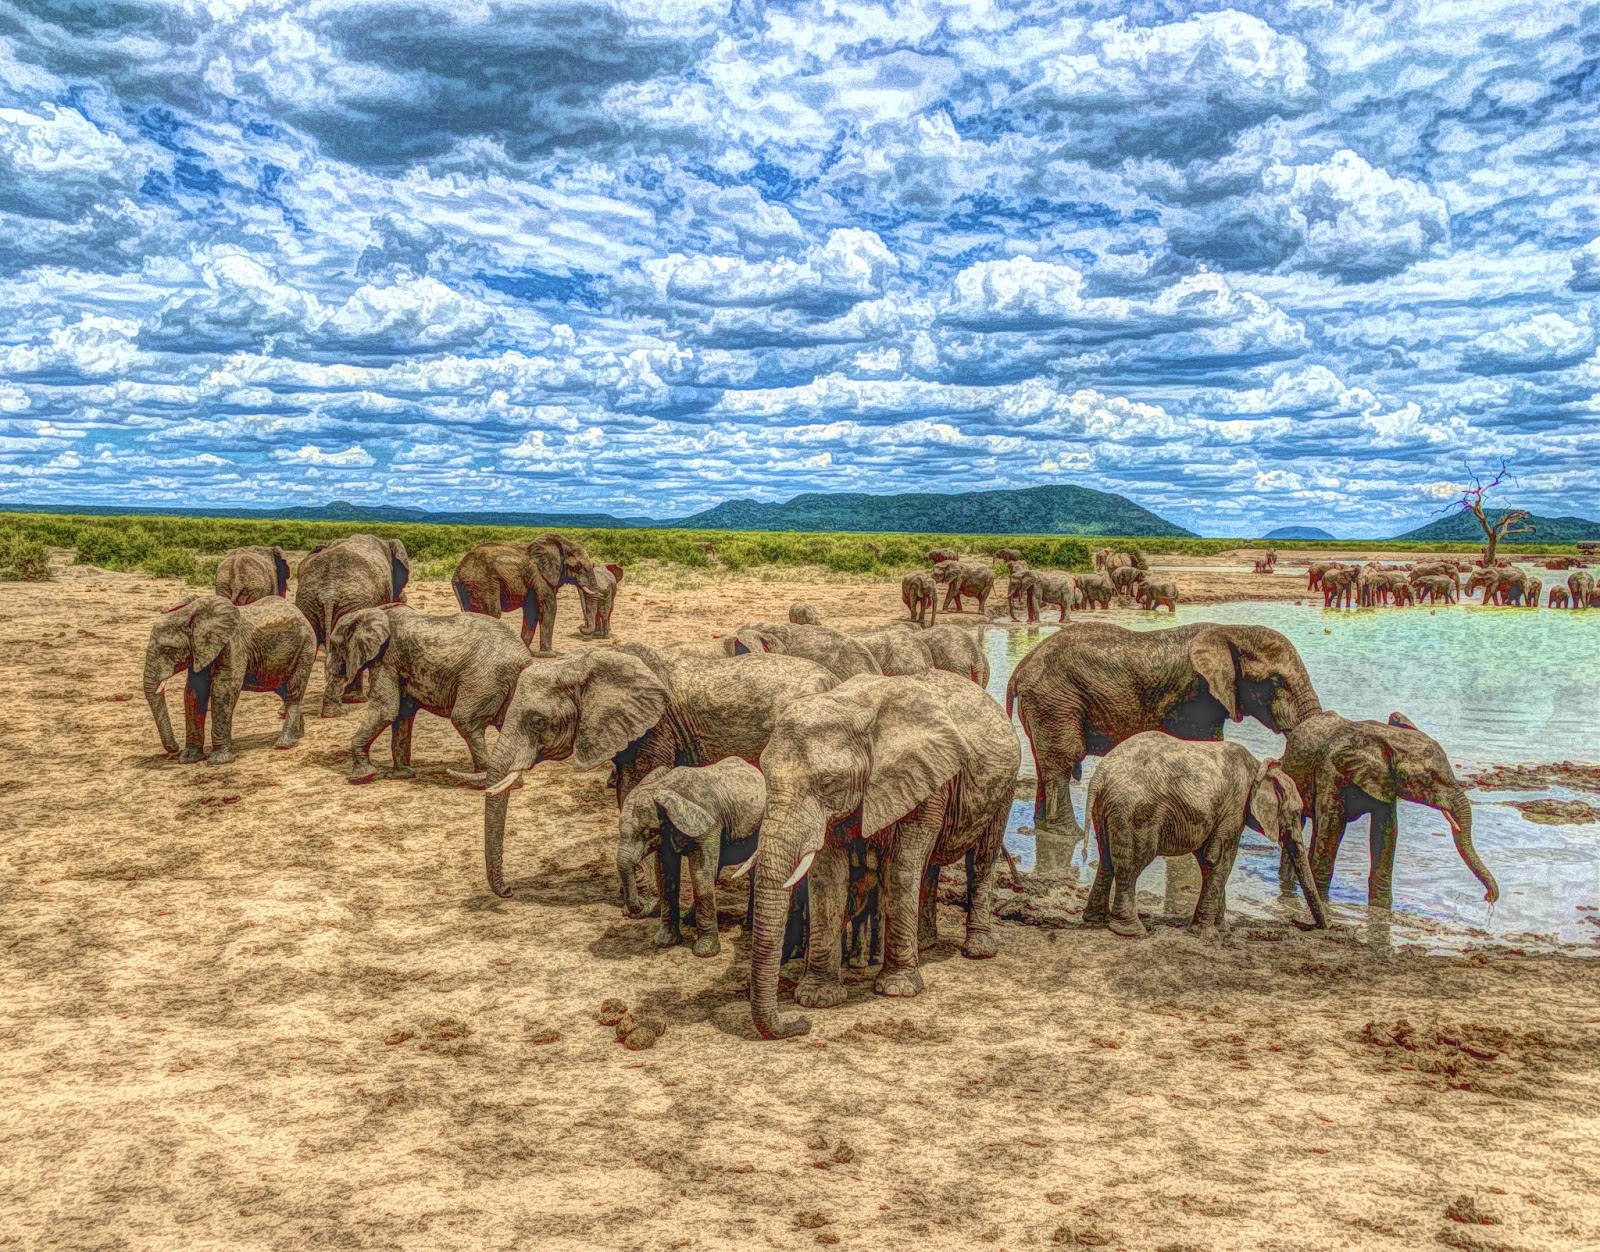
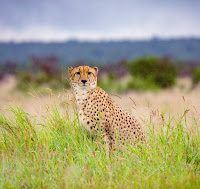
Take a look at the photo having "lunch" to the right. Notice the camera specs: Canon 7D Mk2 fitted with 100-400mm Sigma lens: 1/2000 second @ F5.6 zoomed to 123mm at ISO 2500. Anything less than the higher shutter speed and high ISO and I would have missed the photo.

I hope everyone enjoyed the discussion today and I certainly hope it will at least give you some starting points in any upcoming African adventures you may have in your future.
_______________________________________________________________________

Hey Gang,

That's it for me today.  I can't believe it's Friday already. Have a great weekend and I'll hope to see you next week for a few more ideas and discussions.

Cheers for now, David


Oh, BTW, Here are the links to our rescheduled Safaris for next year.

South Africa at Thakadu: March 30 - April 9, 2021 [link]

Botswana, Africa at Mashatu: April 9 - 19, 2021 [link]

We are sorry we couldn't continue on Safari this year but both LaDawn and I are really looking forward to next year - hope to see you there!  David and LaDawn

Monday, April 13, 2020

Our African Safari in 1000 photos or Less

Good Afternoon Everybody,

I hope everyone had a great Easter weekend.  It was quite a bit different than in years past but connecting with family and friends still made it a special day.  I hope yours was special too.

I thought one of the most creative ideas to "church services" in these days of "sheltering at home" was the approach taken by the paster at Bellarmine Chapel at Xavier University here in Cincinnati, Ohio. He gathered photos of all the parishioners which he then proceeded to print out and tape to all the church pews.  It was quite an uplifting Easter story - here is the link to the short video [link]. Enjoy!
_______________________________________________________________________

Our African Safari in 1000 photos or Less

Now back to what we do here at DigitalProTalk.com, I want to share our 2020 African Safari with you this morning. As many of you know, LaDawn and I have been traveling with our good friends, Kevin and Tricia Dooley of Idube Photo Safaris [link] these past few years. 

Kevin has been leading safaris around the world, but mostly to Africa, for nearly 20 years.  About 4 years ago he asked if I would be interested in joining him - I leaped at the opportunity!  And now we have been on four photo safaris with the Dooley's - all pretty cool!

Our other two sold-out safaris for this year had to be postponed till next year because of all the current travel restrictions.  If you are interested in more info, please let me (david@ziser.com) or Kevin (idubephotosafaris@yahoo.com) know.  We will be happy to get you more info.

Anyway, after a big trip like this, LaDawn and I (mostly LaDawn, really just LaDawn), will edit the thousands of images, tweak the favs, and design a Blurb book telling the entire story from start to finish of our adventures.

LaDawn just wrapped the album design and exported the double-page spreads for upload to Blurb. But I had another idea for the 350 or so spreads.  I thought I would load them in ProShow Producer [link], a great video/slideshow program that I've been using for years with my wedding photography. Unfortunately, they just shut their doors, but the program still works very well for these types of projects.

Anyway, I loaded up all the high-resolution double-page spread, added my royalty-free music,  tweaked the show a bit, and let it rip.  About an hour later I had a very cool video of the entire album of images.  I have to tell you, it looks GREAT on our 82-inch Samsung 4K TV ;~)

I then uploaded the video to my YouTube channel for all to enjoy.  Just click the PLAY button below and enjoy the show.  Most of us have a smart TV so I would recommend loading it up from your YouTube app on your TV for the best viewing experience.


These videos have been a great way for us to re-live our travel experiences. LaDawn and I both agree that after spending hours, days, and even possibly weeks designing these albums and then"arm-wrestling" with Blurb to get them uploaded and published to the tune of about $250/book, the best way to enjoy the whole travel experience is much better accommodated with the videos. BTW...LaDawn LOVES the elephants so be prepared to see LOTS of elephants in the video.

I'm currently in the process of updating our other travel books to videos as well. LaDawn is currently working on a new travel book of our experiences in Iceland and Ireland, one of our favorite trips from 2018.  I'll plan on sharing those images with you as well.

But, in the meantime enjoy this video, including several images of LaDawn and I (lol) and if you have any questions, just leave them in the comments section below and I'll do me best to answer them for you in a timely fashion.
______________________________________________________________________ 

Hey Gang,

That's if for me today.  I really hope you enjoy the post and the photographs.  I'll plan on putting up a few more Tips and Tricks in the coming days.  Remember, leave your comments below.

Adios for now, David

Thursday, April 09, 2020

Camera Settings for Wildlife Photography - Mostly Manual Mode and Why

Good Morning Everybody,

I hope today finds everyone well and "Sheltered in Place" along with 90% of the US. It's certainly a different feeling than usual but the sun is shining in our "neck of the woods" and the weather is just beautiful.  So, I'm going to make the best of it and that means sharing another blog post with all of you.

This post really came about as a result of our safari experiences over these last few years.  I have to say, as a wedding/event photographer, I was ill-prepared with how the shooting circumstances change when out in the field photographing animals.  In this post, I'll share a few of the insights I gained and new shooting technique changes I made to my shooting style for shooting Big game.

Here we go...
___________________________________________________________________________

Camera Settings for Wildlife Photography - Mostly Manual Mode and Why

In my wedding photography world, I generally used two modes when shooting.  First and foremost was M-Manual mode. I did a blog post right here about 10 years ago which fully explains why I make that choice - you can find it right here [link].

Most of my exposures were made with flash and I always wanted to be in charge of my exposures as I balanced flash with various lighting situations. Whether "dragging-the-shutter" indoors to pick up a lot of the ambient  - see image to the right, or shooting outdoors and shooting in "High-Speed Sync" to accentuate skies and other details outdoor, I wanted to be in charge of the lighting on the scene.

When shooting wedding images with no flash attached, I'll shoot many times on P for Professional  - haha, I mean Program Mode and that served me just fine.

But what about Wildlife photography? Thankfully I learned early on in my wildlife safari experience that P - Program mode was many times an "Image Killer" - many photos would just come out "motion blurred".  Think about it,  if you are bouncing along in a safari vehicle, trying to stop the action of moving animals or birds in flight, Program mode just doesn't work many times - you will get blurry images.

Remember, the camera is trying to set the optimum exposure for a nicely lit scene.  It generally sets a fairly low ISO, a reasonably decent aperture, and what looks to be a sufficiently fast shutter speed.  This is all well and good for most day-to-day shooting situations but not out in the middle of a Big 5 wild game reserve.

Time shooting on a game drive takes place between the hours of 6:30 a.m. to 7:30 p.m. A lot of that shooting time is mid-day. It's from about 10:00 a.m. till about 3:00 p.m. that I definitely set my camera to Manual mode.  I want to call both my Shutter Speed and My Aperture letting the ISO just float.

I have discovered that my preferred shutter speed is 1/2500 second and my preferred aperture is usually about F7.1- F8.0 - just off full aperture in order to use a "sweeter" part of the lens and to enhance my "depth of field" ever so slightly.


Now in the image above, I really don't need a shutter speed of 1/2500 second but who knows what might happen in the next half a second - heck, the lion may charge the jeep and I'd miss the shot - not to mention being totally uncomfortable in my underwear - if that ever really happened...haha.  The fact is, I didn't want to take the time to change my settings even for this image. You, many times, lose or miss your best photos because of changing settings and/or lenses. So, just shoot away even at the much faster shutter speed.


In the above image, I'm still using that fast shutter speed.  Did I need it to be that fast - of course not.  But if I was relying on P-Program mode, the camera may have given me a shutter speed that was maybe too slow for the swaying of the elephant's trunks - why take a chance.

Why You Have To Be Ready - All the Time
Here is a perfect example of why you want to be ready for the shot.  Check out the image below.  Just an easy photo of the Zebras enjoying a refreshing drink at the watering hole. Right?


But, just 10 seconds later - I know, I checked the EXIF data - something spooked everyone and all the animals took off in all directions.  Check out this next image of the Zebras.  They are high-tailing it out of there and not wasting any time clearing out from the watering hole.


What spooked them, we weren't quite sure. It might have been the rhino that wandered by and just wanted a drink too.  Anyway, all the animals headed for the hills. But once the danger subsided, they all returned just as though nothing had happened. Just check out the image below.  It was taken 70 seconds after the previous image but this time everybody is happy as can be enjoying a sip of water in the hot sunny afternoon savannah sun.  Pretty cool to see - and why you need to be ready and prepared to capture the shot at the proper shutter speed to capture the action.


Let's talk about one more time when a fast shutter speed is of the utmost necessity. It's bird photos.  You can sit there for 5 minutes with the bird is sitting up on its branch just enjoying the view. But then, it too eventually gets spooked or just tired and will take off.


In either case, I have found that you need at least 1/2500 second to stop the motion of the bird's wings flapping.  You must also use a fairly fast frame rate - I prefer 9-10 frames per second to ensure my action sequence does get a decent wing position of the flying bird.

All the above images were made with my Canon 7D Mk 2 firing at 9.5 FPS fitted with my super-fast focusing 100-400 Sigma IS lens - a great camera/lens combo for safari photography

So there you have it - my favorite shooting mode when photographing animals mid-day along with my preferred apertures and shutter speed. I hope this little insight helps you in your wildlife photography.  I've got lots more tips and tricks - so please stay tuned.
____________________________________________________________________

Hey Gang,

Thanks, that's it for me today. I have to tell you, that just looking over this post gives me so much JOY - I just loved the fact I have a wedding image in the same post with my wildlife photos - who would have guessed. Hey, I'll take my simple little pleasures wherever I can find them amidst our quarantined  times;~)

Audios for now everybody,

David

Monday, April 06, 2020

I've Been Really Flying High These Days!

Good Morning Everybody,

Let me begin today's post by wishing everyone well in these very uncertain times.

My heart goes out to those who are suffering the ills of the Coronavirus, all those who have lost their jobs, and all photographers who have their worlds turned upside down this photography season. We must remember, we are all in this together, and with the help of God and each other, we will make it through all this.

That brings me to why I have "fired" up my DigitalProTalk blog again. I thought these posts would help lift the spirits of some of my longtime readers and maybe also a few new readers who happen by.

Now, on with today's post... 

I've Been Really Flying High These Days!

As I've' mentioned many times over these last few years, LaDawn and I have mostly slowed things down business-wise and have been spending quite a bit of our time traveling the world. In our world travels, a new "toy" or two can really enhance the travel experience.  Today's post is about one of my favorite new "toys".  Check out the "cool" video at the end of this post.

We always head to Cabo San Lucas right after Thanksgiving and have been doing so for nearly 20 years. We love the location, water, weather, sunrises and sunsets, and the people we meet there.

We generally stay for 2-3 weeks, sometimes as long as 2 months, and over the years have really got to know the area quite well. It's always great to get back down to Cabo and check out what's new.  Needless to say, we have quite a bit of time on our hands just to relax once we get settled in. Since I'm not a "pool" person - LaDawn is, I prefer to explore the surrounds, check in with old friends and search out the best new place for a margarita;~)

Last year though I had a slightly different agenda. Friday, the day before we left for Mexico on Saturday, my brand new Mavic Mini arrived from Amazon. The Mavic Mini was (is) such a HOT item, most places were sold out. But, I had mine in hand and I was ready to fly!

Although I've never been a "drone" fan - I never wanted to spend the money and thought they were too bulky to travel with - but what I was reading about the brand new Mavic Mini really intrigued me.

Like I said I wasn't a "drone" person so what processed me to buy this little drone. Well, for one thing, when I began researching the Mavic Mini and watched a few YouTube videos on this amazing little drone - I was impressed with its super small size, the apparent ease of operation, long flight time (30 minutes), and the amazing amount of technology built into this thing!!! Plus, I didn't need to register with the FAA. The FAA says you need to register a drone if it weighs 250grams or more - the Mavic Mini comes in right at 249 grams - yep, it's really light and still has all that amazing technology built-in. Needless to say, I made the jump and bought one. Early Merry Christmas to me!

Purchase Options For The Mavic Mini
Although the Mavic Mini is priced at only $399 for the Mini itself, for only $100 more you can pick up the entire Mavic Mini Fly More Combo kit which includes two spare batteries, a three battery charger, propeller guard kit, extra propellers, cables, and case - such a deal - I sprang for the entire Mini kit for $499.

Settling Into Cabo & Preparing For My First Flight
Upon our arrival, we unpacked, got settled, and enjoyed our first nacho chips and margarita. The next day the weather was perfect and it was certainly a "pool" day for LaDawn.  Me, on the other hand, was going to settle into some YouTube videos to see how to fly my new Mavic Mini.

In all of my YouTube surfing, I have settled into a few favorite Drone channels.  If you're planning a Mavic Mini purchase I would recommend watching several videos from my friends over at:

Drone Valley [link] - Rick is a super sharp wiz when it comes to this stuff and he always offers unique insights into the equipment itself. And, he is fun to watch - one of my Favs.

51 Drones [link] - Another good site with solid info and good insights into flying the Mavic Mini.

FlytPath [link] - This is another great site! Not only is the info solid, but I also love how Aldryn Estacio presents the info in a clear, concise manner. He is also a photographer and I like how that experience works into his tutorials.

Important Quad Flying Tips for Every Beginner To Know

1. Be sure to set your RTH - Return to Home - height high enough to clear the surroundings should you Mavic Mini need to make an emergency RTH.  If its set to low, it just may collide with a building or a tree.  I set mine to about 120 feet.

2. Be sure the RTH point is updated before your flight.  As the Mavic Mini hovers about 3 feet off the ground, just let it sit there for a few minutes giving it time to acquire enough satellites for a safe flight.  When you hear, "Home Point has been updated." you are good to go.

3. Be sure batteries are fully charged before takeoff - just a good precaution.

4. Remove the Gimbal Guard - I forget this a lot of times - but there is a chance you could jam up the gimbal if you are not careful.

5. You will be nervous as heck on your first flight. I was. Just take it easy till you gain some familiarity with the controls. Once you do, it's a "kick"!

6. Remember to hit the "Record" button once you lift off.  I can't tell you how many times I've forgotten to hit "record" - like when I thought I was recording the incoming Humpback Whales just off our balcony in Cabo only to realize upon checking for the video that I missed it. LaDawn still hasn't let me live that one down ;~)

There are plenty more flight suggestions but these and many more are covered in the many videos listed above.  The main thing is to have fun. As you become more confident and proficient with flying you will enjoy it even more.  There is nothing so cool to see the views from 400 feet - it is a way "cool' experience!

It's Time To Fly - Away We Go...
I'm wrapping this post with a short video from my earliest flight experiences. This video is an edit of about 5 of my very first flights.  The reason I mention this is because the video is still fun to watch.


OK, I am NOT even pretending to be any kind of experienced pilot here - these are my FIRST flights.  The point is that even a super beginner like me can get a decent enough video that is really fun to watch.

I've watched this video many times on our super BIG screen TV (82 inches) and it simply blows me away.  The amount of detail and rich colors are amazing! I sure hope you will view this video in the spirit it is offered.  If you are just starting out in this hobby, the results will only get better with more practice and experience.

Have fun watching everybody, and Enjoy!

_________________________________________________________________

Hey Gang,

That's it for me today.  I hope you enjoyed the post today. In the next few days, I'm going to move back to some African images and share with you some insights I've gained from the four safaris we have been on over the last two years. Be safe everyone...

See You Soon, David

Friday, April 03, 2020

My Favorite New Travel Camera, Maybe My Favorite Camera of All!

Good Morning Everybody,

As I mentioned yesterday, LaDawn and I just returned from 3+ weeks of travel in South Africa which included 9 days on Safari and a stint in the Cape Town area, as well.  It was a great trip and we captured some amazing images that I plan to share with you over these next several days.

But to get great photos, it helps to have the right camera to do the job for you. For years our favorite travel camera has been Canon's SX60 camera [link] - before that it was the SX50.  I loved the 21-1300mm IS lens which truly made it a camera for all occasions.  The 16 meg RAW file along with decent low light capabilities and reasonable sharpness added to the camera's already nice list of photographic credentials.

One Almost "Dead" SX60 Camera

But during these travels, this camera was not going to Africa with us.  Why? We just wore it out over the last five years and 200,000 miles of travel. My guess is that the camera has over 100,000 exposures on it.  That coupled with dusty environments, humid conditions, and all the rest have definitely taken their toll on the camera. The zoom lens wasn't working smoothly and the camera took about three or more tries just to get it to fire up - not good. Normally we would have just upgraded to the new SX70 version but in my research, it just seemed like a downgrade from the SX60 - hence the search for a new, easy for LaDawn, a replacement was in order.

I Found My Nearly Perfect Replacement Camera!

After a few days searching on the web and reading many reviews and watching lots of YouTube videos, I had made my decision.  I decided on the 3 times more expensive Sony RX10 M4.  This camera is getting fabulous reviews EVERYWHERE!

The images seemed incredible, the focal length was nearly the same as with the SX60, albeit with the lens doubling feature.  The 1" sensor meant less noise, it could focus in only .03/second, it was image-stabilized to 4.5 stops, had a 20 meg sensor, and could shoot at a blazing 24 frames a second - plus tons more.  Read all about it over at Sony right here [link].

I ended up picking up the camera from my local Best Buy who had it priced at $100 less off retail, at $1500 and they were throwing in a free second battery.  I ended up picking up two more batteries and a charger from Amazon for just about $32 [link].

Test Driving the New Sony RX10 M4

We still had a few weeks before we were leaving for Africa so I decided to let the Sony be my "go-to" camera for a few trips leading up to our big Africa trip. In early February I headed out to Austin to visit my daughter, Liz for about a week. I had some time to myself so I threw the Sony around my neck and began shooting away at the city surrounds. Here is a quick photo I did of one of the local pigeons sitting on a fence post.


OK, it's not an over compelling image but I wanted to show the sharpness and clarity of the image produced by this camera.  This image was taken zoomed to 936mm which means the digital doubling was coming into play - but still, notice its sharpness. And folks, this image was taken wide open at F4.0, handheld at 1/250 second - pretty darn impressive!  Feel free to click on the image for an even larger view - pretty cool!

A few weeks later, LaDawn and I were on a cruise ship with friends traveling the Caribbean. We love our cruises and we love the stage shows on the ship.  I always have a camera with me to capture some of the excitement of these shows.  But, check out the image below - it was taken zoomed to 70mm F3.5 @ 1/640 second. But more impressively, at 5000 ISO!


Even at this higher ISO, I think it looks impressive.  I should mention that I am just shooting these images in JPG mode as the camera's internal noise reduction and processing really does an excellent job. Feel free to click on the image for a larger view and notice the minimal grain pattern.

Now finally on to the last image for today. The image below is of Africa's most beautiful bird, the Lilac Breasted Roller.  As we were causing the savannah one day in our safari vehicles we happened upon this beautiful bird.


Once again, check out the sharpness and detail of the image. This image was made with the camera zoomed to 715mm F5.0 @ 1/2500 second at ISO400. It's also cropped just a bit to improve the composition.   Needless to say, the image is crisp and sharp and really showcases the capabilities of this super cool camera.

In closing, let me say that I am most impressed with the sharpness of the Zeiss lens this camera is equipped with.  It is just stunning sharp! In the coming days, I'll share with you more safari images with discussions about gear, technique, and safari experiences. I hope you will join me.

____________________________________________________________________

Hey Gang,

That's it for me today. Look for more "goodies" coming up in the days to come. Heck, I just may tell you about my newest fun "camera" I'm "playing" with ;~)

Cheers for now everybody,

David


Thursday, April 02, 2020

Just Back From Africa

Good Afternoon Everybody,

We just returned from South Africa a little over a week ago - we were on Delta's third last flight leaving the country - whew!  We had spent about 9 days on a wonderful safari and another 9 days enjoying the wonderful surrounds and fabulous wines of Capetown.

Today, in the short post, I just want to touch a bit on the excitement of our Safari experience.  Turns out this was our fourth safari with our friends Kevin and Tricia Dooley. As LaDawn and I know, every safari experience is a trip of a lifetime and this trip was no exception.

For those of you who never have experienced a safari, your first thought as you are sitting in the safari vehicle is... "Uh, aren't we really a little too close to those lions?!!!!"


In fact, that is the edge of the safari vehicle you see on the left in the above photo - nothing between you and the animals - "Hey, you lookin' at me?"  But the excitement is worth it!

All the animal sightings are really exciting.  LaDawn loves photographing the baby elephants - they are a kick to watch as they travel by. Here is an image LaDawn made just a few weeks ago - kind of fun.


I'm a photographer who really enjoys watching the large herds of elephants gathered around the watering holes.  It's almost like clockwork when the show up - usually at the start of the heat of the day just before noon. This image below is actually one of my favs - and it was taken on my cell phone. OK, I did use the Picturesque app to "artsify" the image, but I still like it.


In closing this short post, I still want to mention one last thing.  At the end of the day, all the safari vehicles pull over to a safe area, break out the snacks and beverages (all varieties) and we all kick back reminising about our wonderful day's experiences and enjoying an always beautiful sunset.


Hey Gang, I going to let that be it for today. I sure hope you enjoyed the few photos I posted today and I hope you will check back for more of our adventures in Africa.

Cheers for now, David