Showing posts with label direction of light. Show all posts

Thursday, July 29, 2010

Captured By The Light 2010 Tour Kicks Off Today! Use Code CBLDPT1- To Save $20 Off Registration

Captured By The Light Tour Kicks Off Today!

Today is the day! I'm officially announcing the the kick off of my brand new digital photography tour "Captured By The Light 2010". Because of the tremendous success of my book by the same name, we are hitting the road and planning to share with you a few highlights from the book, some great new lighting secrets, and lots of dynamite photography and software techniques.

Hit this link right here for all the latest information and to register! Don’t for get to use Promo Code CBLDPT10 – it will save you $20 off the registration $79 fee!

CBTL Brochure page

Hey, I don't plan to stop with just that either. I've also got a few of my latest greatest Lightroom 3, Lumapix, and NIK tips and tricks, just to name a few, to show you. And, I'll wrap with some solid new ideas on how to promote yourself and your photography business.

The cool thing is that this year's program is NEW and jammed packed with information you can start using right away! The program is scheduled for 4 hours, and what I don't cover that evening, we’re throwing in a Tour DVD with and additional 4 hours of extended content covering lighting, Lightroom, photography, marketing, and much more. That means you will be getting 8 solid hours of info all in one evening.

Each attendee will also receive our Welcome Pack with over $350 of REAL value. And, yes, we are doing it again. We are giving away over $3,500 worth of door prizes each evening! That was so much fun last year. So thanks to our sponsors' generosity, we are doing it again. It's always a BIG crowd pleaser.

You can get all the information and register right here. I'm really excited with this year's tour and hope to see everybody there!

Thursday, March 05, 2009

"Dancing In The Clouds"

"Dancing In The Clouds"
©David A. Ziser

Here is another image I came across while reviewing images for my wedding book. I have to say, I really like it. I think it's all those cool, dramatic clouds that are firing me up. We don't get much of that in the Cincinnati area. Once again, it's a simple shot with a dramatic background. The off-camera flash adds to the dramatics. The beautiful bride and her simplistic totally natural position in the composition certainly add to the over-all feeling of the image. Camera specs: Canon 40D fitted with 10-22mm lens at 20mm, F16 @ 1/400 - cheating the sync, ISO 200. Enjoy! -David

Tuesday, March 03, 2009

"I'm Looking At You"

"I'm Looking At You"
©David A. Ziser

I just came across this image as I was reviewing images for my book - yes, I know I keep saying it, but really it's almost finished. I love the use of the wide angle lens in this photograph. It gives the image a wonderful sense of perspective with all the pews leading right to the groom. I positioned the groom dead center to enhance the impact of the image with the leading lines. My light is coming from my right - Quantum through a translucent umbrella - creating a nice directional light and separating the groom from the background. The image is pretty much as it was shot with an ever so minor adjust in Photoshop. Camera specs: Canon 5D fitted with Sigma 12-24mm lens at 14mm, F5.6 @ 1/20 second, ISO 800. Enjoy! David

Friday, January 16, 2009

"Having An Easy Afternoon"

"Having An Easy Afternoon"
©David A. Ziser

I made this image with the new Canon 1D Mark III at the time. I saw 3 things in the scene that I thought would make the image work. 1- Pillars - pillars are always a good thing when it comes to backgrounds and props. 2 - The sun which would act as a backlight for me if I positioned the bride just right. 3 - A beautiful soft direction of light coming in from the left (bride's right). It was subtle, but gave a nice roundness and dimension to the bride's facial features and figure. All combined, we get a very beautiful, well illuminated bridal portrait. Camera specs; Canon 1D Mark III fitted with 70-200mm IS lens at 160mm, F5.6 @ 1/250 second, ISO 800.
Enjoy! -David

Tuesday, November 04, 2008

"Sitting Pretty"

"Sitting Pretty"
© David A. Ziser

This image was made with available window light only. I oriented the bride's face towards the light to pick up a beautiful loop lighting pattern on her face. I thought the groom was OK in the harsher, almost split lighting situation. To soften the contrast, I brought in a large reflector to the right to open up the shadows a bit. I particularly like the opposite directions in which each person is leaning - I thing it adds to the somewhat contemporary feel of the portrait. Camera specs; Canon 20D fitted w17-85mm lens at 53mm, F 5.0 @ 1/50 second, ISO 400.
Enjoy! -David

Friday, October 17, 2008

"Hangin' At The Marriott"

"Hangin' At The Marriott"
© David A. Ziser

Here is another image I recently made at our local Marriott Hotel. It's a popular venue for wedding receptions and in addition to some very cool architectural features throughout the hotel, these columns are some of my favorites. By selecting a fairly long lens, I can make the columns slowly fade into the background while still giving me strong compositional elements with which to frame my subject. See how the leading lines of the columns lead right up to the bride. My low camera vantage point helps in this regard. Also notice how the strong vertical elements contrast nicely with the smooth flowing lines of the bride. I think this results in a very dynamic image of the bride in a business hotel setting. Camera specs; Canon 40D fitted with 70-300mm IS lens at 80mm, F 5.6 @ 1/15 second - hand held, ISO 800. Illumination from my Z-Ray flashlight. Enjoy! -David

Thursday, October 16, 2008

"An Easy Afternoon In The Park"

"An Easy Afternoon In The Park"
© David A. Ziser


This image was made just as we were wrapping yesterday's final day of video taping for the Kelby Training Videos. The photograph was taken as part of a lesson on how to find and see the light. Too many people just shoot away without any regard to trying to sculpt the scene with a BEAUTIFUL direction of light. This was the perfect location to do just that. The light was flooding in from the open sky to my left and the arbor blocked the overhead light. This created a beautiful direction of light in which to place my bridal couple. I asked them to turn their heads slightly into the direction of light in order to open up the shadows on the "camera side" of their faces. Look how much more flattering the lighting is on the couple - it slims them and trims them sculpturing their facial features beautifully. I also was attentive to how I brought them together to create a relaxed, casual and mostly believable triangular composition. The last tweak was positioning their faces in the top left quadrant of the viewfinder which completed my composition. Sure, we take about 4000 images on the wedding day striving to capture all the fun, spontaneity, excitement and emotion of the day, but I still sneak a few of these types of images into the wedding celebration coverage too. Our clients can see and appreciate the difference. Camera specs; Canon 40D fitted with 24-105 IS lens at 35mm, F 5.0 @ 1/60 second, ISO 250. Enjoy! -David

Tuesday, July 08, 2008

Day 1 - Master Class Recap

Good Morning Everybody,

Well, we are off and running and we have a great class of attendees this week. We pulled off some coo0l shots over at my favorite wedding/reception venue - the Netherland Hilton Hotel and then wrapped the shooting portion of the day at Drees Pavillion which offers a great view of the Ohio river valley. It is always a terrific backdrop for really cool outdoor photographs. I post a few additional images later this week.

Last night everybody had a chance to relax and just get to know each other at our Welcome Party. It went a little late, but what the heck, everybody was having a good time. I did a preliminary run through of our work flow. LaDawn, Jen, and Stacy introduced everybody to the inner workings of the studio from image archiving, album design, and printing. With our class members from Albert Canada, New Zealand, and all around the US, it is truly an international symposium this week.

Day one was terrific!! Today, we are hitting three locations that offer some great opportunities for shooting too. The twist to today's session is that we are breaking into smaller groups and then practicing what we learned yesterday and today. I guess I'll find out just how good of a teacher I am today ;~) Anyway, it's a full day of shooting and should be fun.

Wednesday, February 13, 2008

"Just A Little Attitude"

"Just A Little Attitude"
© David A. Ziser

This image comes from one of my winter portrait sessions just this last December. I actually featured the shoot on DigitalProTalk right here in mid December. I love the client's look, the color in the scene, and the composition. The direction of light came from my assistant which just happened to be her mom - holding my Quantum flash left of the subject. The flash was softened by shooting it through an umbrella. Camera specs; Canon 40D fitted with 70-200mm IS lens at 155mm, F 4.0 @ 1/25 second, ISO 200. Enjoy! -David

Tuesday, November 27, 2007

Breaking News - Just In!!!!!+!

One of my most sophisticated commercial lighting techniques, featured a few weeks ago right here was just featured again over at the Strobist this morning. This technique may just revolutionize how product photography is done :~) I'm not saying any more than that - here is the Strobist link for the whole story.

Monday, November 26, 2007

Revisiting Carrot Cake Lighting

So what do three photographers talk about when they get together for dinner the first night together? They talk about "Carrot Cake Lighting" of course! If you remember, I posted a kind of a tongue and cheek posting while in Florida a few weeks ago and it kind of went all over the net. Here is the link to that "Carrot Cake Lighting" post right here. The gist of the article is how to get directional lighting from an on camera flash. Read the article for the details. I showed Kent how to do it and he came up with this great image of Sarah. I did perk up the exposure in Photoshop, but the direction of light is all "Carrot Cake Lighting" Hey, all in the name of photography and good fun.

Tuesday, October 30, 2007

Let's Get Up Close and Personal

Brand new ideas and hoping for some very cool results - that's what the plan was earlier Sunday morning. I asked LaDawn if she would like to head out to the Cincinnati Nature Center after church services this past Sunday, just for some fun shooting. Walking thru the center is one of our favorite things to do so she was all for it. I did have my own agenda in mind though. I wanted to explore macro photography, but with a twist. I wanted to use my brand new Canon 580EX II flash to illuminate the subject bringing a direction of light from any direction I chose. That way, I could create a nice direction of light at a very close range and kind of be my own self contained macro photography studio.

Here is the setup: I was using a Canon 40D fitted with 100mm F2.8 macro lens with a 580EX flash attached. The 580Ex served two purposes - first, it would have the Quantum Freewire transmitter attached to it - the Freewire was hardwired into the camera's sync terminal; and, secondly, it would supply any fill light I thought necessary. Myself or LaDawn would hold the 580EX II with the Freewire receiver attached to it at the appropriate angle for experimenting and finding the best direction of illumination.

My whole idea for the shoot was to experiment more with the new off camera flash features of the 580EX II. The first thing I did was set up the flash so that it would not automatically shut down and then secondly, I wanted it to fire in Manual mode triggered by the Freewire. I wanted manual mode so I could control the density on the scene by varying it's distance to the subject. You can see how I set up the flash in a previous post - Best Little Light in the World right here. I know what you are thinking, Ziser has taken this $460 high tech flash and turned it into a simple manual (yet very portable) flash - yep, that's what I did. I dialed the power down to about 1/8 power. At this setting and at the distances I was working the flash, I would be using very small apertures since maximum depth of field was one of my prerequisites as well.

As you can see throughout this article, I was getting my desired result - granted some were better than others, but the exercise was still fun. I found that if I was working close to the subject, I preferred the wide angle diffuser over the flash head because at the close working distances, it created a much softer light. Removing the wide angle diffuser and setting the flash to 80mm zoom gave a different result - this set up actually created a spot light effect on the scene localizing the lighting effect for maximum viewer's attention. You can see that effect in some of the images accompanying this article. The remote flash gives the images a special quality that makes much of the subject matter pop off the page as it stands isolated, many times isolated from the background.

I've populated the article with several of the images taken this past Sunday along with the setup shots for your reference. You can click on the images for a larger view to see the equipment set up. A slide show follows of some of my favorite images from the Sunday nature shoot. Let me know your thoughts in the comment section below.

As a postscript to this whole post, let me say that pointing your camera at something different than what you normally point your camera at - for me it's normally people - especially brides and grooms - helps get those creative brain juices flowing and is quite a kick. Enjoy, --David

Tuesday, October 23, 2007

"A Walk On the Beach"
© David A. Ziser

I made this photograph yesterday of our friends, Lisa and Dave, just as the sun was setting at Honeymoon Beach in Tampa, Florida. The setting sun and the clouds were combining for a magnificent sunset, but I wanted to deepen the sky even more in the background. I had my assistant, LaDawn, pop in a little light from my Quantum flash to create a nice direction of light on Lisa and Dave. This enhanced the image while still maintaining it's believeability and beauty. Enjoy! --David

Monday, October 08, 2007

"For the Love of Opera"

© David A. Ziser


The image was created as a part of a series of portrait studies I did for a special magazine feature entitled "Our Most Inspiring Volunteers" in the Arts here in Cincinnati, Ohio. I love the color and tone co-ordination, the equal but opposite lighting pattern on the subject's face when compared to the artwork behind him, which is from the opera, Aida, by the way. Illumination provided by my "shoot through" umbrella, exposure F6.3 @ 1/40 second, ISO 800, 32mm on Canon 24-105 F4 IS lens.

Tuesday, October 02, 2007

"Afterneen Tranquility"
© David A. Ziser

I love this image. I used a Canon 70-200mm IS lens mounted on my 20D. The exposure was 1/400 second @ F4.0 at ISO 100. The direction of light was supplied by my off-camera Quantum flash set to full power. I love how the wide aperture softened the background so nicely. The higher shutter speed let the flash sync with only the top part of the image area which helped create that beautiful dimensional lighting on the bride's face. A great classic portrait!

Thursday, September 27, 2007

Questions, Questions, Questions...

Our readers also post questions occasionally about a certain image, technique, etc. I'm happy to provide the best answer I can, so feel free to ask. Leo asked if yesterday's post - "More Curves Along the Way" was only one light source? The answer is yes. The bride was near the bottom of the steps and there was no room to maneuver an umbrella into place. So I asked Jeff, my student Assistant on the shoot to just bounce the flash off the nearest pillar. The flash head was pretty close to the pillar, due to our very tight quarters, which created a fairly small "light source" illuminating the bride. Hence the harsher "shadow edge accutance". Doesn't that sound teckky!! It just means that the size of the light source relative to it's distance to the subject controls how the softness or hardness of the shadow's edge will fall upon the subject. Since our flash created a smaller than usual bounced light on the wall - the lighting on our subject becomes a bit more dramatic or harsher on our bride. Check out the accompanying image - I even added the approximate size of the bounce flash in the following illustration. (Yep, that's me "chimpin" the shot too.)
One of our readers asked how I metered "Hollywood Lighting - and the Oscar Goes To...". In the "Old Days - read film days - I always used an incident light meter and measured at the subject's position just how much light was falling on the subject. I always read the highlight side of the face. That way I knew I could add light to the shadow side to get my desired "contrast lighting ratio" - the ratio of the highlights to the shadows. Those days are gone - now I just use the LCD screen to look for the "blinkies" on diffuse whites, like the bridal gown. I adjust the exposure till I just see the "blinkies", then back it off till the "blinkies" go away - presto, no blown out highlights and a perfect exposure for the diffuse whites in the image. And, remember - I'm a JPEG shooter too. It just "ain't" rocket science if you think it through. I'll cover exposure more in future posts - questions like... "What happens if you have no diffuse highlights in the image? Check back for that one.

Tuesday, September 25, 2007

Hollywood Lighting - and the Oscar Goes To...

It worked for Humphrey Bogart and Lauren Bacall - I know I showing my age here - but those old Hollywood portraits sure had something special and dramatic about them. Here is a variation of that style in a portrait we did at my Master Class yesterday. Normally, I like to light my portraits by shooting through an umbrella. This gives me a nice soft light that really flatters the subject. But, yesterday, I found myself in a situation where I really wanted the bride to "pop out" of the scene. I also wanted all the viewer's attention to go mostly to her face. I know that I can "control" how the "viewer" visually explores the image with various amounts of light, color, and detail that I incorporate into the image. In this case, I chose to light primarily the bride's face with a very strong directional light. I did it with a "snoot" light.

Here is how we did it. I pulled the reflector off of my Quantum T5d showing only the bare bulb. Next, I borrowed some notebook paper from one of the students to wrap around the flash tube as you can see in this first image.

This basically created a new light source with a very narrow beam of light. The "tricky" part was getting the "snoot" light pointed properly to create the "Hollywood" lighting pattern I wanted on my bride's face. My "Hollywood" lighting pattern is simply a variation of the classical "Rembrandt" lighting that artists and photographers have been using for years. Shellee, my assistant on the shot, positioned the flash so she could not see the far side of the bride's nose - so neither could the light she was holding, but she could still see plenty of the far side of the bride's cheek - and so could the light. Check out the second image.


Now if the light was held in the position described above, we should see an image of our bride with the dramatic, hard shadowed, directional light on her face, with the light falling off quickly over the rest of the scene to drive the viewer's attention easily to our bride's face. I think the resulting image does just that. Pretty cool, I think. --Enjoy.

Tuesday, September 11, 2007

Technique Tuesday

Good Morning Everybody,

Well here we are our first "Technique Tuesday." I want this part of the blog to give you some solid information, insights, and techniques that can really make your photographs stand out from the crowd. But hey, if everybody reads and incorporates all the techniques, maybe your work won't stand out so much. But, at least the crowd's work would look better too - and that's not a bad thing either. So off we go to:

Ziser Lighting 101 - Part 1:

There are a "million" new shooters out there thanks to the explosion of digital photography. Many of these new shooters are also trying to do wedding photography on weekends, maybe not as a full time occupation like many of us, but just as a way to bring in a little extra income - and that's a good thing, too. A little extra income never hurt anyone.

Here is the situation - the giant wave of new shooters has certainly leveled the sea in the level of "Sameness" in the wedding market - "Sameness" is on the rise in wedding photography. But, we can do something about it - each and everyone of us can, if we choose. By choosing to do so introduces a brand new way to be creative in our photography.

The "Strobist" started a blog discussing off camera flash about 18 months ago that is now off the charts. The phenomenon David Hobbie - "The Strobist" - created was the result of people wanting to be less the same, more different, and more creative. If you have never visited his site, check out his blog here - tons of info there.

I want to create the opportunity for each of our readers to be more creative in the context of Wedding Photography. I will post a series of tips over the next several weeks that hopefully will spark one's initiative to reach out for that goal of being different. Remember, "It's the Difference That Makes the Difference!"

Let's look at what is being shot, how it is being shot, and how we can easily change it for the better. Look at the following 4 images. This first one was shot with a single on-camera flash. Look how ordinary it looks. It's "blasting" right into the face. Because of the smallness of the flash head, it creates substantial and unflattering specular highlights on the subject's forehead, cheeks, nose and chin . Good morning, Uncle Harry and Aunt Mary - this is how the bulk of new photographers are lighting their subjects. Not bad for the occasional family snap, but not acceptable for the professional or "want-to-be-professional" wedding photographer.

To solve the "specular" problem, many photographers will bounce the light off the ceiling by turning the flash head skyward under the impression that the "bounced" light will give a softer look. Softer yes, but from the right direction - NO! Look at the second image here.
You might say, Hey Dave, look, no more "specular" highlights". You would be right there, but look at the brand new "raccoon eye sockets" we created on our bride's face - again, not flattering. I call this "office lighting."

OK, one more try, suppose I use the little fill flap to bounce a little more light back into her face. Sounds like a good idea at first glance, but let's look at the next image. What do you think? You might be inclined to say - WOW! that's a lot better, I can see her eyes again. Yes, that's true, but notice that the specularity has returned. Granted, there are flash attachments out there that are basically larger "fill flaps". My buddy Gary Fong makes one that is quite good, in fact I occasionally send my second shooter off to use his original "Lightsphere" in some "Cocktail Candid" situations. A larger light source reduces the "specularity" - it basically puts non-directional fashion lighting on the subject. Another name for this lighting is "Butterfly" lighting. This might be good for the fashion model. But my brides, while incredibly beautiful, are not typically fashion models.
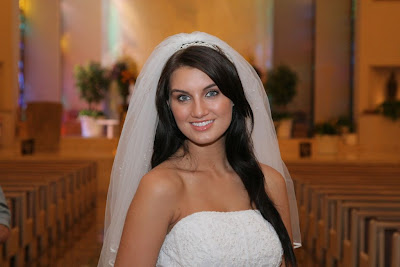
How can we get a much more flattering directional light on our bride with our on camera flash? The answer is simplicity in itself. Have the on-camera flash send it's light to another location, bouncing off of the new location and returning from a direction that really flatters our bride. Take a look at the last image - it's the "Treasure Image" - the one that captures the beauty of the bride, the one that has the light coming in from a direction that places a highlight next to a shadow, creating detail, depth, dimension, and color saturation. This is the image that will produce a look that is different from the rest of the pack.


The lighting on this image was effortlessly created. I simply turned my flash about 90 degrees to the right pointing at a flat white panel that my assistant was holding to the right of the bride. That mass of little "photons" headed out of the flash head, traveled to the reflector, most of those little guys - and they are very small, just ask Einstein - pushed off (or were reflected) back into the direction of the bride, and illuminated her face beautifully. What do you think? I love the result.

Here is an image of the exact set-up.

Hope you all enjoyed the first lesson. I'll hit some news again tomorrow.

See you then, --David