Friday, May 29, 2009

"Window Washers"

"Window Washers"
©David A. Ziser

Here is one more image I made while in Baton Rouge - I promise to get back to wedding images next week. The small blue rectangular shapes of the windows contrasting with the bright yellow angular lines of the cranes I thought made an interesting composition. It's a photograph that's just fun to look at. Camera specs; Canon 5D mark II fitted with 24-105mm IS lens at 84mm, F7.1 @ 1/250 second, ISO 100. Enjoy! -David

Light Up My Life Friday - Silhouettes

Good Morning Everybody,
We had a wild and wholly Texas crowd of over 225 photogs last night - it sure seemed to me everyone had a good time. I know I did. Man, people hung around till 11:30 p.m. just talking and visiting. We are off to San Antonio on Monday - hope to see many of you there.

HELP WANTED! LaDawn wanted me to put out a call for volunteers for next week's leg of the Digital WakeUp Call tour. We head to San Antonio on Monday, Dallas on Tuesday, Ft. Worth/Arlington on Wednesday, and Oklahoma City on Thursday. Anyone wanting to lend a helping hand can contact LaDawn at ladawn@ziser.com and she can give you the details.

Summer Master Class - July 27-31. Just a note that my summer Master Class [link] is filling up now. Here is the link to all the info. The class is always a great time and we still have seats still available. Contact Jen or Sharon at 859-341-5900 for more info.

OK, time to get on with Light Up My Life Friday - here we go...

Light Up My Life Friday - Silhouettes
Silhouettes have been very popular with wedding photographers for many years. I can remember years ago coming out of St. Agnes Church and posing the bride and groom under one of the church's exterior arches. This kind of photograph has been a main stay for wedding photographers for years.

A funny thing about that image I made at St. Agnes - I delivered the album to the bride's home and her dad was there. He looked at the silhouette, paused, and said, "…be a good picture if you could see their faces." He is the same dad who spotted another image in the album that had been inadvertently printed backwards. I immediately owned up to my mistake and offered to get it corrected right away. He took a second look at the image, paused again, and said, "Don't bother, it shows my best side." I could hardly hold my giggles back. Yep, true story - we meet all kinds in our profession, don't we?

Anyway, hit the "Read More..." link below for the rest of the story.

But back to silhouettes - you know though, there are ways to improve on silhouette images. First of all let's start out with how we posed the bride and groom. Many photographers have the bride and groom face each other and stare into each other's eyes. A big no-no - have any of you guys and girls grabbed your "significant other's" then stared into their eyes and feel very romantic at all. I would think not - it's not natural for people to do that. It's a "photographers" standard pose and not a very good one. Frankly, it's a very stiff pose and doesn't elicit any sense of romance at all. Please read on.

A much more natural and comfortable pose is to have the bride and groom turned towards each other about 45° with the groom on the right side because I like his boutonniere on the right side of the photograph -- and the bride on the left side. Then fine-tune the pose by having the bride take her right foot and point it slightly forward. Then have the groom point his left foot slightly forward too. That puts all the weight on their inside legs and is a much more natural / believable stance.

Now simply have both of them turn their heads only towards each other and smile. I have their heads turned to a point to where I only see one half of their face -- I would call this a profile view.

Now we can light the silhouette in any number of ways. We can use the Sun, the sky, car headlights, flash gear, or even the videographers lights. In today's post we are going to use the flash.

Here is how I do it. I have my assistant hold my off-camera flash behind the bride and groom about 12 feet away, 4 feet off the ground, and pointed at their shoulder blades. The flash - my Quantum T5d - is set to ¼ power to ½ power. The camera is set to F5.6 at ISO 800. These settings give me the best results for my back-lit shots. I've talked about that many times on Digital ProTalk. Here is the link to the backlighting post I did several months ago.

There are times though when I want to modify my standard back-light routine. Occasionally I want a little light on the front of the subject as well. In that case, I may want to see a bit more detail in the subject's expression and even in their wedding attire. In that case, I want to pop just a little bit of light on the front of them.

Take a look at the accompanying photograph. This is an image of Mark and Kristen, Mark is one of my assistants, who I had the honor of photographing about a year ago.

He and his bride had one of the prettiest Cincinnati sunsets of the year. After the couple finished meeting and greeting everyone in the receiving line, we broke away to capture this photograph.

We worked our way to the top of the pavilion under which the wedding reception was taking place. By the time we got to the top the sky had still retained the last vestiges of the sunset. The blue firmament was just starting to settle into the top part of the sky. The rich colors of the Saturday evening lent themselves to a beautiful silhouette of the bride and groom.

Since this sky was getting pretty dark I decided that I didn't want their silhouette to be a stark black totally lacking in detail. Without the light being able to bounce off of anything outside, that's what would have happened.

I thought I could enhance the photograph by bringing just a little light in from my on- camera flash. This was easily accomplished by turning on the flash and then reducing its output substantially. I dropped the light output from my on-camera flash by three stops or more. I used the viewfinder to test my settings. This gave me just the right amount of light from my on-camera flash preserving just the right amount of detail to see their expressions and some detail in the wedding gown.

So in recapping, here's how I made this photograph.

1. I adjusted the camera's exposure at F5.6 to underexpose the sky about one stop.

2. I positioned my assistant behind the couple about 12 feet away, with the flash 4 feet off the ground, and pointed at their shoulder blades.

3. My on-camera flash is dialed down to -3 stops of its normal output.
DAZNOTE: I don't use a rotating flash bracket so I made the photograph with the camera in the horizontal position. If I had turned the camera into a vertical position, I would have cast the couple's shadow on the back balustrade. I think the photograph works better in horizontal position anyway as it picks up more of the evening sky.

So that's about it. The simplest of silhouettes -- the couple against a blue sky -- is probably the least dramatic of the silhouette photographs. The back-lit photographs are always my favorites. But, as I said before there are times when we want to add just a bit of light onto the front of the subjects to enhance the image a bit more. That's what I wanted to discuss today. Remember too, that is always a matter of aesthetics. What looks good to me may not be your cup of tea. I suggest just going out, experimenting with your own light settings, and have fun getting your favorite result.

Hey gang, that's it for me today. I've got to catch a plane this afternoon and fly back to Kentucky for a wedding this weekend and then back to Texas on Monday. Everybody have a great weekend and I'll see you on the flip side. Hope to see many of you in San Antonio Monday evening. Just remember, pixels like barbecue too. Adios, Dave

Thursday, May 28, 2009

"Stained Glass Glory"

"Stained Glass Glory"
©David A. Ziser

Yesterday we were fortunate enough to have the time and a wonderful tour guide and friend, Larry Weaver, take us on a tour of the old State Capital of Louisiana - the place was spectacular and beautiful on the inside. It is one of the most distinguished examples of Gothic architecture in the United States. I took this shot as we ascended the the steps to the second floor - as you can see, the view was breathtaking. The play of rich colors against the spiral staircase offers a visual feast of composition. If I'd only had a bride....... Camera specs; Canon 5D Mark II fitted with 24-105mm IS lens at 24mm, F4.0 @ 1/25 second, ISO 500. Enjoy! -David

Business Day Thursday: Booking Weddings, How About Booking 5 Bonuses To Seal The Deal?

Good Morning Everybody,
Can you believe it, we took the day off yesterday! Turns out that when making our tour plans we thought the drive to Houston was a bit longer than it really was and planned to take two days to get there. Turns out the drive is only about 4 1/2 hours so we decided to hang out in Baton Rouge for the day yesterday and head out early today.

My buddy, Larry Weaver, who lives in Baton Rouge took the day off and played tour guide for LaDawn and I for the day. We saw Mike the Tiger over at LSU, toured the destroyer, the USS Kidd, toured the beautiful old Louisiana State Capital - WOW, what a place, and even saw a bill passed at the new State Capital. All in all, a nice day finishing up with a little crayfish etouffe and red fish for dinner -ahhhh nice.

We head to Houston in just a bit so let's get on with Business Day Thursday - here we go...

Booking Weddings, How About 5 Booking Bonuses To Seal The Deal?
These are tougher times than usual and prospective brides are shopping more photogs before they make their final buying decision. Why not give them more of an incentive to book with you. We started doing this years ago. If my bride booked my biggest coverage, I would toss in a complimentary engagement session and a 16x20 print - a $425 value. If they booked my 2nd tier coverage, I would still offer to shot the engagement session - still a $200, but the 16x20 print was not included.

Let me clarify my point about booking bonuses too. I'm calling a "booking bonus" a special offer for the bride and groom to book with us right now or within say, three days. These bonuses should not be construed to be part of the package offered the bride and groom. The bonuses are a one time offer for booking now.

That was then and this is now. Times and tastes are changing for the brides and grooms of this new millennium. Most are not too enticed by a wall portrait - at least that's the case in good ol' Cincy, Ohio. So what are the alternatives? I have to say in this day and digital age, the choices are many. And, many of them don't have to break the bank.

Hit the "Read More..." link below for the rest of the story.

Here are my top five ideas for booking bonuses:

1. Create a blog for them - FREE. Offer to upload a sampling of engagement and wedding portraits for them. Both of you have access to the site so they can update it too. All of this is pretty simple with Blogger.

2. How about 50 low res images for their i-Phone, iPod, , or iTouch. FREE. The resolution is low enough so that prints can't be made from them but they are still in a very convenient shareable form for family and friends.

3. How about a Hi-Res DVD from Animoto? The cost doesn't break the bank and is a great product with lots of value to offer your clients. By the way, if you use the Digital WakeUp Call special code - dwuc0701 - you can get one month free on a 12 month subscription - a pretty good deal.

4. Let's not forget the engagement portrait session either. There is still some mileage in that offer too.

5. This is one of my favorites. How about for booking the wedding with you, your client receives the loan of a digital photo album they will receive at the wedding reception to share with family and friends right away.

Our plan is to let them keep the photo album for up to 60 days until their regular album comes in. I blogged about this months ago and now the Digi Photo Book is available with and 8 inch 800x600 screen. We plan to keep three of them available and rotate them out as needed. Need a price point a bit less? Then check out the much smaller Digi Pocket albums from $29 - $89 - pretty cool.

The bottom line is this folks, we want the client to make the decision to use our services now. Offering booking incentives with value and style may just lead to an upturn to your wedding bookings.

Hey gang, how about some ideas from our readers too. Like always, if we get 20 plus ideas from our DPT readers, I'll award the winner - my choice - a $50 prize. What a deal!

That about wraps it for me today gang. We are Texas bound in about an hour. See ya' in Houston tonight. Adios, -David

Wednesday, May 27, 2009

"The Cliffs Of Moher At 30,000 Feet"

"The Cliffs Of Moher At 30,000 Feet"
©David A. Ziser

I haven't posted an image from the sky in quite a while. I love the window seat of an airplane when traveling. I'm always amazed at what one sees at 30,000 feet weather it be the clouds above or the land below. Today we have on the the "clouds above "shots. The weather was beautiful on our flight from Cincinnati to New Orleans yesterday. I was taken by these cloud shapes as we were about to land in New Orleans. Their shape reminded me of the view I had seen at the Cliffs of Moher while on a trip to Ireland about eight years ago. The majesty of the cliffs as they fell to the sea was mesmerizing to me. These clouds had a very similar shape and brought back some of those feelings for me. It's a simple shot but I still think beautiful in it's simple presentation. -David Camera specs; Canon 5D MkII with 24-105mm IS lens at 65mm, F16 @ 1/1000 second, ISO 800.
Enjoy! -David

Portrait Day Wednesday: A Good Looking Group

Good Afternoon Everybody,
Once again, we had a great crowd in Baton Rouge last night. That's LaDawn and I passing out over $4000 worth of door prizes to our crowd of over 165 attendees last night - always a fun time. Congratulations to the lucky winners.

Several friends showed up to help set up and also just to visit. Heck, I think LaDawn and I knew more photogs at this stop than at any other. Trent, Frank, Bonita,and Larry - all Ziser Master Class came by to help set up and my buddy Ralph Romaguera came by with his son, Ryan, and son-in-law, Rock. By the way, Ralph and the family run one of the top senior studios in the country. Check out his site right here. It's always wonderful to see friends and familiar faces especially last night as we again made a few new friends along the journey.

Hey gang, how about a Quick Hit Family Portrait Tip Today -
Today I want to briefly discuss how I bring family groups together. You know obviously that everyone wants to look their best in the family photograph. Let's briefly review the arrangement of the group.

Hit the "Read More..." link below for the rest of the story.

Look at the family groups of this promo piece we send out to our perspective clients. You find similar placement of the family members in 3 out of the five images, except the one of the three ladies on the right hand side and the the 6 men on the left of the promo piece. Can you see the circular rhythm in the composition of the groups. Your eye gets to enjoy all the faces of the groups as a family without settling on any one person.

Basically, what I'm trying to do is to create a "Tri-Angle" or "Circular" composition with the faces of the family members in the group. When having people at different levels in the group, never have heads at the same level or lined up with each other. All three family images illustrate this perfectly. If you do, the viewers "eye" will get "caught" on that level in the composition and hover there longer than usual - something we don't to happen as one views the image.

I also try to encourage a little "touching" going on between the members of the group as the dad on the right with his hand on his son's shoulder or with the other dad with his hand on his wife's shoulder. This connection helps as the "eye" enjoys the group. The connect offers a bridge from one member to another and brings a closer sense of intimacy to the group as a whole.

Notice too how the hands of each family member are arranged different from one person to another. This brings a bit of individuality to each separate member of the group. It sure beats everybody sitting there with their hands in their laps. The exception is the group of gentlemen that requested this particular, all very similar, look in their photograph.

One last thing, notice that I make the mom the center of attention by placing her in or near the center of the group. Dad most often has the tallest position in the group too. You know, that "patriarchal" position - hey, call me "old fashioned". The oldest sibling has the next highest position in the group and so on.

Folks, these are not hard and fast rules, but they do give me a starting point when bringing my family groups together. Sure we mix things up once we have the classical group image, but these suggestions in today's post will give you a good start too the next time you head out to photograph a family portrait. Happy Shooting!

Hey gang, that's it for me today. We luckily have the day off in Baton Rouge and are planning to see some sites. We head to Houston early tomorrow morning and are looking to seeing several DigitalProTalk readers there. Come on by and say HI.

See everybody tomorrow. Adios, -David

Tuesday, May 26, 2009

"Ready For An Elegant Evening"

"Ready For An Elegant Evening"
©David A. Ziser


I made this image during Saturday's wedding. It is one of the classic photographs we make at every wedding. I like to photograph the bride and groom surrounded by the decor and flowers that are part of their day. Their positioning in the composition is important too. With them set against the lighter section of the wall, the flowers on our right lead the viewers eye directly to the couple. The flowers on the Chuppah finish and frame the composition nicely. Lighting was accomplished with my Z-Ray flash light further enhancing the scene. Camera specs: Canon 5D Mark II fitted with 12-24mm Sigma lens at 12mm, F 5.6 @ 1/30 second, ISO 2000.

Enjoy! -David

Technique Tuesday: A Fugal Man's Approach To Off-Camera Flash

Good Morning Everybody,
We are heading to the airport bright and early this morning, landing in New Orleans, and then diving to Baton Rouge - City #24 of my Digital WakeUp Call tour where we plan to visit about 150 enthusiastic attendees. I know I have a few old friends coming by so we are looking forward to this stop.

Today I've got a special treat at DPT. As you know, I give a mention to my buddy and Ace Assistant Nicholas Viltrakis now and then. I also check his blog every Monday morning just to see what he's up to lately.

Nicholas has been with me for several years now coming over from the corporate life to try to carve out a career in photography. He brings a level of enthusiasm, ability, superior people skills and professional demeanor that will serve him well in his photographic endeavors.

Mr. V is getting quite good with his off-camera flash technique. Heck, he practices every weekend - just follow his blog [link] to see what he's up to. Anyway, After seeing some recent posts, I asked Nicholas to do a guest blog post for me. He has happily obliged offering a thoroughly written and illustrated post showing how to get your light looking good on a shoe string budget. I think you will enjoy it.

Hit the "Read More..." link below for the rest of the story.

Here is Nicholas' article. He has footnoted 7 related links, so don't miss them either - happy and fun reading.

A Fugal Man's Approach To Off-Camera Flash
I know on Digital Pro Talk you hear a lot about the fabulous off camera lighting that David created for his clients. “Yea sure,” you’re probably thinking, “that’s great if you have all that money for a Quantum flash and an assistant! There’s no way I can do anything like that on my budget.” Don’t be so sure! The principles you can learn from using the expensive toys can translate to the less expensive toys with a few modifications. You just have to work smarter!


For those of you that already have the big fun stuff and think there’s nothing for you in this article by Ace Assistant Nicholas Viltrakis [1](A.K.A. The Death Bag Toter) now is your turn to think again! Read further to see how any level of photographer can travel light, fast, and cheap while still creating amazing images for your clients.

OK, OK, so I do have all the fun equipment that David talks about. I have the Quantum Q pack [2], I have the 4i Freewire radio units [3], but I don’t always want to lug that stuff around! If you are just going out for fun with some friends who want portraits or a client who wants some images in a hard to reach place it’s tough some times. My solution is pretty simple.

Stands, lights, transmitters! That’s all. Now I have developed this technique for my beloved Canon equipment, but you can do the same thing for your choice brand of camera.

#1. You need stands, man (or woman)! As you can see in my photo my stands are pretty cheap (one of them is broken, too). You don’t need expensive assistants and gear, you just need something that will get the job done. I have even duct taped my flashes to a tree branch for the same effect. The important part is that you need to put your lights where you want them for optimum effect!

#2. Let there be lights! I use two 580EXII flashes. Why? I had a 580EX and then I bought more. They are quality and I can adjust them independently in Manual mode. They have a master slave mode, but I have found that mode is not always reliable. I keep everything in manual (M). The important part here… have flashes you know how to work and you can adjust. You are going to want to control them for your specific situations.

#3. Are you receiving the transmission? Pocket wizards are the hot item right now, and they are great, but my wife just “got downsized [4],” so I need a cheap alternative. Cheapest I could find pocket wizards on eBay was $250 for 1 set. My solution to you? YongNuo Wireless Remote Shutter Trigger for Canon [5]… get this… $19!!!! Woo!


That’s right! I have bought 3 sets and here’s the best part! Due to the nature of the cheap animal, all the transmitters and receivers work on the same frequency! So I have bought three of these and the first transmitter fires all three of the receivers! Just what we want! A three light wireless trigger setup for $60.

That is all! Now set up your lights and shoot like a professional!

Use a diffuser on your key light if you want or make it harsh and edgy its up to you.
Take a traditional portrait with loop lighting and a rim light to separate your subject from the background…


Or go nuts and make a harsh light portrait that defies convention!


Or use the extra lights to make your background really spectacular!


It’s simple, it’s easy, it’s cost effective. There are some down sides, though. For one, you are never going to get the recycle time you could with a Quantum flash or any other flash with a dedicated battery.


If you are a spur of the moment rapid-fire shooter this setup will not be for you. Stands don’t move as quickly or intuitively as a human assistant either. Also, Canon’s sync speed for other brands of flash transmitter is 250th of a second. In the case of my triggers it’s more like 200th and that means if you are shooting at 200th of a second at ISO 100 and it’s still too light, you’re going to have to use a higher F-stop. If you want to shoot all your portraits at F-4 that might be tricky.


Finally, the receivers for my setup [6] are not built well! Quality is inversely proportional to cost. And as a result I’ve had to purchase tiny nuts and bolts to reinforce the connections on the YongNyu receivers so they don’t break and my 580s go tumbling to the pavement. But, hey, they’re $20! It’s a give and take. Really, other than that, this setup is fantastic! My clients are continually amazed and overjoyed at the results I have produced.


It just goes to show you that the methods and philosophy you learn here at Digital Pro Talk are really the important part! How you do it is up to you. As we all know technology changes so quickly. There are probably 100,000 ways to take a great portrait. The goal is to do it with a balance of quality, cost, functionality, ease, versatility, and with a classy presentation (remember we are creating value for our artistry here)!


Well that’s all folks, Ace Assistant Nicholas Viltrakis out! To see what I am up to on a weekly basis check out http://nicholasviltrakis.blogspot.com/ [7]

Happy Shooting! - Nicholas

Related Links:
1.
http://nicholasviltrakis.blogspot.com/
2.
http://www.vdhphoto.be/quantum/images2/qpack.jpg
3.
http://images.aandhmarketing.com/bigpics/quantum/505sri.jpg
4.
http://nicholasviltrakis.blogspot.com/2009/02/022209-will-teach-for-food.html 5.http://www.dealextreme.com/details.dx/sku.13089
6. http://www.dealextreme.com/details.dx/sku.13089
7. http://NicholasViltrakis.blogspot.com

Hey Nicholas, Hi Fives for the post - thanks a bunch!

Hey gang, that's it for me today. We have planes to catch, people to see, and seminars to give;~) See ya' tonight in Baton Rouge.

-David

Monday, May 25, 2009

Monday: Remembering Our Heroes

This is a day on which we are to remember our heroes, but a lot of the remembering sort of gets lost in all the hot dogs, hamburgers, cold beer, and pop most of us will be consuming. Don't get me wrong - that's all great stuff - but the reality, I believe, is that picnics, parades, and parties push away, and some time even negate, what this day is meant to stand for.

This post today is not meant to be a "downer" post. It is meant instead to raise our awareness of what these brave soldiers sacrificed to preserve our freedom especially on this Memorial Day. It's meant to have their lives, touch our hearts today and challenge us to connect with a few of these young men and women on a personal level.

LaDawn and I were flying home last Friday from San Diego and, as usual, I was reading the Friday edition of USA Today. The story that caught my eye told about a mother, Carla Sizer, who visited Legacy.com's "In Remembrance" site everyday to read about her 19 year old son, Spc. Dane Balcon, killed in Iraq or Afghanistan. He has his own memorial page with a musical tribute, 176 photos and a "guest book" with almost 1,200 messages posted by relatives, friends, neighbors, schoolmates, comrades and total strangers [link].

On Saturday morning I headed over to Legacy.com and visited the "Moving Tributes" page [link] to see what this site was about. As I watched the "Moving Tributes" to many of the soldiers honored, I was taken back by my feelings that I felt welling up within me - "Look how young these kids were. That soldier had two little kids at home that now won't see their daddy. Look at the optimistic, smiling faces of these brave men and women that gave their lives for our freedom."

Each tribute brought me closer to the sadness, loss, and love the families and friends of our fallen heroes must feel. The site gave me a very real appreciation of what today is suppose to represent to America - a day of remembering our fallen heroes. Please take a few minutes today - visit and connect with a few of the families who will be celebrating/remembering this day in a much different way than most of us as we will be enjoying our families and friends today.

Today is the day we honor these brave men and women in our hearts and souls. Let's do just that purposefully for just a few minutes today - we can get to the burgers and dogs later.

Sincerely, -David

Thursday, May 21, 2009

"Reflections Of Yosemite"

"Reflections Of Yosemite"
©David A. Ziser

I promised one color image from our trip to Yosemite National Park last Saturday and here it is. On the way to the park, we passed this small pond with this very interesting reflection of the stones and pines. I jumped out of the car and took a few shots. After getting back into the van and moving up the road just a few feet, I knew I had missed the best shot. On our way back out of the park many hours later, I wanted another crack at capturing the photograph. The second time around, the water in the pond was very still and gave me a much better refection that I had captured originally. I picked my best spot - zoomed into the rocks and favored the reflection in my composition. This was my result. I enjoy the colors, textures, and especially the soft reflections on the water. Camera specs; Canon 5D Mark II fitted 24-105 IS lens at 105mm, F4.5 @ 1/160, ISO . Enjoy! -David

Light Up My Life Friday: Double Lighting The Wedding Cake

Good Morning Everybody,
We had another wonderful West Coast crowd last night. It was a nice surprise that fellow blogging buddy, Brian Auer, stopped by too. Brian, whom I have mentioned several times on DPT runs EpicEdits.com, one of the most popular photo blogs on the Net. He is currently running a very fascinating series on "The Art of Making Fine Art Prints." Here is the link.

Brian is a very busy guy - in addition to his day job, he is also the force behind FineArt Photo Blog - a blog dedicated to exhibiting fine art images from a select group of 9 talented photographers from around the world [link]. I am honored to be included in that group.

Wait -- there's more -- Brian is also one of the driving forces behind PhotoNetCast.com [link]. PhotoNetCast is a collaborative effort of four photographers from around the world discussing all things "photography." The atmosphere is casual and relaxed. Head on over and check out any of their 30 episodes. If you go back far enough, you'll find me as a guest in Episode 8. Brian is a busy guy with his regular day job, his family but still manages to bring a ton of solid content to the blog sphere for thousands and thousands of photographers. THANKS a bunch Brian!

Let's get on with Light Up My Life Friday. Here we go...

Double Lighting The Wedding Cake
Too many photogs only use one light when photographing the wedding cake. The result is flat and two dimensional. Adding that second light makes all the difference in the world. Heck, I'm saying it all through my Digital WakeUp Call Tour - "You have to put a shadow next to a highlight to create the detail, depth, dimension, and color saturation in your shot. Uncle Harry's on-camera "blast flash" just doesn't cut it".

Hit the "Read More..." link below for the rest of the story.

So just where does that second light need to come from? Check out the fist diagram. I've tried to show the position of the Bride and groom, the cake, my assistant, and myself in this set up. Notice the the groom is positioned behind the cake table with the bride to his right.

The most important consideration is just what the assistant sees from his/her position holding that second light. My assistant must see from left to right - groom, bride, cake. If the assistant sees the cake in front of the bride, then he/she will throw the cake shadow onto the bride - not a good thing. As long as the assistant has a clear view of all three from their vantage point, all will be good.

Remember too, that my assistant is creating the main light on the scene. That means that my on-camera flash is acting as "fill - light" and as such, the intensity of my flash is slightly less than my assistant's off camera flash. That is what brings that dimensional look to the image. Once more, it's all about highlights next to shadows.

Take a look at the next image to see what I mean.

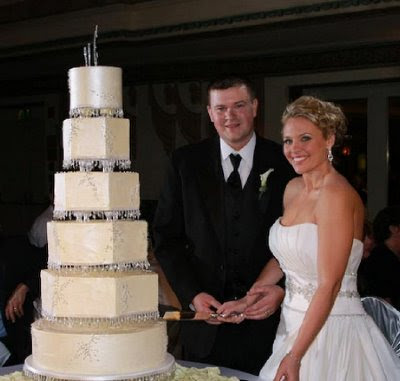
This is a typical cake shot - I take several, but this is the first one I take asking the bride and groom to look back into the camera. You can see the nice effect my second light brings to the image and that's always my goal with my lighting set up. Anyway give it a try at your next wedding and see if you don't like the result better too.

Hey gang, that's it for me today. We catch our plane back to Cincy in a short while and get to spend the weekend back on our home turf. THANK YOU and with a slight tear in our eyes - good bye West Coast. LaDawn and I look forward to the time when we have an opportunity to explore the West Coast areas again. Everyone, have a great weekend and I'll see you on the flip side next Tuesday in Baton Rouge. I'll have a short post up on Monday- Memorial Day, but will be spending the balance of the day with family. See ya' next Tuesday. -David

"Distant Peaks"

"Distant Peaks"
©David A. Ziser

This is another image taken from Glacier Point last Saturday. I promise a color image tomorrow .... really. This image, at first glance through my viewfinder, showed more promise than it delivered when I brought it up in Lightroom. The original just didn't pop for me. I did quite a bit of tweaking in Lightroom to get it to a point where I thought the composition finally presented itself well. I'm going to plan a Technique Tuesday on this image in an upcoming post. I think you will be surprised with the final enhancement process. All that said, I do like how the image turned out. The snow capped mountain peaks contrasting with the foreground elements and framed by the Redwood branches overhead, finally came together for a nice B&W image. Camera specs; Canon 5D Mark II fitted with 24-105mm IS lens at 58mm, F10 @ 1/320 second, ISO 50.
Enjoy! -David

P.S. Click on any of the daily image posts for a much larger view of the image. Enjoy -DZ

Business day Thursday: 60 Ways To Build Your Business

Good Morning Everybody,
A great BIG thank You to all 230 photographers that attended last night's DWUC program. I have to say, the Irvine crowd was quite an energized group and we all had a great time. Each location offers it's own spice and nice surprises. Frank flew in from Winnipeg, Canada to see the program. Frank also flew in for my 2006 DWUC program, too. It was a very nice surprise to see Frank again last night.

Fellow blogger, Kerry Garrison on the right and his blogging partner, Maurice also came by to lend a helping hand. Thanks guys for all your help! We all got a chance after the program just to relax, share a few new ideas and talk blog stuff. I've mentioned it before - Kerry runs one of the best photo-blogs available on the net. Here is the link to CameraDoJo.com - an invaluable resource a that's not to be missed with a TON of good stuff posted. Be sure to check out all of his 50 podcasts too - all offer very tantalizing as well as informational listening. Hey guys' thanks again for coming by the presentation.

Time to get to today's post - here we go...

60 Ways To Build Your Business
Time is running a little short today and the post I had planned is going to be reserved for a later post. I'm talking to the Animoto guys and we have some good things cookin' for my DPT readers. Stay tuned for additional information on a later date.

The last section of my Digital WakeUp Call tour is dedicated to marketing, business building, and selling. I race through that section because every night, as LaDawn constantly reminds me, I am short on time. Today I thought I would offer up one of my posts from about a year ago which covers a lot of bases and more on enhancing your business. This was sort of the "mother" of my business posts here at DPT. So on that note let me point you to "If You Were Just Starting Out, How Would You Build Your Client Base - More Than 60 Ways To Do It!" Here is the link - happy reading.

Hey gang, we are really running behind today so I've got to scoot. We hit San Diego in just a few hours and wrap our West Coast leg of my DWUC tour tonight. I hope to many of you there this evening. Be sure to come on up and say HI. See you in San Diego! -David

Wednesday, May 20, 2009

"Yosemite Valley"

"Yosemite Valley"
©David A. Ziser

Yep, one more image from our Saturday visit to Yosemite National Park. We had actually stopped here on the way into Yosemite but as we were heading out of the park around 4 p.m. the light was perfect. The sun's elevation was just at the appropriate height to enhance the scene with just the right light to bring out the textures of the rocks, mountains, and foliage. A few tweaks in Lightroom finished the image presentation. Camera specs; Canon 5D Mark II fitted with 7024-105mm IS lens at 47mm, f9.0 @ 1/200 second, ISO 50. Enjoy! -David

Portrait Day Wednesday: Booking, Shooting, and Selling The Family Portrait

Good Morning Everybody,
We had another fun crowd in Ontario, CA last night. Man, everybody loves the door prizes. We wrapped pretty much on time and I stuck around about another hour just visiting with folks about photography.

Today we head to Irvine, CA where a crowd of over 200 awaits us – San Diego tomorrow evening and then home for the weekend for a wedding and a couple of welcomed days off.

I think I have a informative post for our portrait shooters today so let’s get right to it.

Booking, Shooting, and Selling The Family Portrait
In today's post I want to discuss probably one of the most important considerations in making family portraits. Today's topic is on background selection. Well, what do I mean by background selection in a family portrait? What I mean by this is finding an area against which I can pose my family. This area must compliment and not distract from the finished family portrait.

Hit the "Read More..." link below for the rest of the story.

I prefer a background that is at a substantial distance behind the subjects and goes softly out of focus behind the subjects in my shot. When cruising the Net and checking out the family portraits samples many photographers feature in their galleries I have found that often there is not much attention paid to how the background can compliment the image. Many times the background is just as sharp as the subjects in the photograph.

This is because many photographers are using to small of an aperture when taking photographs when shooting their portraits. I learned a long time ago that there are three ways to draw viewers’ attention to the subject in a photograph. Those three ways are “light, color, and detail.”
So follow my thinking. If we focus on our subjects and at the same time use a fairly small aperture, the background then also is rendered in the fairly sharp focus. A lot of photogs think they need to use the smaller aperture to keep the subjects in focus. But that is not necessarily true – I’ll come back to that point later.

Let’s get back to what’s happening when using this smaller aperture. Since so much of the scene is in sharp focus with the use of the smaller aperture, our eye is drawn to nowhere in particular in the scene since everything in the scene is in relatively sharp focus. What we need to do is use a wider aperture for example f 4.0 when shooting our portraits so that the subjects remain sharp but the background is rendered softly out of focus.

Here is another point to consider. It's always been my goal to avoid backgrounds with spotty bright light and sparse foliage where too much of the bright sky shows through. What I try to look for is a background that is fairly homogeneous in color and densities. That usually means that the landscaping, tree line, or whatever has to be dense enough to give me that nice smooth, attractive background behind my subjects.

Some additional problems to consider when working in the client’s own backyard is to avoid telephone poles and wires, neighbors houses, passing cars or other vehicles, signs, or basically anything that distracts from the scene. This is fairly easy to accomplish when working in the park because we are usually working in large enough areas whereby we can position the subjects far enough in front of a background and thus create the homogeneous harmony in the background I'm looking for when I make my portrait.

Take a look at at the image below. Notice how the background is not drawing attention to itself.

That's because my main rule of thumb is to shoot family portraits at F4 with my 70-200mm IS lens racked out to about 150 mm. At those settings my depth of field is quite shallow but, still sharp enough to keep everybody in focus. Keep in mind that I pose what I call a shallow family group no more than two people deep. But the shallow focus now makes my background go well out of focus because its distance is so far from the subjects.

So this introduces a new consideration when setting up your family portrait. How far back must the background be from the subjects? I always say the further the better. Because the further the background is removed from the subjects the softer and less distracting it becomes in the photograph.

Take a look at this next photograph and you can see what I'm trying to accomplish. This was just a simple family portrait that happened to be made in the client's backyard.


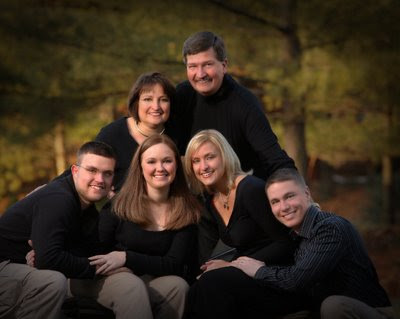
Their backyard joins several other backyards and I was able to position them in such a way that the neighbor's foliage served as my background. This image was also made fairly late in the year right after Thanksgiving in the Midwest. That means not much leafy foliage remained against which to position my subjects. I was lucky enough to find some evergreen pine trees, which served as my background.

Longer focal length lenses also allow us to find smaller areas of the background against which we can pose our subjects. What do I mean by that? I mean that the much more narrow view of my longer lens throw of the telephoto lenses gives me the ability to use a smaller background space for my portrait.

That's what happened in the portrait I’m showing above. There was just a small place in the background that I was able to zero in on with my long lens to have it serve as a nice out-of-focus background for this easy family portrait.

Remember: it's always about getting the viewer's attention to go to the subjects in the portrait. Our goal then is to remove any distracting elements that detract from that goal. The easiest way to remove distracting elements is to throw them out of focus.

So the bottom line is this. Keep your subjects in front of a consistently uniform background. Be sure you don’t have distracting hot-spots in your chosen background. Keep the background sufficiently behind the subjects so it goes nicely out of focus at a wider f-stop. Simple, easy placement and positioning of the subjects. That’s about it. Have FUN!

I've tried to point you in the right direction in creating portrait images that are quite a bit different to what we normally see in our business. As I said earlier my goal is to create a wonderful, somewhat timeless, portrait that focuses on the client. We do this with background selection, lens selection, and aperture selection.

Next week we will discuss lighting the portrait. So again, on that note gang, I'm wrapping today's post. Were on our way to Irvine today then San Diego tomorrow and finally home on Friday. I hope to see many of you in Irvine, California tonight. See you then, -- David

Tuesday, May 19, 2009

"View From Glacier Point"

"View From Glacier Point"
©David A. Ziser

Here is another image I made while in Yosemite last Saturday. This is probably my favorite image of the day. Glacier Point offers one of the most magnificent views of the Yosemite Valley from its 7200 feet elevation. The road to Glacier Point had just recently opened for the summer so it was perfect timing for us to make the trip. Tourists, believe it or not, have been making the trip to Glacier Point since 1872. It was a bit easier for us, with the nicely paved roads and 4-wheel drive vehicle to make the journey this past Saturday;~) Anyway, this image was made later in the afternoon when the sun was just starting to cast a few shadows along the valley adding some nice textures to the scene. That's Half Dome on the right side of the image. Camera specs; Canon 5D Mark II fitted with 24-105mm IS lens at 28mm, F13 @ 1/320 second, ISO 250. Enjoy! -David

PS - Hit the "Read More..." link below to see the image in color. The B&W is still my favorite.

Here is the color version of the same shot.


Technique Tuesday: Good deals At NIK Software & Learning To See The Leading Lines

Good Morning Everybody,
WOW! What a really nice crowd we had last night in Burbank! About 230 friendly photographers came by for the Digital WakeUp Call tour - quite the "wild bunch." Enthusiastic and passionate about their work. By the way, I mean that in the most complimentary fashion - I think we all had a wonderful time. Today need to be on the road shortly to Ontario, CA - so let's get right to the post today.

NIK Software 25% Off!!! Please Read On
Hey gang, before we get into this week's Technique Tuesday episode, let me tell you about the best deals on NIK software available anywhere! NIK, as you know, is famous for making some of the best plug-ins for Photoshop and Lightroom on the planet. That would include Viveza - my favorite; Color Efex Pro - about the best set of cool effects in a box; Silver Efex Pro - I like to call it Ansel Adams in a box; D-Fine 2.0 - noise, noise go away; and Sharpener Pro - the mandatory finishing touch to every picture.

Here is the super good deal. Viveza is on sale over at NIK Software for only, get this, $150! That's $100 off the regular price till June 2. Now let me sweeten the deal even more for you. As one of my tour sponsors, I arranged a special price on all NIK products while my Digital WakeUp Call tour is on the road. You can buy any NIK product for 25% off the regular price - specials (like Viveza) not included - which makes everything they offer a steal of a deal.

You've got to know the "secret handshake" though. Got your pens and paper ready? Here it is - DZISER - use that secret code when ordering online and pocket the 25% difference in savings. Pretty cool, eh - don't thank me, thank NIK Software.

OK, now on with Technique Tuesday...

Learning To See The Leading Lines
Today's video tutorial is short and sweet but offers some insights in how I like to design my images. What do I mean by that? I'm a photographer who first surveys the three dimensional space before I ask my subject to step into the scene. I'm always looking to where the "directional pointers" lead in the scene and then tend to place my subject at that point. You will see in this short tutorial how the lines in the scene, once determined, lead the viewer's eye right to the subject. It's important that we learn to see in this fashion because then we have more control over our final composition and the final impression our photograph has on the viewer. Hit the PLAY button below to see what I mean.


Hey everybody, that's it for me today. We are on our way to the Inland Empire of California for tonight's program. Hope to see many new faces there. Adios, -David

Monday, May 18, 2009

"Yosemite Falls In May"

"Yosemite Falls In May"
©David A. Ziser

I made this image while touring Yosemite National Park last Saturday. This site was truly impressive in Yosemite. It seems the month of May is one of the best months to visit because the waterfalls are all flowing at their fullest. It sure seemed so to us. You are able to get up close and personal with the falls throughout the park, but I like this view best of the Yosemite Falls. From this vantage point one gets to see the upper and lower falls which offers a spectacular view. I fine tuned the image in Lightroom and really liked it best as a B&W image. Check out my color image below and see if you agree. Camera specs; canon 5D mark II fitted with 24-105mm IS lens at 40mm, F8.0 @ 1/160 second, ISO 50. Enjoy! -David

Quick Hit Monday: Geek Alert; New Canon 50D Book; Best Of The Web; A Little Common Sense

Good Morning Everybody,
Hope everyone had a great weekend. We spent Saturday at Yosemite National Park - only 90 minutes from Fresno and what a treat. I was there years ago shooting a wedding but didn't get a chance to explore it the way we did this past Saturday. Look for some Ansel Adams "look-a-like" images of the day coming your way this week.

The thing that struck me while working with the images in Lightroom was how much more I enjoyed the images in B&W. I know that may sound weird, but for me it was true. The B&W versions of my favorite shots struck me as the most dramatic and powerful when compared to my color versions.

Check out the image above in my "Image of the Day" post - a beautiful B&W image. Now look at the image below - yes, it still looks good but doesn't grab me the way the B&W version does.
Hey, maybe Ansel had something there. He was never a big fan of color either. He felt he could get a much better range of tonalities using his Zone system with B&W film and compensating with exposure and processing.

I have to say, I have never seen so many pro level cameras in one place than at Yosemite National Park - it was like everybody had them. Given the situation, what was I to do? I thought "shameless self-promotion" was in order here.


Here I am passing out my DigitalProtalk.com cards to a group of photographers from Boston. The gentleman on the right says, "I know you, I've seen you on Kelby Training videos." [link] What can I say - small world, even in Yosemite;~)

Hey gang, let's get on with Quick Hit Monday - here we go...

Geek Alert, Geek Alert...
Well, things started when we sat down for a cold refreshment after my program in San Jose last week. Mike, who had graciously given us the tour of Google earlier in the day, pulled out his laptop and showed us this very cool application from CoolIris. CoolIris is a plug-in that transforms your browser into a lightning fast, cinematic way to enjoy photos and videos from the Web or your desktop. You've got to check it out - here is the Cool Iris link.

Wait, there's more. I made the trip over to Lifehacker.com over the weekend and found this very cool tool for easily trimming your videos very quickly. The app is called FreeVideoCutter and can be found at the website of the same name - here is the link. Well, Lifehacker.com pointed me to TechBlissonline.com who had the link to FreeVideoCutter.com along with a lot of related links at the bottom of the page.

OK, by the time you finish all the Dot Com browsing in the previous two paragraphs, it will be Tuesday morning before you know it - have fun.

Just Published - New Book On Canon 50D
I just found out that fellow blogging buddy, Jeff Revell, has just published a brand new, hoppin' good book on Canon's 50D camera - I just ordered my copy. I first saw the story over at uber blogger, Scott Kelby's site. It seems this is the book to read if you are shooting the Canon 50D - it's not just a manual, it a road map to taking better pictures. Here is the link to Amazon.com and Barnes&Noble.com where you can pick up your copy too. Hey, don't forget to check out Jeff's PhotoWalkPro.com site too - here is the link. Congratulations Jeff on the new book!

2009 Webby Awards - Schedule Some More Surfing Time
I just caught this over at Cincy blogging buddy, Ryan Dlugosz's blog - rrdphoto.com. It seems the Webby Awards for best web sites of 2009 were just announced and Ryan has found some photo gems in the list. Here is the link to his site which includes the main link to the Webby Awards too. Lots of cruise time needed to check out all the goodies here.

And Now For A Little Common Sense
In part of my DigitalWakeUpCall program I discuss business building as it related to building relationships with your vendor buddies. Bud Bilanich, who runs a very successful blog on success had a great post on just that topic. The post is entitled, "Think WE for Relationship Success." Here is the link to the article. Bud offers some common sense insights that should be common practice to all of us wanting career and life success. His blog is a refreshing and enjoyable read - definitely worth the visit.

Hey gang, that's it for me today. We have about 250 photogs landing in Burbank tonight for the last leg of my DigitalWakeUpCall tour down the west coast. We are off to Ontario, CA; Irvine, CA; and finish in San Diego on Thursday. I hope to see you somewhere down the road, maybe even this evening in Burbank.

Keep your pixels smilin', -David

Friday, May 15, 2009

"Verdant Desert"

"Verdant Desert"
©David A. Ziser

I made this image while traveling to Fresno on Thursday. LaDawn was driving, pedal-to-the-metal of course, and I was doing some "drive-by shooting" out of my side of our mini-van. I have to say the drive from San Jose to Fresno was beautiful - the rolling hills, the colors, the textures of the landscape were mesmerizing. We got a bit further down the road to the San Luis Reservoir area. I was able to grab a few quick shots as we went whizzing by and this is one of my favorites. It was made mid day when you would think the light was not going to be your friend. Instead, the high afternoon sun created contrasts on the hills and surrounds which complimented the very smooth water surface. A tweak or two (maybe three) refined my image to it's final composition. The rich blues against the desert colors, the simplicity of design and composition all combined for a striking portrait of the landscape. Camera specs; Canon 5d Mark II fitted with 70-300mm IS DO lens at 75mm, F14 @ 1/640 second, ISO 800. Enjoy! -David

Light Up My Life Friday: Lighting The Group Shot

Good Late Afternoon Everybody,
We wrapped this week in Fresno, headed for the lounge for a refreshment or two, and turned in late last night. We decided just to kick back and relax a bit this morning and catch our breath from a very busy week.
And what a great week it was -- the highlight of the week was our Wednesday visit to Google. Mike, who was attending the DWUC program that evening, had e-mailed us a few weeks ago and invited us to take a tour of the Googleplex. What a treat! We spent a couple hours there with Mike giving us a very thorough look at the inside workings of Google. Hey Mike, THANKS and a big Hi-Fives for the visit.

Since we don't have fly home this weekend for a wedding, we are hanging out in Fresno for a day or so and planning to make the trip over to Yosemite National Park tomorrow. Heck, we're this close, we should visit one of the most exciting national parks in the US.

On that note, lets get on with today's post.
You Light Up My Life Friday: Lighting Group Photographs
During my Digital WakeUp Call tour I like to visit with the attendees at the half-time break and also at the end of the program. One of the questions that comes up most often is how I photographed my groups. The first half of the program is dedicated to lighting. I specifically discuss how I use my shoot through umbrella for a lot of the images on the wedding day.

So that brings us to today’s topic. Today’s discussion is going to revolve around photographing large wedding party groups -- say 12 to 20 people in the group.

Hit the "Read More..." button below for the rest of the story.

There are a couple things we have to keep in mind when photographing a group this large. Since I'm using an off-camera flash, I have to be sure that I don't throw any of the shadows of the people in front of the group onto the people in the back of the group. It's imperative that my assistant, from his/her position, can see all the complete faces in the group. Part of my shadow problem is easily solved because I'm shooting through an umbrella which softens the shadow edges and makes any shadows much less distracting.

It's also important how far back my assistant is with the second light. My easy advice I've been giving for years is to pace off from the group 7 steps back or in other words about 20 feet -- and then about four steps over or approximately 12 feet. With my assistant in this position, I'm bringing the light in at an angle of about 25 to 30° with respect to the group.
Also it is important to note that when I'm working with large groups I recommend to pose a fairly shallow group. That means that the group is no deeper than about 2 1/2 people deep. I'll cover group posing in a later post.

What's important to notice the direction my assistant is pointing the umbrella. My assistant is not pointing the umbrella directly towards the center of the group. Notice in the diagram that my assistant is much closer to the people in the right hand side of the group. That would indicate then that this side of the group would be getting more light than the further distanced far side of the group.

The way to solve this problem is to have my assistant point slightly to the left of the group’s center. Notice in the diagram at the longest arrow is pointing just a bit left of center of the group. What happens then is this. The light is feathered off of the right side of the group and is being directed to the wedding party members on the left side of the group. The net effect of feathering the light slightly to the left of the group is that we obtain a very even illumination over the entire group.

Typically when I'm making these photographs my off-camera flash is set to half power. I need the higher power setting because of the distance in which we are working to the group. My on-camera flash is also turned on but I have the light output adjusted down 1 2/3 stops. The on-camera flash is acting solely as a fill light on the group. As I've mentioned so many times before, the off-camera flash is fired by the transmitter that rests via Velcro to the top of my on-camera flash.

The only other thing I need to do to enhance the photograph is to slow down the shutter a bit to pick up the ambient light in the church. This allows the image to take on quite a bit more of a dimensional feel because the ambient light gives greater depth to the scene.

Whether I'm shooting my Canon 40D or my Canon 5D Mark II, the lens of choice for me is always my 24-105mm IS lens with the aperture set to F5.6. The camera set to ISO 800 at about 1/20 second. I want to assure I see everyone's face ad then it's important to work quickly as NO one in the wedding party wants to be taking these photographs as a reception party is waiting.

So there you have it all the facts and the figures and a road map to take really good group photographs at your next wedding.

Hey gang, that's it for me today. The late start on the day has not given us much of the day left to enjoy so I think I'll hop in our minivan and explore the surrounds of Fresno. So, until next week, everyone have a great weekend and I’ll see you Monday in LA.

Adios, David