Monday, March 31, 2008

"Friend Of the Arts"

"Friend Of the Arts"
© David A. Ziser


This image was created as part of a series for the Arts of Cincinnati entitled "Inspiring Volunteers". These 15 minute portrait sessions had to be pulled off quickly and efficiently. I found the setting I liked, noted the exposure for the background, asked the volunteer to step in, and illuminated her with my off-camera Quantum flash shooting through a translucent umbrella. For our very quick 20 portrait sessions photographed on location around the Greater Cincinnati area over a 2-day period, this final result continues to be one of my favorites. Camera specs; Canon 5D fitted with 24-105mm lens at 24mm. F4 @ 1/20 second hand-held, ISO 1000. Enjoy! -David

A Pretty Marvelous Monday

Good Morning Everyone,
Hope you all had a great weekend. LaDawn and I jumped on the flight to Orlando yesterday about 3 p.m. and finally got settled into the beautiful Peabody Hotel about 6 p.m. We are both looking forward to a good week down here at Photoshop World. The only down side - we were both socked with one humdinger of a cold over the weekend we are trying to shake. Hopefully the drugs we got from our Doc will help us shake it off in a day or two.

On a much more positive note, I'm signed up for a program later today with the famous Adobe mad scientist Russel Brown . We are going to create real life 3-D images. It should be very cool and a wonderful opportunity to learn a new trick or two. I'll give you the follow-up tomorrow. That said, I'm going to make this a quick hit news Monday so let's get right to it.

It's Been a Great Past Decade In Photography - How About the Next Ten Years?

It's been a great digital run so far, but how about a peek around the corner to see what research has in store for us in the next ten years. See what Stephen Shankland has to say about it over on his Underexposed blog in his article entitled, "Photo Industry Braces For Another Revolution." Here is the article link right here. It's a fascinating read. Thanks to PhotographyBay for the heads up on the story.

Radio Poppers and High Speed Sync

About the coolest new piece of flash related equipment is about to hit the streets - The Radio Poppers. These things have been getting a lot of coverage all over the net these last few months. What is a Radio Popper ?? It's a clever device you attach to your 580EX2 or SB800 flashes which then gives you full functionality of the Master-Slave features of the flashes and also the High Speed sync features as well. In the past, reliability and consistency of these flash units has not been the best mainly because of distance and line of site limitations of the IR sensors of the flash units themselves. Radio Poppers change all that.

My blogging buddy, Matt Adcock over at FlashFlavor, got a chance to check them out recently. You can read his test report right here. Also, there is a nice Popper Promo featuring their high speed flash versatility right here. And lastly, check out the Radio Popper web site for all the info right here. Frankly gang, I think these are pretty hot items and bear watching if you want to take your flash photography to the next level.

Get Them While They're Hot

That's right, Adorama is clearing house on a bunch of Canon gear! This happens a few times a year, so head on over and see if there are any good deals you can't live without. Here is the Adorama good deal link right here.

Ten Legal Commandments For Photographers

So, is it OK to photograph public buildings or private spaces? If you are asked to leave, what are your rights? I've personally had the guards chase me from outside a Federal building before. I was photographing a senior against the cool facade of the building and we got the boot. Anyway, this is a good read over at PhotoJoJo right here. And it may keep you out of trouble down the road - unless you choose to walk the edge like me ;~)

Hey everybody, that's it for today - time to crack open the Sinex, Drixoral, and Advil. So a sniffy adios to all, and I hope to see you tomorrow for another addition of Technique Tuesday, --David

Friday, March 28, 2008

"The Color Red"

"The Color Red"
© David A. Ziser

I loved the intense bright red color of the geraniums on the steps playing against the equally bright red door of this little shop in Provence, France. It's just a loud splash of energizing color in this one composition. Camera specs; Canon 5D fitted with 24-105mm IS lens at 70mm, F7.1 @ 1/200 second, ISO 800. Enjoy! -David

Fabulous Inspiration Friday

Good Afternoon Everybody,

I'm throwing this post up a little late today because of the delayed post yesterday. Sorry, we had too much stuff going on around here to get it up earlier.

On a different note - a little housekeeping - I need feedback from our readers. I had Joe comment that the posts were getting too long and his FireFox browser was having trouble seeing all the posts. I've cut the posts down to 10 days showing instead of 15 days. Let me know it that helps. Also, I had a reader comment that the Technique Tuesday videos were not running in Safari. This is the first time I have heard of this problem but all works fine on my MAC while browsing with Safari. So keep me posted if you too may be having trouble or if all is running fine.

I would also like your input as to how you like the format of the blog; Monday - open, Tues - Technique Tuesday, Wednesday - open or special series like Wayback Machine and History of Wedding Photography, Thursday - [B]Business day Thursday, and Friday - Inspirational site and images. I personally like the way it is coming together - but would like to get your feedback. So please, let your voice be heard and don't hold back on those comments, suggestions, topic ideas, pleas of help and image solutions.... just let me know. Thanks!!

How about on with "Inspiration Friday". While LaDawn and I were in Park City strolling down Main Street, we stopped by about every gallery displaying examples of photography. Some of the stops were truly inspirational!! The work of some photographers we knew and others we didn't, was breath taking. Let me share a part of our stroll with you.

Unbelievable Landscape Artists

Windows On The World - The work of John and Deborah Scanlan was hands down our favorite gallery to visit. Their images are amazing. They are a young couple who has traveled the world capturing the beauty of all the locals they have visited. The color, composition, and beauty of their imagery is just striking.

Check out their web site right here. It is wonderfully laid out too. What I liked was the story associated with each image. Hopefully you will find some time over the weekend to enjoy the browse of their galleries.

One Of The Big Names In Wildlife Photography

Tom Mangelsen is one of the foremost wildlife photographers working today. He has 16 galleries around the country where you can view his work. We first came across his work several years ago in Breckenridge, Colorado and were blown away by his images then. It was a nice treat to see his some more of his collection again in Park City.
His gallery in Park City was showing a beautiful book of his work entitled, "The Natural World" and we almost purchased it for $75.00. As fortune would have it, we found it on Amazon for $47.25, quite a savings - here is the Amazon book link. I just purchased my copy today. Check out Tom's on-line galleries right here - truly beautiful.

Another Scenic and Wildlife Photographer To Blow You Away

David C. Schutz is producing some stunning images as well. His gallery work was also just breathtaking to see in person. You could spend a few hours just luxuriating in his images. Here is David's gallery link right here.

A Little Edgy - A Little Different

Jonny Barrett is a photographer living in Park City producing some very interesting images. The subject matter is of everyday item, but Jonny has a nice sense of color and balance in his compositions. The images may not be everyone's cup of tea - but they are at least worth a look. Here is the link to Jonny's gallery right here.

Hey gang, that's about it for today. I putting finishing touches on my presentations for Photoshop World and hope to see many of you there. Have a great weekend and I'll see you in Orlando next week. --David

Thursday, March 27, 2008

"The View From Above"

"The View From Above"
© David A. Ziser


I wanted a different perspective of the bride and groom in this beautiful church. I think this technique filled the bill. I put my camera on a monopod and set it for a 10 second self timer delay. After focusing on the couple, I put the fisheye lens in “manual mode” to preserve the focus for the shot. I had a small accent light positioned behind the subjects and my Quantum supplying the primary key light slightly from the side. I pressed the shutter release, started my count to 10 and at about 6, started raising the camera into position about 6 feet over my head. (You need to practice this a few times to get the framing right.) I asked the couple for a good smile at the last second and got the shot. Camera specs; Canon 30D fitted with Sigma 8mm Fisheye, F5.6 @ 1/30 second, ISO 800. Enjoy! -David

Thoroughly [B]Business Day Thursday

Good Afternoon Everybody,
Well, we made it home safe and sound late yesterday. Like Dorothy said, "there's no place like home." Just in time to head to the cleaners and get ready for our next trip on Sunday to Orlando for Photoshop World. But, we do have a few days to recoup and catch our breath this weekend. So let’s get right to it.

Check out the posts below. I’m starting a new four part business series on how to build your wedding business. There is lots of good information here so don’t miss any of them. This week I’m starting with “Portfolio Development” or “How to Get a Good Set Of Samples.”

Building Your Wedding Business Series – Part 1 of 4

11 Ways to Better Portfolio Development And Presentation

Where is your business right now? Are you cruising along without a care in the world? Business is great and there is never any need to look at the bank account flush with funds? Or, are you like so many businesses out there trying to be more profitable and build a better bottom line, and constantly looking for ways to do just that? This series is targeted for the business owner trying to build a presence in their community, book more clients, and put more money in the bank.

A lot of these ideas come from my own 30 year studio experience and we still incorporate many of these practices in my business today. As with any recipe for success, it’s like a diet – you have to stick with it to see any results. And just like a diet, once you start to see the results of your efforts, you must continue working at it even more. Remember, it’s easy to be the best – just work a lot harder than the next person.

For this first in the series, I want to discuss portfolio development or how to get some “dynamite” images in your sample set. Here we go.

1. Give it away for free. Everyone’s sample set of images can always use some help. At least to keep it fresh and updated, but more importantly to show excellence in your work. You need some new samples, or you need some more practice, then give the sessions away for free. So you accomplish both at the same time.

Hey, if you were like me in my early days, I had plenty of time on my hands, so I filled that free time with free portrait sessions of my couples who booked me for their wedding. It “killed two birds with one stone” as they say. First, when booking the wedding, it was a great incentive for the client to book with me because of the complimentary session worth $200, and secondly, it provided me with willing subjects for my portfolio development exercise, and increased my proficiency in portrait photography.

2. You want to get better at wedding photography too – then give the outdoor bridal session away for free too. Back in the early days, we usually planned the session after the wedding so the bride would have no concerns about the wedding gown.

We encouraged the groom to approach the tux shop and see if he could get the use of the tux for a few hours during the week – no weddings going on – and offer to pay the modest cleaning fee instead of the whole tux rental. You would be surprised how often this worked.

By the way, for flowers, we would put a little bouquet together of long stem roses with some ferns and baby’s breath. Remember, we are not trying to create wedding day images, but beautiful images of the bride and groom for a bridal portrait and additional sample images for myself.

The terrific benefits of this exercise were the finished images we produced. We were able to take these beautiful images without the time and weather constraints of the wedding day. Now it was easy and fun to produce a great set of images for our client and our own wedding portfolio. Hey, don’t forget to sell something from the session as well. I would offer the images at a special price - say 20% your regular price – that way you get to make a few bucks and recover your expenses from the shoot.

3. Still in search for clients at this point, but still need to get some images for samples. How about hiring a college student and maybe even some of her friends to be your models for a day? Offer to give them copies of images from the shoot in exchange for their time. You may even approach a wedding salon and/or tux shop and offer to do photography of their gowns and tuxes at no charge in exchange for the usage of the gowns and tux for the day.

4. Start your “brain trust” – a group of like minded photographers in your area. Collectively go out on shoots together. That way each of you will benefit from the collective ideas and expertise of the group. I did this years ago with about 3 other photographers – we are friends to this day and all operate successful studios.

5. Search out “Silent Auctions” in your community and donate a 16x20 and shooting session to the cause. This is about a $500 for us, but it results in about a $1000 average per donation.

6. Need more practice shooting families – call up friends, relatives, etc. and give it away for free again. Offer the finished images at a special price as before. It’s just one more way to get the experience you need while developing your style, building your portfolio and building your reputation in your community.

7. Use other photographer’s sites as your guide. Hey, you want to get good like the “big guys” in town, then hit their web sites and see what they are showing. Now you have a benchmark for your own work and some ides for your shooting session.

8. Search the Internet by topic – weddings, portraits, seniors, etc. for more good ideas to. I’ll give you a head start. Here are three links for weddings, family portraits, and seniors. Pick out your favorite images and try to re-create the same type of image excellence.

9. Showcase your work – make it stand out from the crowd. You can pick up some good looking frames a lot of places around the Internet. One of my favorites is Frames USA right here in Cincinnati, Ohio. They have some great looking value priced frames. Many frame shops have the “half-price” bin where you can pick up some deals. We even found some “one of a kind” frames for studio samples at Hobby Lobby. They run “½ off” sales too.

10. Use inexpensive “peel and stick” albums from Neil Enterprises – I’m talking under $20 here – for a quick presentation of your work. You will want to reserve a bigger part of the album budget for first class albums, say from Zookbinders, when you want to put your best foot forward. But, in the meantime, these “Neil” books are just the thing for quick, good looking presentations.

11. Get yourself an iPod or similar media player. Load it up with your best images, and keep it on hand all the time. That way if you find yourself in a conversation with a potential client, you can show you samples immediately.

Now armed with some great looking samples, how can we get those prospective clients knocking on our door? We will cover that in next week’s segment on marketing.

Using Your Time Wisely

I’m taking the liberty of posting a recent comment from one of my readers, Bakari Chavanu, who is trying something new out for his business. I thought it was a good idea for all the DigitalProTalk readers so I am featuring it here for everyone’s benefit.

Bakari writes,

“I thought I'd contribute something I'm trying out for my business, which has been rather slow in the last few months. Like most people who are self-employed, I've realized that it's really easy to not use my time wisely or as productively as I could.

While I get lots of work done, there are days and weeks when I let things I need to get done lag or drop by the waste side. So I've decided to start keeping a business goals and maintenance log where I list goals and actions that I need to accomplish in the area of marketing, photography skills, and personal/business growth. Every week I will fill out the log and keep track of what I'm getting done. When I come across ideas and techniques like the ones I come across on your site, I'll write them in my log, to make sure I'm getting it done.
Here's a link to the pdf copy of the log if anyone is interested.”

Thanks Bakari. Continued Success.............

And Speaking Of Success

There are all kinds of ways to “skin the cat,” the success cat that is. I saw this fascinating article on “Success” a week or so ago over at APhotoEditor and thought it had a good message about real success.

The article is entitled, “Unconventional Rules For Success.” Here is a few quick bullet points from the article. Please give it a thorough read right here - it's worth it in our too busy world we live in today.

  1. Take whatever time you need to discover what matters to you most.

  2. Don’t base your choices on others’ approval.

  3. Stay authentic.

  4. Go for meaning over money every time.

  5. Be endlessly greedy — for learning.

  6. Make a friend of failure.

  7. Make sure that every time you make a mistake, it’s a new one.

  8. Choose to spend your time with the right people.

  9. Drop whatever is inconsistent with these principles.

Hey everybody, got to run – time for me to get back to my real job again for a few days. See you tomorrow for an unforgettable “Inspiration Friday.” Be sure to tune in.... you will really enjoy it. Adios, --David

Wednesday, March 26, 2008

"Afternoon Shadows"

"Afternoon Shadows"
© David A. Ziser

I made this image while heading up the mountain for the last run yesterday. The sun was getting a little lower in the sky and was casting long shadows within the stand of Aspens. The pines in the foreground give balance to the scene. I decided on a black and white image because it wonderfully captures the subtle tonalities of the scene from the shimmering snow to the dark pines. Camera specs; Canon 40D fitted with 17-85mm lens at 81mm, F16 @ 1/640 second, ISO 400. Enjoy! --David

WayBack Machine Wednesday

Good Morning Everybody,
Well, we survived the skiing including one black diamond!! I'm still in one piece, and writing the post this morning in complete and utter pain - not really but there are a few parts of my body letting me know I should have taken it a bit easier yesterday (and applied a little sunscreen.) All in all it was a great day with my son, Aaron on the right, as our host showing us all the beautiful runs of Park City Ski Resort. I have to say the views from the sky lift and top of the mountains were unbelievable.

We head home today for just a few days before heading to Photoshop World on Sunday, so we still have a pretty hectic schedule ahead of us. Luckily no weddings this weekend so we should get a few days to recoup. Anyway enough of that, how about another installment of the "Ziser WayBack Machine." Off we go....

Ziser WayBack Machine #5

This week I'm featuring images from my very first Bar Mitzvahs. I got a call from these prospective clients 26 years ago asking if they could come over and discuss the possibility of my shooting their son, Adam's, Bar Mitzvah. I said yes and made the appointment - only one problem, I had never shot a Bar Mitzvah before in my life and had little clue as to how I was going to make a presentation to them for the job.

The evening of the appointment, I "fessed up" to my lack of experience in this field and showed them some wedding images! They loved the images and began "taking me by the hand" mentally as they assured me all would be well and they would be sure I got all the shots. It was a wonderful meeting and the beginning of a terrific friendship. The next day, I got 4 calls from their friends with upcoming Bar/Bat Mitzvahs and booked everyone one of them! Bar/Bat Mitzvahs now make up 20-30% of my business each year.


In the images you will see the influence of Monte Zucker's style. At that time I was bringing a background and studio lights with me to every event - see article below. Nobody in Cincinnati was shooting family and individual portraits on the day of the event thereby giving me the Difference advantage I discuss throughout this blog. I was getting pretty good at my posing, lighting, and candids. The coverage turned out just fine and the clients loved the images. I have stayed friends with that first Bar Mitzvah client over all of these years.

Last year, I got the call to photograph Adam's wedding. It was 24 years after I photographed his Bar Mitzvah. What an honor!! Watch the slide show below, pause it as necessary, and enjoy the images from 26 years ago and just last year of few of my same client. Enjoy! -David

Next week, I'll fast forward to the late eighties and early nineties - it should be a kick.

History of Wedding Photography - The Early Eighties and Monte Zucker

Monte Zucker (1929-2007) was honing his skills as a wedding photographer throughout the early 70's studying with Master photographer, Joe Zeltsman. Joe taught Monte the intricacies of posing and lighting which Monte took to the next level. For a peek at the Master who trained the Master, check out Joe Zeltsman Guide To Classical Portraiture right here. It is a little "blast from the past" but all 16 chapters are a wonderfully detailed course on portrait photography. Read my lips - Joe's Guide to Portraiture should not be missed!

In the mid 70's Monte was asked my Meisel Lab, one of the premier labs in the country at that time, to present his wedding philosophy and style at a series of seminars. This was the start of Monte's teaching career. From these humble beginnings he would go on to reach world class status as one of the legendary teachers on the subject of wedding/portrait photography. Please check out Monte's website which is jammed packed with 6 great articles on lighting, posing, wedding technique, and portfolio images right here. This too is a great find for anyone wishing to seek out the almost lost art of classical portrait photography.

In 1979, I was attending as many wedding photography seminars as I possibly could find the time to experience. I never worried about the expense, because this is what I had decided to pursue and knew I had to get as much education on the subject as possible. That same year, I attended a week long class with Monte which exposed me to the fine art of portrait lighting and posing.


Nobody was doing much of this on the wedding day and it became a big "differentiators" for me in my business. Still today, my Bar/Bat Mitzvah clients want a touch of the classic portrait background coverage added to their celebrations.

A Way Cool Wedding Photog Site

Hey gang, I'm wrapping today's post with a link to John Solano's website right here. John presented at the Nikon booth last week at WPPI and did an excellent job.

His images were beautiful and his "flashlight" technique was pretty cool - in fact, I purchased the flashlight he was using later that evening on-line. I'll keep you posted as to my results. Anyway, check out John's site - it is Flash, but a bit different in concept from most flash sites. I think you will enjoy it. Here is the link to John's right here.

Hey everybody, that's it for today. LaDawn and I have a plane to catch. I"ll see you back in Cincy tomorrow for [B]Business Day Thursday. See you then, -David.

Tuesday, March 25, 2008

"Easy Beauty"

"Easy Beauty"
© David A. Ziser

This image was made as part of a bridal session a few years ago. You are looking at the image as it was taken with no Photoshop enhancement whatsoever. The illumination was created with my off camera Quantum flash shooting through a umbrella to soften the light and give me the direction of light I wanted. I then adjusted the exposure to pick up the ambient light in the room for a really nice result. Camera specs; Nikon D1x fitted with an 18-35mm Nikkor lens set to 18mm, F5.6 @ 1/50 second, ISO 400. Enjoy! -David

Technique Tuesday - All Day!

Good Morning Everybody,
I am feverishly trying to fit this post in today, before LaDawn grabs me by the ear and drags me off to slopes of Park City for a day of skiing. She just doesn't realize how much I want to spend the whole day with you, my dear readers ;~). All kidding aside, we are heading out in a matter of minutes so let's get right to it.

Technique Tuesday - Specular vs. Diffuse Reflections

Hey everybody, let me start by saying thanks for the "Rave" reviews for my Lighting Class over at Kelby Training! As with anything though they are always questions that arise from the viewers. Today I want to discuss "Specular" vs. "Diffuse" reflections. In the first lesson the question was raised about my remarks regarding how the size of the light source affects the specularity on the skin.

Here is an excerpt from the question I received, "I was a little confused on one thing. David seems to be making the point that the size of the light source will affect the degree to specular reflection on the skin. ... I read “Light: Science and Magic” a few months ago, and my understanding is that reflections or glare on the skin like this is more a function of the texture of the skin rather than the size of the light source. The size of the light source will affect the harshness or softness of the shadows, but skin glare is something you can control only though the angle of incidence, polarization (of the light source or a filter on the lens), or changing the degree to which the surface diffuses the reflection (i.e. powder makeup, etc.). ... I’m just not seeing how the size of the light source would control the amount of glare coming off the brides face."

OK, here we go and hang on as it might at first seem a bit complicated ----

Light: Science and Magic: is a great book - I own it myself, but we need to look beyond the absolutes of "angle of incidence" = "angle of reflectance". Sure it's true, but a person's face is composed of what I call a bunch of "micro surfaces" all oriented in a different direction. That's why things like make up cut the shininess of the skin. It's an application of even more "micros-surfaces" - so small in fact that there seems to be no shininess at all, but under a microscope, you would see the same behavior. So what we are discussing here is truly a diffused highlight as opposed to a specular highlight.

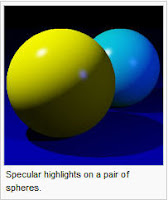
So now let's define a diffused highlight. It's a highlight that when a beam of light hits the diffused surface, the beam is reflected off into any number of directions randomly. Point a flashlight at a white board at any angle and you always get a diffused light return. Sure the shape of the light pattern is different as you rotate through the angles of incidence, but the angle of reflectance is still random because of the orientation of the "micro-surfaces."

Now let's discuss "Specular" reflections. Do the same experiment, but this time point the flashlight at a mirror. Notice that now you can see the reflection of the flash light quite plainly as you move through the angles of incidence. It is only when you are perpendicular with the mirror surface that we get nearly complete return of the light to our eyes - read that as specular return on the subject's face.

What we are trying to accomplish in our portrait lighting technique is bring the density of the "specular" highlight more in line - density wise - with the diffuse" highlight. In other words, we want detail in the speculars. Maybe this is where I wasn't clear in my video tutorial. Please read on. So how can we do this? It's simple, by using a larger light source and by bringing it closer to the subject.

But how does a larger light source reduce specularity? Let's do a little "mind exercise". Suppose you had a mirror 8x8 feet large in a room (our specular surface) and at the bottom right hand corner of the mirror was a white card (our diffuse surface.) Next I want to illuminate that surface with a light source. I choose my 200 W.S. Quantum, pointed directly at the mirror going through a 1x1 foot or a 1 square foot soft-box and I fire away.

Now let's take a spot meter reading of the 1 square foot hot spot on the mirror. For the sake of discussion, let's say it meters F64. Now do the same for the white card. Remember, the white card is giving us a much less efficient return to the meter since the light is being spread in all directions by those randomly oriented "micro-surfaces". Hence, the meter reading from the card will be substantially less - let's say F8.

OK, this is where it's gets a bit trickier. Now, lets say I manage to increase the size of my soft-box to 2x2 feet or a 4 square feet area. Now lets fire the strobe and take our measurement. The still intense specular reflection for the strobe would be what? It's easy the calculate - we have the same amount of light (200 W.S.) spread over 4x the area so the intensity has to measure 1/4 the original reading or two stops less - F32. The white card on the other hand still sees 200W.S of light and gives us F8.

Now, let's do this exercise one more time. Let's increase the size of our 200W.S. light box to 4x4 feet or 16 square feet of area. Let's fire away again and take our measurements. What do we get? Using the same reasoning as before we can easily calculate the new "brightness level" of our 16 square foot light source will be diminished by another 2 stops or now reading F16. What's our card read - still F8 - since it is still seeing 200W.S. of light.

So what's happening here is that the larger light source, as it spreads out over the specular surface is being reduced proportionally as it's size increases. Conclusion - the larger the light source relative to the subject reduces the intensity of the specularity in a very controllable fashion. In fact, the ratio of "specular" to "diffuse" highlight can be controlled to a point of maintaining detail in the specular highlight. Pretty cool, when you understand the concept and know that we have a lot of control over our finished image.

I learned this from my friend Dean Collins in 1983 when I took a very informative week long class from him. It's for this reason that I choose large light sources most of the time for my wedding images. It all goes back to Dean's explanation of the "specular" vs. "diffuse" highlights. I did a quick "google" search on Dean Collins and specular highlights and come up with this very thorough article over at the Strobist site discussing the same concepts with a slightly different perspective. It's well illustrated and really worth the read - lot's more good info there. Here is the Stobist link.

I hope this explains my comment on the tutorial and again, thanks for watching.

This Is How It's Supposed To Look In Lightroom

OK, you gave it your best shot, you followed all the rules, you used all the best plug-ins out there, you referenced every book out there on color correction and your image still doesn't look right. It's just not how you remember it. It's just TOO neutral - so what do you do?

Boy, I just witnessed this first hand recently when we were recruiting and eventually hired a new digital tech in my studio. We interviewed 4 candidates, and then selected three for our "digital try-outs." Jen, my studio manager, selected about 20 images with colors all over the place - some in tungsten lighting, mixed lighting, daylight - a real challenge for our candidates.

We reviewed the images and what was apparent to me was the fact that most of the candidates were going for that perfectly neutral color without regard to the setting and feel of the image. I like my ceremony images to be slightly warm to reflect the surrounds of the church, for instance. The same is true if I drag the shutter in a church or a nice hotel where I pick up the ambient light too. The warm ambient needs to be reflected in the final image. That is to say - I don't want my result to be a perfectly neutral in color density images lacking the ambiance of the scene.

What I'm trying to say.... is that the final result is a subjective conclusion from the person doing the color correction. And that subjective solution must be based on the setting, the scene, and the subject matter. That all being said, check out the tutorial from George Jardine entitled, "Lightroom - Subjective Color Correction" - links below.

In this tutorial he outlines the basics of color correction, in a situation where the color and density of the photograph are wide open to interpretation.
This tutorial can be downloaded from George's iDisk right here. This podcast is labeled “20080224 Tutorial Podcast - Subjective Color Correction” in the Public directory. Or, you can find it on iTunes by searching under Podcasts for “Lightroom”. The RSS feed is right here.

Fun With Joe McNally

Here is a quick hit for you. The world famous photographer and best selling author, Joe McNally, has a great post over on his new blog entitled, "Fun With Lights" Check it out right here - it's a nice read.

Hey gang, that's about it for today. Those "double diamonds" are calling (but not to me - I'm more of a true blue skier.) I'll see you tomorrow, assuming I am still fully intact. Have a great one! --David

Monday, March 24, 2008

"Morning Glory"

"Morning Glory"
© David A. Ziser


I created this image while hiking through the Valley of Fire. This National Park is a magnificently beautiful locale just 45 minutes outside Las Vegas. LaDawn and I head there every year because of the shear beauty of this geographic wonder in the middle of the desert. This is actually a mid afternoon shot of some spring wildflowers taken from an extremely low perspective. My camera was just inches off the ground giving the vantage point of the flowers reaching to the sky. The wide angle lens accentuated the effect. The contrasting colors of the wildflowers framed by the red sandstone and against the blue sky makes for a very pleasing composition. Camera specs; Canon 40D fitted with 10-22mm lens at 10mm, F14 @ 1/500 second, ISO 400. Enjoy! -David

Monday Morning Musings

Good Morning Everybody,
Well, last week – Las Vegas and this week – Park City, Utah. Yep, we jumped on a plane late Easter Sunday morning heading to Utah and arrived into Park City around 4 p. m. We are stopping by to visit with my son, Aaron, for a few days before heading back to the Kentucky side of Cincinnati on Wednesday. So the posts from today through Wednesday will be coming at you from about 8000 feet - so on with Monday Morning Musings…

Hangin’ With Three Famous Dudes

On the last day of the WPPI trade show, I ran into my buddy Gary Fong of LightSphere fame. Gary was there signing his new book – Snaps. It’s kind of a history of his success in the business over these past several years. Gary started just like a lot of us in the wedding business, but with his talent, smarts, and a few breaks along the way, he has had a very successful career – actually about 3 careers so far in is life. One of the best pieces of advice I was ever given was, "If you want to be successful, hang with successful people and copy what they do. And, if you can't hang with them at least find out what they do - via books, tapes, seminars, etc. and copy it." If you want a peek into how Gary achieved his successes, check Snaps out at his website right here – a very interesting read.

And speaking of successful dudes, we had a wonderful dinner with Ron Nichols and his beautiful wife Carol. Ron was presenting his Photoshop Retouching Palette at the WPPI convention – very handy, by the way for the Wedding/Portrait photog – it automates the retouching chores very nicely. You can learn more info on it right here. Also joining us for dinner was Peter Howlett and his wife Fran – two of the nicest people in the world. Peter is the genius behind ProSelect software, rapidly becoming the de-facto standard for wedding/portrait studios wanting the best solution out there for editing, presenting, selling, and tracking your studio sales. I’m working as one of the beta testers for ProSelect so I'll keep you posted as things proceed. That's a picture of all six of us spending the day in the Valley of Fire right outside Las Vegas earlier in the day.

Also joining us for dinner was Jerry Ghionis from Australia. Jerry is a phenomenal photographer from down under - he is considered to be one of the top ten wedding shooters in the world. It was truly a pleasure to meet he and his wife Georgina. Jerry operates two very successful studios and is looking to open a third “Signature” studio upon his return. I have to say, he struck me as a sharp guy who knows what he's doing. Did I mention that his work is “knock–out” gorgeous, too. Check out his new website at right here. He is a wedding photog you will want to keep your eyes on.

Who’s Got My Monkey – I Mean Munki

I almost forgot to mention this last week, but it was one of the hot topics at the show. Several of the presenters mentioned it from stage and it had good buzz in the trade show. Here is their quick blurb about the ColorMunki product -

The ColorMunki was designed for the digital work flow of social, wedding and portrait photographers -- or anyone passionate about photography -- ColorMunki Photo delivers an easy, quick and affordable solution for matching colors from display-to-print. It was developed with professional photographers input, ColorMunki Photo is a completely integrated, versatile solution that calibrates displays, projectors and printers, measures ambient light and captures spot colors. ColorMunki Photo gives photographers ultimate color control for their images.

You can read the complete press release over at ImagingInsider right here. Also, check out ColorMunki.com right here for all their info. The word around the show was “Amazing.” Check it out.

Hot Off The Presses – DataRescue Release Latest Upgrade Of PhotoRescue 3.1

If you do not have this piece of software in your data recovery toolbox, get it in there today. I’ve been using PhotoRescue since it was introduce more than 7 years ago, Read my lips – “It is the absolute best solution out there for data recovery from corrupted, formatted, or otherwise unreadable flash cards." It has brought a few of my cards back from the dead, and saved the day for some of my friends to whom I recommended the software. Hey, for a lousy $29, you can’t go wrong. Check out and buy PhotoRescue 3.1 right here. It’s a Ziser “Top Choice” pick.

Panorama Photographs - The Final Word

Hey gang, if you are a fan of Panorama photography like me, you need to check this out over at Jim Goldstein's JMG - Galleries site. Jim runs a great site that is always jammed pack with information. He has done it again with his "EXIF and Beyond: Mastering Digital Panoramic Photography" right here.

Jim's topics include an introduction to the technique, best practices, pitfalls, alternative methods, computer & software tips, and creative vision. Jim's information packed episode will put you on track to master this challenging photographic technique in roughly (30) thirty minutes. The article is complete with detailed info on the process, 12 links with even more info on the subject, and links to the iPod download as well. One stop shopping for Panorama info.

Hey gang, that's it for me today. We are heading out to check out the sites and sounds of Park City today. See everybody tomorrow for Technique Tuesday. --David

Friday, March 21, 2008

"Beach Walk"

"Beach Walk"
© David A. Ziser

I made this image after a photo shoot with a client. We were just heading back to the car and the last evening glow was just starting to leave the scene. I made this as one of the last exposures of our visit to the beach. I love the line the rail gives to the composition leading right to the sea. The textures of the weathered walkway against the enhanced evening colors complete the image. As you view the image, it seems to draw you into the tranquility of the scene where you just want to rest a while and enjoy the last of the evening light. Camera specs; Canon 40D fitted with 10-22mm lens at 22mm, F5.6 @ 1/50 second, ISO 400. Enjoy! -David

Inspiration Friday

Good Morning Everybody,
It was really great having a little R&R yesterday. We headed out to Lake Las Vegas. Andrea Bocelli did a concert there last year - it's a cool place to visit and have lunch - quiet, peaceful, colorful it just makes for a nice day trip from the hustle and bustle of the "Strip". Today we are planning another easy day and heading up to Mt. Charleston. We will start the trip in desert surrounds and end up at about 8500 feet in the snow covered terrain of the mountain.
It's another beautiful day trip out of the city. Coming down from the mountain presents the viewer with one of the most beautiful views of the desert one will ever see - it is fabulous. So LaDawn and I are looking for some inspiring scenery on this "Inspiration Friday." Hopefully, I get a shot or two to share with you on Monday.

Hot News - Right Off The Presses - Ziser Goes Live

My first training series went live this past Thursday - yesterday. Scott Kelby just announced it on his blog today - here is the link. Ken from Lexington just posted to my blog his "review" of my new training video. Here is what he said, "I wanted to report I just watched 2 segments of your training at Kelby Training. WOW, Outstanding. Having attended your Master Class last year, I must say, this training will go down as one the best on Kelby Training."

Charity also had this to say, "This is another "thank you" vote for your training series on Kelby. I just watched it and was so thrilled..." Hey Ken and Charity, thanks for the "high-fives" on the training. I tried to make that video just "chocked full" of lighting info and techniques helpful not just to the wedding/portrait shooter, but for anyone wanting to make better photographs with their digital cameras. Check it out over at Kelby Training.com right here.

FYI: My Summer Master Class is scheduled for July 7-11. Call the Studio for more information and to reserve your space. 800.292.2994

And Speaking Of Creativity - How About Fun With Smoke

Don't try this in a New York City restaurant with their no smoking rule - but it would be cool to try at home. I always been intrigued by the guys and girls that experiment with smoke photographs. The random designs are always interesting and simply beautiful to me. Rick, better known as "CheekyBikerBoy" over at Flickr has a great series of images he produced. The really cool thing is that he gives you an in depth tutorial on just how to do it. I have to say, it is a thorough and informative piece. Give Rick's smoke pics a peek right here.

Hey, let's take it a step further. I ran one of Rick's images through one of my Photoshop actions which does a "mirror image" flip of the image. I flipped it once, rotated it 90 degrees and flipped a second time to get this final result - kind of cool - I call it "Jaws. Let's do it one more time. Check out the original smaller image and then my result after the flips - a very cool design. So keep playing!!

3 Things Ways To Improve Your Business From Lessons Life Can Teach You.

There is some really inspirational articles over at the "Dumb Little Man" website. They cover ways to save you money, increase your productivity, or simply keep you sane. I've taken the first three suggestions of one of their articles and adapted it for photographers and to the profession of photography. Here we go.

You must create and look for opportunities:
We must constantly do this in our business. Those opportunities can occur anywhere as simple as a random meeting of people. I once booked a wedding and portrait with a client I met on a flight back to Cincinnati. Create you own opportunities by doing the thinking for your clients. Make suggestions how your services can benefit them - think outside the box. It might be more than a portrait you suggest - what about B&W images in a special or unique presentation. How about "stylizing" the image in Photoshop to give it a different look. Be enthusiastic with your suggestions and your solutions.

Negativity will only bring more of it:
I just had dinner with friends the other evening and we were discussing photographers and how they interact with their clients. My friend was telling me about a couple who was always bickering with each other while on the job. They had actually created a reputation for this behavior throughout the community. Is this lame or what?! My good buddy, Don Blair - God rest his soul - never had a bad word for anybody - ever!
While giving a program in Florida, he was watching a news report from Salt Lake City showing a scene where a car had crashed into a photo studio and eventually exploded. The driver survived but the studio, it's interior, and all it negatives were destroyed. It was Don's own studio he was witnessing. I never heard him utter a negative comment about that horrific experience. Sure he was affected by it, but he and his family rebuilt everything and the studio continues to be successful today. Don, who was in his 70's at the time, went on to create some of his most exciting images of his career after the fire.

Where you are does not determine where you can go:
This speaks perfectly to yesterday's post. Being smart, rich, energetic, etc. does not guarantee success. We have to constantly be moving in the direction we want for ourselves. Sitting on the sidelines "resting on our laurels" will never get us anywhere. I like to say, "Sometimes, we have to get out of our own way to get what we want out of life."

Hey gang, that's it for today. LaDawn and I are heading for the mountains. Have a great weekend and if you are planning to be gambling with and any pixels - remember, fold the "raws" and hold the "jpegs" :~) See you next week. --David

Thursday, March 20, 2008

"Morning Reflections"

"Morning Reflections"
© David A. Ziser

This image was made looking out our hotel window. Each morning the the early light hits the glass on the opposite building and gives a wonderful display of warm colors. The close crop gave me the abstract patterns and colors I wanted. Camera specs: Canon 40D fitted with 17-85mm lens at 85mm, F7.1 @ 1/125 second, ISO 1600. Enjoy! -David

[B]Business Day Thursday

Good Morning Everyone,
Hey, it's still morning here in Las Vegas anyway. Well, WPPI wrapped yesterday and was their biggest convention ever. The numbers I heard being tossed around were over 11,000 attendees! That is quite a crowd of photographers and vendors. What I love about this convention are the photogs - everyone I met is excited to be there and excited to pick up as much as they can from the programs. It is a learning fest par excellence for 5 days out here. In addition, you get to visit about 350 vendors all showing their latest, greatest wears. Always good stuff to see - maybe even some things that can help you make a bit more money - duh! Read my "Hot Spots" section below for more info.

Alright, let get right to it. You are running your business, you want to be a better photographer, you want to have a more successful business. Then give the first article - "What It Takes To Be Great" a read.

What's It Take To Be Great?

This is always a hot topic in books, seminars, and presentations world wide. But how often do we consider applying it to ourselves. Most of us are content to move through life doing our job, working at our business - basically doing the same thing day after day. We don't have time to work on being great. Yet, the biggest complaint I hear from photographers as I travel around the country is that business is down. Uncle Harry and Cousin Mary is taking all their business - and on , and on, and on. It's the "moan and groan" drone.

Folks, maybe it's time we started thinking about getting great and being great at what we are doing. Guess what, when you make that kind of mental commitment to yourself and your business, the "moan and groan" drone will eventually disappear. But you have got to want greatness before you can ever get it. "Wanting it" are the operative words here. Those who want to be great have a better chance at getting there than those who only want to be good, and those that want to be good may end up a bit less than that.

I was reading the March 10th issue on Time magazine a few weeks ago. The article was focusing on the "experience factor" of our current presidential candidates - how much experience does one need to be persistent. Well, it was the side bar piece - The Science Of Experience - that caught my attention. The topic was partly on athletic performance - what does it take to be great? Here is an except from the article;

"Take figure-skating as an example. For the 2003 book Expert Performance in Sports, researchers Janice Deakin and Stephen Cobley observed 24 figure skaters as they practiced. Deakin and Cobley asked the skaters to complete diaries about their practice habits. The researchers found that élite skaters spent 68% of their sessions practicing jumps which is one of the riskiest and most demanding parts of figure-skating routines. Skaters in the second tier, who were just as experienced in terms of years, spent only 48% of their time on jumps, and they rested or took breaks more often. As Deakin and her colleagues write in the Cambridge Handbook, "All skaters spent considerably more time practicing jumps that already existed in their repertoire and less time on jumps they were attempting to learn." In other words, we like to practice what we know, stretching out in the warm bath of familiarity rather than stretching our skills. Those who overcome that tendency are the real high performers."

Folks, I think this little tidbit of information gives a good insight into what it takes to be great in whatever we want to achieve in our lives. Practice the hard stuff, it's the second tier performers that spend too much time practicing the easy or routine stuff, within their comfort zone, that they are already good at achieving.

When it comes to photography - practice the hard stuff. Get your camera off "P" for Professional!! Try and practice some lighting techniques you have never tried before. Learn and practice different ways of photographing the bride and groom. Try different or unconventional light sources. I watched a presentation by John Solano at the Nikon booth, showing how he uses a flashlight to add a cool touch of impact to his images. I bought one that evening on-line and can't wait to give it a try. And why not? I might find that I love the results!! Or even more exciting I might find a new way to use this tool, just from practicing. We constantly need to be practicing the hard stuff and more importantly, seeking out the new and the hard stuff to practice.

As we amp up our experience and expertise, the success will follow. Remember too, there are no excuses for failing, only reasons for trying again and even harder the next time around. Then when you get it down, amp it up to the next level of difficulty. Keep the journey uphill..... ALL the time. This strategy will continually help you surpass your own expectations and stay on the pathway of being great. It is the only way to ever get there. You know , it's easy to be the best - you just work a lot harder than the competition. You know the upside of his strategy is that even if you falter occasionally, you are still much better off than where you were before ever trying.

Tiger Woods just won his fifth tournament in a row last weekend. Do you think he's taking this week off before he heads to the Doral? We all know the answer to that one. No one has said it better than Nike.....Just do it!!

Hot Spots In The Trade Show

Hey, it was a super big trade show - and sure there were a gazillion album companies available to view - some even from the far east - all showing some cool cover designs, various sizes and a myriad of products. Even the labs were getting into the act offering what they call their "print to bind" services - i.e. You send the images to the lab, they print them up and bind them into your choice of album - all for one low price. When the labs started offering the service just as Zookbinders, my favorite album company, is also jumping into the lab business and started offering the same service. What do they call that today - convergence. I guess it's happening across all types of industries.

Anyway, the first of four vendors that impressed me with their products was Tamron, who was showing their first VC - Vibration Compensating lens. Yes, we are quickly running out of acronyms for these kind of lenses. It was a 28-300mm lens and is quite compact. It was cool to point it at something across the room and see it instantly lock into both focus and stabilization. The image looked rock solid - no shake - as I looked through the viewfinder. It was so good in fact, that at one point I even released the camera and it held firmly to the scene suspended in mid air!!! OK, just kidding here, but it still was really,really impressive.

Athentech was showing a beta of their stand alone "Perfectly Clear" technology. This is cool stuff to enhance your work flow. The perfectly clear technology has been incorporated in some other software as an example Bibble, but this is their first endeavor offering it separately as a stand alone product. So what's it do?? How about you point it at a folder where last weekend's wedding images are sitting - raw or jpeg - press "play" - metaphorically speaking, and Perfectly Clear kicks into gear and color corrects and density adjusts each image improving color, luminance, shadow detail, sharpness, just to name a few. It looks amazing. I'm going to be hooked up as a beta tester and can't wait to give you the low down on how it all works. I'm really fired up about this one!!

The folks over at Jainco Tech were promoting their Quality, Performance, Productivity solution whereby you, the photographer, send them all your images from a job, like a wedding, and they will do all the color correcting, density adjustments and edit. Each image is reviewed, accurately adjusted, saved separately and then sent back to you on one of those little mini hard drives. How much does this service cost? This is the part that caught my eye - how about $.13 an image! Pretty darn reasonable. They will even give you 75% off your first order. I'm sending them a wedding just to see how well they do. Expect about a two week turn around time. I'll keep you posted on the results and my impressions.

The fourth vendor - Tafota.com - was showing easy to design, update, and post websites. Its main promise to the user is it's "ease of use" unique design, end user updating of their own site. This has always been the big headache - keeping our sites fresh and new. Tafota makes it really easy to change design, color schemes, layout, images - anything you need to keep potential clients coming back to your site. It's a new company, but they struck me as really committed to offering the best costumer service available. Anyway, check them out and see what you think.

Folks, that about it for the show report, so hit the links for more info. I'll keep you posted with any new info in the next several weeks as things develop.

Hey gang, that's going to it for today. LaDawn and I are planning to spend a little time relaxing today and possibly hit the desert. But, don't worry, I'll be back in time for tomorrows post. See you then. --David

"Looking Up In Las Vegas"

"Looking Up In Las Vegas"
© David A. Ziser

LaDawn and I were just relaxing on the patio of our hotel at the end of the evening. I leaned backwards over my lounge chair and was taken by the very cool symmetry of the building. Needless to say I grabbed the camera and took the photograph. The upside down perspective adds to the interest of the image for me. The late evening illumination added to the unusual color and softness of the light. Camera specs; Canon 40D fitted with 17-85mm lens at 17mm, F4.0 @ 1/8 second, ISO 1600. Enjoy! -David

Way Back Machine Wednesday

Good Morning Everybody,
Man, it was a busy day yesterday with this very busy convention going on and my morning program yesterday. After the trade show closed we headed to a private cocktail party hosted by Zookbinders, my favorite album company. Mark Zucker, the owner throws this nice party for staff, customers, and business partners every year at the WPPI convention.

It is always a good time as you can see from the photography. Once the guitar player started Neil Diamond's "Sweet Caroline", the 80's music fan club jumped up, grabbed the mic, and sang along in earnest. From left to right, that's LaDawn - a big fan of Neil Diamond, Robin Gross - our friend from GNP Frames, and the man himself, our host, Mark Zucker. Turns out Mark is quite a musician and plays drums occasionally with a group in Chicago. A wonderful opportunity to visit with the Zookbinders Team, visit with friends, eat a little Mexican, enjoy the music....just a great late afternoon celebration. THANKS Mark!

Engagement Sessions 80's Style

On with the Ziser Way Back Machine - this week it's portraits - engagement portraits. Free engagement portraits for my clients were a way for me to practice my technique. I had free models - my brides and grooms - and even sold a picture or two. Hit the play button to see the images. Clicking on them will take you to Picasa where you can view each one at your leisure.

Here is the point - I gave it away for free to practice. What better way to improve your photography!! I had at my availability willing subjects who are excited with your photography and willing to give you their time to help you get better at what you do. The couple didn't know that was what they were doing, they just thought it was a free session of photography before their wedding. It was a match made in heaven. I leaned how to see the light - well, almost as your see in these images - but I was getting closer. These images were made as part of one of those sessions. I've included a few images from another session as well so you could get the feel for the style of my imagery at the time. Also notice the few wedding images in the mix. Read on to see how they figured in the collection.

Wait, it gets better!! Just as many photographers do today, I needed a way to get the word out about David A. Ziser Photography in those early years. So I made these portraits of the couple, added copies of their "growing up" photos to the grouping, sequenced everything into a nice order, dropped them into my Kodak Carousel slide trays, added current trendy music and presented a slide show of the images at the wedding reception. We called it our "Reflections" show. It was a very successful way to build my business as the slide show presentation was presented to hundreds of guests.

Wait, it still gets better!! Around 1983, Polaroid came out with it's instant slide film - that's right, slide film that processed in a few minutes. During the course of the wedding, I would shoot about 20 images throughout the wedding day taking images starting at the bride's home and finishing up with one or two Polaroid images at the reception. We would process those images at the reception, mount them into slide mounts, and drop them into the slide trays. The A/V program tape included cues for the added images, so the show included titling, the "growing up" images, my engagement portrait session, and some actual images from the wedding day.

We would set up the two projectors at the wedding reception, hook up the sound system. And at the appropriate time, I would give the bride and groom the best seat in the house, usually centered together on the dance floor, with their moms and dads. I would then, with the couples permission in advance, get a live mic from the band or DJ, and make an announcement introducing myself, mentioning the the wonderful occasion, and then how the bride and groom would like to thank everyone for being there celebrating their wonderful day with this short little presentation. On that note, I would hit "Play" on the tape player and start the show. Needless to say it was extremely well received everybody loved it. Tears of love and joy would be shed by friends and families!! The bookings started picking up.

David Jay mentioned doing slide shows at weddings as a marketing tool in his Professional Photographers of Ohio presentation a few weeks ago - he's right, it works. And, it's a lot easier to do today than it was in 1983. The wedding reception slide show worked great in escalating my business in 1983. This same idea is working even today and will give yours a great boost too if you want to make the effort. Hey remember, it's easy being the best - just work a lot harder than the next guy or girl. Hope you enjoyed the Way Back Machine today. Next week - a Bar Mitzvah I photographed in 1983 and the wedding of that same young man I photographed just last year - I think you will enjoy it.