
Good Morning Everybody,
We arrived safe and sound after a short and uneventful 4 hour drive from Palm Springs to Phoenix yesterday. During the drive we continued to listen to the Steve Jobs bio. He’s about 30 now, worth about 250 million from Apple going public and just threw himself a birthday party for 1,000 of his closest friends. Oh, and he’s about to be ousted by John Scully and the Apple board. Like I said yesterday, a very fascinating story. Anyway, the listen sure makes the driving time go by quickly.

Anyway, that’s the latest update on our travels, how about we get on with this week’s episode of Technique Tuesday.
Light Bending, Pixel Pushing, Sync Cheating Lighting!
I’m a BIG fan of “cheating the sync” on my DSLR. Maybe it goes back to the film days when I was shooting Hasselblads. The medium format Hasselblad had the ability to sync up to 1/500 second and that gave us Hassy shooters the ability to really work the light outdoors especially when using flash. That 1/500 second let us create some gorgeous sunset images because of the that fast sync speed.
Check out the three images below made years ago on my Hasselblad as I increased the sync speed from 1/30 second all the way up to 1/500 second and in about 45 seconds. What a difference the faster shutter speed makes in adding a dramatic feel to the image.


The only thing I had difficulty adjusting to was the rectangular format. Hassys shot square format. Nevertheless, I did enjoy that faster sync speed.
As the cameras “improved” the sync speed was reduced to about 1/250 second for most of the camera manufacturers. Now it became a “pain in the neck” to achieve the same results I was getting at my faster sync speeds. What was a photographer to do? It was time to live dangerously, throw caution to the wind, totally disregard what the camera manuals said about the “native 1/250 second sync speed” and kick things up a notch!


Cheating the sync gives you a brand new way to control your light on the scene. It gives you wonderful control on how you light your subject. Now it’s easy to create a much more dramatic look to your images with your new found understanding of how to cheat the sync on your camera.
All kidding aside, it’s a great way to stretch the boundaries of photographic possibilities and easily create images that would have required a lot more equipment and a lot more time to produce.
Why not hit the PLAY button below and enjoy the show. I think you’ll really enjoy this week’s lighting tutorial and get a real “kick” out of the results when you see them.
It’s not “brain surgery” or “rocket science”. It’s just a cool way to get a really nice visual result. Come on, walk on the wild side with me and check it out ;~)______________________________________________________
Hey gang, that’s it for me today. We are heading out shortly for my meeting and then it’s on to Sedona, AZ. I’ll plan to see you tomorrow for another episode of the “How Small Things Can Make A Big Difference”.
Have a great day, I hope to see you then, David


 There are two kinds of Fisheye lens, those that make the circle fisheye like the lens Sigma's 10mm for full frame 35mm and their 4.5mm fisheye for APS sensors just introduced last week and the cropped Fisheye's made by Canon, Nikon, and Hasselblad. The Sigma's circular fisheye lenses shows a 180 degree field of view around the entire image area while the other version shows the 180 degree field of view just from corner to corner. Nikon used to make a
  I own Sigma's 10mm circular fisheye for a full frame 35mm camera and really enjoy using it on my ASP sized sensors on my Canon 40D. The effect is still quite dramatic in the right situation. If the subject matter has "curvy" lines, I think the fisheye effect adds to the "dramatics" of the images like this image of the Netherland ballroom below.
 Check out these last two images - where they made with a fisheye lens - you can't really tell, can you. That's because I kept the horizon line in the center of the viewfinder and the subjects near the center of the frame. The rest of the subject matter had no point of reference from a distortion point of view so "appears" not to be distorted in the image - hence, the extremely wide angle shot without the "Fisheye" distortion.
 The fisheye lenses today sure don't break the bank like in the Hassy days, so they can be part of your equipment arsenal should you want a very different look to your photography. Give it a try - It opens up a entire new world of shooting possibilities. That's it for today, Gang, we are off for a day of sun and fun over at the


 Before I attached the flash to the stand, I set up some flash custom functions via the 40D. This is easily done by scrolling to "Flash Control" -> "External flash C.Fn. setting -> "3.External Metering: Manual" - see Diagrams.
  Next, disable the auto "Power Off" function C.Fn. 1 - here is the screen grab.
 I planned to shoot at ISO 400, so after testing, I settled on 1/4 power manual on the 590EX II flash. The back light was supplied by my Quantum T5d flash also triggered by the FreeWire radio. I just adjusted it to an output that just illuminated the background slightly - 1/64th power. For a higher key effect, I "goosed" the power to 1/32 or 1/16th power. That was about it.
 What’s the easiest and fastest way to do get a great result? It’s not just getting the light behind them, but how you get the right behind them.
 We could get into the “physics” of light here, a concept called “refraction”, but that’s beyond the scope of this article, so let’s skip it. Let’s just say that the light needs to be far enough behind the subject so that the light will gently wrap around the subjects.
 The next image is one of my favorites – the slower shutter speed picked up the dappling of the light as it fell on the bride’s gown. The groom dipped at at just the right moment and I got a great shot.
  The following image is another nice result we got when we asked the bride and groom to pause for just an instant as they came out of the church. In this case my assistant was much closer to the couple and as a result the light splashed off of them and added some illumination to the arch of the cathedral doors highlighting the couple even more.
  Sometimes, back-lighting is just a “kiss” a light on the veil to create some separation from the background. The following image was illuminated with my “shoot-
 Here are a few variations on a theme from the back-lit dance shot at the wedding reception. Look at the next image. See how the light bounced off the groom's shirt and illuminated the bride’s face – I love it.
 As you can see, there are so many possibilities to really get some great images. Now use your own imagination, add gels, smoke, whatever your heart desires to tingle those brain waves and
  Next I "enabled" the "Highlight Tone Priority" feature on the MarkIII, had the bride step out of the shadows into the sunlight again as I continued to shoot away. Check out the second image - the exposure is just about "nailed". Look at the histogram - it's right where it needs to be.
 Now look at the third - full length - and fourth - close-up - images. Look how the dress detail is preserved beautifully with the the "Highlight Tone Priority" feature enabled - Amazing!!!
 So just how far can you go before you go beyond the range of this "safety net" feature? I'd say about one stop. Take a look at the fifth image, which I published in my newsletter a few months ago. the difference between exposures was one stop. The overexposed photograph was still saved by the "Highlight Tone Priority" feature.
  Imaging Resource had a brief discussion on
  This basically created a new light source with a very narrow beam of light. The "tricky" part was getting the "snoot" light pointed properly to create the "Hollywood" lighting pattern I wanted on my bride's face. My "Hollywood" lighting pattern is simply a variation of the classical "Rembrandt" lighting that artists and photographers have been using for years.

 This first one was shot with a single on-camera flash. Look how ordinary it looks. It's "blasting" right into the face. Because of the smallness of the flash head, it creates substantial and unflattering specular highlights on the subject's forehead, cheeks, nose and chin . Good morning, Uncle Harry and Aunt Mary - this is how the bulk of new photographers are lighting their subjects. Not bad for the occasional family snap, but not acceptable for the professional or "want-to-be-professional" wedding photographer.
 You might say, Hey Dave, look, no more "specular" highlights". You would be right there, but look at the brand new "raccoon eye sockets" we created on our bride's face - again, not flattering. I call this "office lighting."
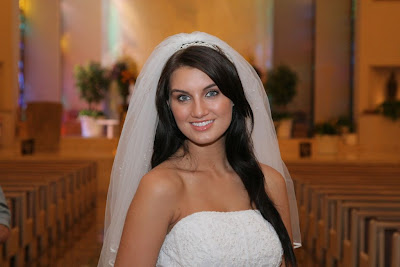 You might be inclined to say - WOW! that's a lot better, I can see her eyes again. Yes, that's true, but notice that the specularity has returned. Granted, there are flash attachments out there that are basically larger "fill flaps". My buddy Gary Fong makes one that is quite good, in fact I occasionally send my second shooter off to use his original "Lightsphere" in some "Cocktail Candid" situations. A larger light source reduces the "specularity" - it basically puts non-directional fashion lighting on the subject. Another name for this lighting is "Butterfly" lighting. This might be good for the fashion model. But my brides, while incredibly beautiful, are not typically fashion models.
