Good Morning Everybody,
Yesterday's shoot went great. We got some beautiful images at the Marriott in the morning and then headed to the magnificent Mother Of God Church for the afternoon shooting session. I mentioned earlier that for the first time at my workshops, I was going to let the class break down into smaller groups and work through the various locations in the church to see what they could put into practice what they actually learned and also what they individually could come up with. I was a bit hesitant, but the class feedback was overwhelmingly positive for the experience. Count me wrong on that one as I felt the class might feel uncomfortable shooting in front of each other. Yes, we will do it again at my Fall Master Class in September.
One subject that came up during the shoot was " How do you control the brightness of stain glass windows while still preserving the detail in the rest of the church?" This is an excellent question, because in the old days of film, we would just send it to the lab, order a custom burned and dodged print, write a out a big check, and be pretty happy campers (except for the cost of the print.
When we get into this situation, I call it wrestling with the light. What do you want to give up, the rich color of the stain glass windows by adding more exposure for the background detail? Or would you prefer to keep the richness of the windows and let the detail suffer. Well gang, in our wonderful digital age, we can have it all!
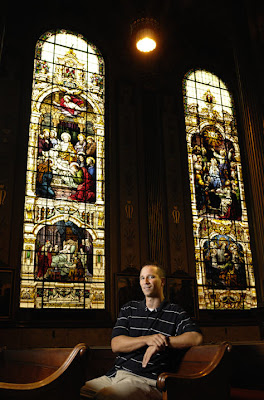
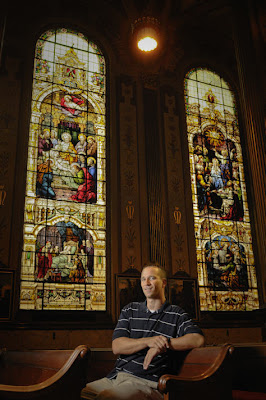
 Check out the first image and our handsome model taken by one of our class members. We got good detail in the windows but not much in between. This is such and easy fix these days. Pop the highlight recovery in Lightroom to pick up a bit more detail in the windows, add some fill light for the shadows, then selectively raise the density of other dark parts of the scene with Lightroom 2's new retouch feature. Presto - check out the second print.
  If you are worried about introducing too much noise when you pull up the shadows, just shoot at a lower ISO to keep the noise in check. Easy as pie in these wonderful digital days of photography. And NO big check written to the lab. Life is grand!!
Yesterday's shoot went great. We got some beautiful images at the Marriott in the morning and then headed to the magnificent Mother Of God Church for the afternoon shooting session. I mentioned earlier that for the first time at my workshops, I was going to let the class break down into smaller groups and work through the various locations in the church to see what they could put into practice what they actually learned and also what they individually could come up with. I was a bit hesitant, but the class feedback was overwhelmingly positive for the experience. Count me wrong on that one as I felt the class might feel uncomfortable shooting in front of each other. Yes, we will do it again at my Fall Master Class in September.
One subject that came up during the shoot was " How do you control the brightness of stain glass windows while still preserving the detail in the rest of the church?" This is an excellent question, because in the old days of film, we would just send it to the lab, order a custom burned and dodged print, write a out a big check, and be pretty happy campers (except for the cost of the print.
When we get into this situation, I call it wrestling with the light. What do you want to give up, the rich color of the stain glass windows by adding more exposure for the background detail? Or would you prefer to keep the richness of the windows and let the detail suffer. Well gang, in our wonderful digital age, we can have it all!
 Check out the first image and our handsome model taken by one of our class members. We got good detail in the windows but not much in between. This is such and easy fix these days. Pop the highlight recovery in Lightroom to pick up a bit more detail in the windows, add some fill light for the shadows, then selectively raise the density of other dark parts of the scene with Lightroom 2's new retouch feature. Presto - check out the second print.
  If you are worried about introducing too much noise when you pull up the shadows, just shoot at a lower ISO to keep the noise in check. Easy as pie in these wonderful digital days of photography. And NO big check written to the lab. Life is grand!!
This would also be a great place to use exposure bracketing and merging the results. A bit more work, but sometimes resulting in a smoother end product, IMO.
ReplyDelete