 Hey everybody, welcome to this week's Technique Tuesday.
If you're a regular viewer of digitalprotalk.com - did you notice last week's Technique Tuesday was a bit different? Did you notice the George Lucas like hi-def digital quality of my live video segments - just breathtaking videography, wasn't it? Well, this week you are in for more of the same. Yep, I've pulled out all the stops again today using the finest video quality equipment available from my video supplier, Wal-Mart. Only there can you pick up the "phenomenal" Aiptek Action HD video recorder for only $199! All that quality for so little a price;~)
Does anybody sense my tongue in my cheek yet? Actually, I thought it would be kind of fun to add some live video to the tutorials, and give me even further possibilities in my Technique Tuesday segments. OK, granted the camera is not the greatest in the world, but is does add a fresh twist to the tutorials - at least, I think so. Give me your feed back and let me know what you think.
Adding the additional video segments adds a bit more complexity to the final product, but so far, I'm liking it. Here is the quick low down on my process. I have absolutely no experience in video production so everything I do concerning the video editing process is all new to me. Here is the cool thing. The Aiptek video camera records in .MOV format so I can easily convert that to AVI format with an inexpensive piece of software called Total Video Converter. That gives me the compatible AVI's I need for my Camtasia 5 productions.
I produce video in a 640x480 size, produce it as a Flash .FLV format, upload to Viddler.com, and embed it into DigitalProTalk.com. So far, it's pretty easy to put together, albeit, a program crash or two. I'm still learning and working on that. Anyway, I think the finished result turns out OK - hope you enjoy them. Look out PhotoshopUser TV, DigitalProTalk TV is on the horizon ;~)
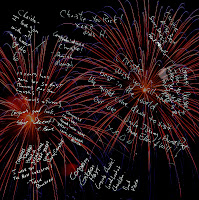
Today I want to discuss a really cool portrait product for your clients. This tutorial also shows how to add pizazz to that portrait album with a completely different twist. Think of this week's tutorial as a cross between marketing and Photoshop.
Hit "PLAY" below and give it a peek.

hello, you've got a nice blog. It is sure that I'll come back. :)
ReplyDeleteI visit your blog often, and although don't comment much, I think it's one of the best. Thank you for sharing so much of your absolutely amazing talent. Love, ya, David!
ReplyDeleteVery nice David! I did this same kinda thing with my kids and our family trip to Disney last year. We took one of the commercial autograph books and filled it with all the Character's signatures. Then used this same trick when we got home to merge the "autograph" onto the image of the character and my kids. Made for a special keepsake.
ReplyDeleteI had done something similar: The bride's sister was writing her toast. I photographed her while she was writing, then I photographed a closeup of some of what she wrote. Later, in PS, I overlayed her words onto the image of her writing. Sweet!
ReplyDelete