Showing posts with label Flash. Show all posts

Tuesday, April 09, 2013

Technique Tuesday: Big Lighting From Small Speedlights

Good Morning Everybody,

It's a busy week for us since we will be traveling for the next  five weeks.  Not only do we have Photoshop World to get presentations polished, power points reviewed….we also have to pack for four more weeks of travel after that. But, more on that later.

Technique Tuesday: Big Lighting From Small Speedlights

Hey gang, I’ve prepared a pretty cool Technique Tuesday for you today. I'm going to keep it short and sweet but I think there's a good lesson here. And it shows the added versatility that we can bring to our speed-lighting techniques.

Recently I had to the opportunity to photograph of family portrait. We were outdoors with the beautiful vineyards in the background. The problem was that the vineyards were in direct sunlight so I had to place my subjects in the shade.  As a result, the direction of the natural light was flat and not flattering on my subjects.

Most of the time I prefer to use flash whenever I'm shooting outdoors. It just guarantees that I'll get the direction of light on my subjects exactly the way I want it. That was also the case in this portrait session – I wanted directional light on my subjects. But, I wanted that directional light to be a very, very soft and flattering light as well. Remember I’m in direct early afternoon sunlight. 

The way I handled the lighting situation is what I demonstrate in our tutorial today. Why not hit the PLAY button below and enjoy the show. I hope today's lighting lesson helps bring greater flexibility to your speed-lighting as well and I hope you get even better portraits than ever before.

___________________________________________________________

Hey gang, that's it for me today. It's back to work getting ready for our next BIG adventure.

Everybody have a great rest the day and I'll see you soon.

Adios, David

Monday, July 30, 2012

Quick Hit Monday: My First Day With Canon 600EX-RT Speedlights–WOW!

Good Morning Everybody,

I can't believe it, we been in New Orleans for three days and I think I've already put on 5 pounds and that's even trying to avoid some of the fabulous, rich food that is so delicious. So much for the diet when you're in New Orleans – that's for sure!

We landed in NOLA late Thursday morning, got settled and began walking the French Quarter to just get the lay of the land. The rain was looking to wash out our walk so we took cover under the waiting area for the Natchez Riverboat Cruise.  We saw 5 young kids take cover as well.  It turns out that were aspiring jazz musicians and before long were jamming for the crowd. A fellow who was a cook for one of the restaurants was on his way to work but stopped long enough to join the musicians and before long had the entire assembled crowd sing “When The Saints Come Marching In.”  Check out my video below.  It was a way cool experience!

New Orleans has always been one of our favorite cities to visit – the people, the culture, the colors, the smells, the food, the history, friends in the area and so many other great things about this wonderful city is why we enjoy it so much.

Friday I was up bright and early, did a quick 5 mile walk up the Riverwalk and enjoyed a beautiful sunrise over the mighty Mississippi. Then it was back to the room to get ready for my wedding shootout class.

Thanks To The Rain, My Wedding Shootout Was Pretty Exciting

Canon 600EX-RT2I was excited about the class because, because B&H had just sent me three brand-new Canon 600 EX-RT speedlites to play with. I was planning to give them a good workout during my class. Confidentially, after just a few minutes shooting with them, I have to tell you, they were wonderful! But more on that later.

Strormy NOLAWe spent the morning portion of the class going over the lighting and compositional concepts I like to review and discuss before we actually head-out on a shoot. Think of it as sort of a warm-up for our location session. My good friend Ralph Romaguera, lined up a gorgeous church for us for our afternoon session but, as luck would have it, the bad weather rolled in and it looked like it was going to be far too difficult to keep the bride and all of us dry in trying to relocate to the church location.

We quickly switched to Plan B and decided to stay inside and shoot around the hotel instead. Don't get me wrong - the hotel turned out to be a great place to shoot . It had a fabulous staircase, wonderful second floor balcony area, and large, beautiful windows overlooking the Mississippi River.

We made great use of all the locations within the hotel and captured some fabulous images for our bride. It turns out my model was actually a beautiful young lady who is going to be an actual bride in just about four weeks. She was wearing her actual wedding gown, had her wedding day hairstyle created by her beautician and even asked her florist to make a duplicate bouquet like the one she would be carrying on her wedding day in August. So, the bottom line was this. With our beautiful bride in a great location, we captured some fabulous photographs for her.

Flash Photography Just Got A Whole Lot Easier!

Easy ButtonThat's right, after my experience with the brand-new radio controlled Canon 600 EX-RT speedlite units, flash photography and off-camera flash has now become the easiest thing in the world to accomplish. Anyone reading this blog knows I am a HUGE proponent of off-camera flash – that is putting a directional light on the scene and the subject to capture detail and dimension in every photograph.

Unfortunately, I think most photographers seem to be put off by this concept. Many photographers are happy enough just to be shooting with on camera, non-directional flashes.  Maybe they think off-camera flash is either too difficult or too hard to do . The fact of the matter is that the new Canon flash units make off-camera flash technique almost automatic.  No,  not almost automatic - they make the use of off-camera flash absolutely automatic!

I was a bit hesitant not knowing what to expect in using the new flashes. And, as with anything new, getting started, learning the equipment, adjusting to a new routine, (especially in front of a class) at first may seem quite daunting. But, I have to admit, after grabbing the manual, reading and reviewing the settings for approximately thirty minutes, I was off and running and very surprised to see just how reliable and consistent those early results were.

So, here we are on my wedding shoot in New Orleans. How are the Canon 600 EX-RT speedlites going to handle?  Were they going to be difficult to adjust to obtain the correct exposure?  Would they be easier or more difficult to use than my off-camera Quantum flash I’ve been using for so many years?  My initial “out of the box” experience answered all of those questions and more.  The new Canon flashes are the easiest strobe units to use that I've ever experienced in my life. It simply is a matter of turning them on, setting the on-camera flash to Master mode and the off-camera flash to Slave mode and start shooting away.

The strobe units, when “talking” with the camera, produced images that were exposed beautifully – the entire process was effortless and uncomplicated. I was never a big fan of the optical system of the 580EX II strobe units.  They were great as regular strobes but I never found them to be as reliable or practical as I needed when photographing my weddings. The new radio controlled Canon 600 EX-RT speedlites are a completely different animal and, after my experience on Friday, offer a brand new, very compact, easy and efficient way of photographing my weddings.

OK, Time To Give Them A Try

Off-Camera 600EX-RT Flash Bare

600EX-RT MasterOn my first try I wanted to see how the off-camera strobe would perform under my normal shooting conditions.  I set my Canon on-camera flash as the MASTER strobe but did NOT want it to fire. It’s purpose was to only fire the off-camera strobe.  I wanted to see just how accurate the off-camera strobe would be on it’s own. 

I had one class member hold the strobe, while mounted on a mono-pod, off-camera creating the loop lighting pattern on my subject's face that I'm always looking for. I made my first exposure and it was perfect. I was surprised that is worked so easily! Notice the sharp edged shadows on the back wall – that’s because of the small light source used for this image.

600EX Fig1NOLA Bride 1

Off-Camera 600EX-RT Flash Through Zumbrella

The next setup was to shoot the Canon 600 EX-RT speedlites through my Zumbrella and see if I could obtain the same result.  We attached to the mono-pod my umbrella adapter and threaded the Zumbrella in place.  I also positioned the 600 EX-RT wide-angle diffuser over the front of the flash to get the maximum spread of light from the flash through my Zumbrella, and then fired away. Once again the exposure was perfect. Also notice how my Zumbrella softened the background shadows very effectively too.

600EX Fig2

NOLA Bride2

Off-Camera 600EX-RT Flash Through 84” Westcott Translucent Umbrella

After that quick opening volley of lighting success, I decided to add the Westcott 84” Translucent Umbrella in front of the 600EX-RT.  Could I still get a consistently accurate exposure? I had to have LaDawn hold the large umbrella about 5 feet from the umbrella to get the small strobe to fully illuminate the umbrella.  Creating a photograph with such a large light source really gives you a very soft light on the subject.  Not only was the light very soft – no shadows at all, the exposure was just right too.  Amazing!
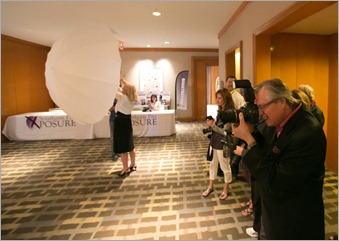
600EX Fig3NOLA Bride3

An Unlikely Soft Box

We spent the rest of the afternoon working our way throughout the hotel finding the best locations and capturing some amazing images.  I’ll follow up with another post showing more those results. You will definitely want to tune in ;~)

OK, fast forward to last evening.  I was one of five photographers at the convention conducting a small workshop with the convention attendees. In my relaxed workshop we discussed all things concerning wedding photography.  During the two hour program I made a comment about how technology is constantly making our job easier.  I decided to further demonstrate my point with my Canon 600 EX-RT speedlites.

I asked LaDawn to place one of the 600EX-RT’s into a small shopping bag she had with her. The flash was set up exactly as it was the previous day for my wedding shoot.  I figured after my Friday flash success, I could place the strobe into anything even slightly translucent and turn it into a soft box – why not a white paper shopping bag?

I then had LaDawn position the bag containing the radio slaved Canon flash next to Ronnie, one of the class members.  I wanted it’s placement to give me my standard loop lighting pattern on my subject.  Once everything was in place I fired away.  So what do you think of my new paper bag soft box?  Heck, maybe I should call it a bag box ;~)  Anyway, you get the idea just how easy it NOW is to use off-camera flash thanks to Canon’s introduction of their brand new 600EX-RT radio controlled strobes.

BAg ShotRonnie with Bag Box2

Links to:

Canon 600 EX-RT speedlite info: [link] 

David Ziser’s 42” Zumbrella: [link]

_________________________________________________________________

Hey gang, that’s it for me today.  We’re out the door early to catch a program or two and then hit the trade show.  Then it’s off to see some of the New Orleans sites and sounds and probably partake of the over abundant edible goodies here in the Crescent City.

Have a great rest of the day and I’ll see you soon, 

David

Wednesday, May 11, 2011

"Skies Of Blue"

Skies Of BlueIMG_5843-Edit

"Skies Of Blue"
©David A. Ziser

You would not believe the conditions under which this image was captured.  Bright afternoon sun, no acceptable location to place the bride for a decent background – nothing was going right.  It looked like we weren’t going to get anything till I decided to “play” with the light.

The background of this scene was the church parking lot – with several cars parked in it!  Beyond the parking lot was another building – ugly and pretty darn challenging.

I figured that if I got as close to the ground as possible that I could eliminate most of the clutter in the background.  That worked for the most part but I wanted all the clutter gone.  That meant a slight 3/4 crop on the bride. That mostly did the trick.  I still needed to remove a few of the parking lot lights but that was easy in Photoshop.

The next problem was the bright sky behind the bride – how could I get any color at all into that sky"?  The answer, of course, is to under expose the sky.  That was going to be a bit more difficult because I still needed to get light on my bride’s face.  Anyway, I decided to give it a shot.

I brought my 150 W.S. Quantum flash in close from camera left.  How close – about 4 feet away from the bride’s face.  If you look closely, you may still see some remnants of the flash hiding within the tree on the left.  Reminder, if you are going to include your gear in a shot, be sure to put it in a “Photoshopable” area of the image.

Why did I need the flash so close?  Easy answer – I needed a very small aperture to darken the sky.  Remember, I could only push the shutter speed so fast and still see the flash sync in this image.  Once I reached the flash sync speed limit, all I had left was aperture and that usually means a very small aperture under extremely bright lighting conditions like we experienced at this location on this day.

Anyway, we were able to pull it off and capture a great image to boot. I especially like the sun peeking through the trees ;~)

Camera specs: Canon 7D fitted with Sigma 8-16mm lens at 10mm, F16 @ 1/400 second (cheating the sync), ISO 200.  Enjoy!  -David

The One That Got Away: Mostly Because Of Subject Placement; Jason Groupp Sets New Flash Record!

Good Morning Everybody,

Snails paceWhat a day yesterday turn out to be – whew! Our IPS’s connectivity dropped to a snail’s pace -60B/sec, yes 60B/sec – 60 bits of info per second!!!!  I was pulling my hair out trying to get the blog posted.

On top of that, Vimeo also had a hiccup or two as well. I asked Jennifer to try to get it posted before she left for the day.  I switched to my Verizon My-Fi card to get to the internet and Vimeo finally got back on track about 5:30 p.m.

But the day ended on quite an up note.  We caught up with our friends, Cindy and Ralph Romaguera – Ralph’s a mentor at the After Dark happenings in Cincy this week – and got a chance to visit a bit before Ralph had to go back to work.

And speaking of After Dark, Jason Groupp, also one of the mentors set the the world record for most flashes used to take a photograph!  [link] 

World Flash recordJason wired, radioed, cajoled 300 small flashes to fire together to set the all time record. The bystanders blinded by the super nova burst of flash was only temporary and luckily their sight had returned within the hour – just kidding ;~)

DAZ LD BeehiveThen it was off to the play to see Beehive, a very popular musical featuring the songs of the 60’s.  Hey, I’m a child of the 60’s and I was lovin’ it.  The best part – the 4 song Janis Joplin compilation at the end of the play – Piece Of My Heart, Try (Just A Little Bit Harder), Ball and Chain, and Bobby Magee – that’s when music was music ;~)

The One That Got Away: Mostly Because Of Subject Placement

I was reviewing images for today’s post and couldn’t find just one that stood out for me to discuss.  In fact I found many that could fill the bill.

In looking at many of the class’s images it dawned on me that many times the image could have been improved just by being a bit more careful with subject placement.  Many times I was seeing distracting elements in the background. These could have easily been avoided by moving the subject a little to the left or the right or even changing the camera position just slightly up or down.  Let select a few images and show you what I’m talking about.

Photo #1:

OTGA - Photo 1_MG_5777

Image placement is not too bad in this example but it could still be improved upon.  On the positive side I think the maker has a nice sense of space created around the couple.  The focal length of the lens and the camera distance to the subject yielded a nice balance of the size of the arch with the relative size of the subjects in the foreground.

In addition, they are centered in the arch which works in this composition as well.  The flash and ambient are balanced giving the couple the attention they deserve.

My minor complaint about this image is in the subject placement.  Look at the cross sticking out of the bride’s head.  Once you notice it, it really is a major distraction to the image.  All the maker needed to do to fix it was to lower his/her camera just a few more inches.  That would have hid the distracting element behind the bride’s head.

Let me point out that you’ve got to be VERY careful in lowering the camera position – lower it too much and you place the subject’s heads up into the very bright arches above.  That would have been even a worse situation.

So you can see, it’s only a matter of inches that can make or break a shot.  Keep your eye on the background and be sure you have an “all clear” behind the subject’s heads before you press the shutter button.

Photo #2 Series:

OK, now let’s have some fun.  Let’s look at this next image.  I think we have the same problem with image placement.

TOTGA2

At first glance it may have seemed like a good idea to place the bride in front of the stain glass window behind her head.  You could argue that the window was leading the viewer’s eye to the subject.  I get a different feeling.  I feel that the window is growing out of her head.

What happens if we move the bride around a bit on this background.  Let’s try the second position below.

TOTGA 3

OK, in this position we, at least don’t have the window growing out of her head.  Actually I think this position is an improvement on the initial placement.  But what happens if we move her head even more to the left and bring her closer to the camera.

Moving her to the left let’s us place her head within the larger space of the wall behind her.  I’m thinking this is the best placement for our subject.  Take a look at the image below – what do you think?

TOTGA 4

Now I think the image is beginning to come together.  Let’s give it a tweak or two in Lightroom 3 and see what we get.  Check out the last image below.

TOTGA 5

What do you think?  I think a lot better – the bride is framed nicely against the back wall.  I toned down the brighter areas in the background to remove them as distractions.  A little better crop also allowed me to reposition the bride into nodal point # 1.  All the lines seen in the foundation of the building lead to our bride as does the corner of the building.  The tree also gives us a nice canopy over the bride and adds a touch of Springtime to our image.

I hope this progression of images has been helpful today.  I’ve tried to show you the iteration my mind goes through when composing an image.  It’s always a tweak here and a tweak there before you get to press the shutter button.

________________________________________________________

Hey gang, that’s it for me today.  I’m going to run down to After Dark one more time today and say my good-byes to my buddies.  We have a few instructors coming over for dinner this evening. On top of that, I’ve got clients coming by this afternoon to review their images.  Yep, another busy day here at David Ziser Photography.

How about I see you tomorrow for a business building Business Day Thursday post. Tomorrow’s topic – “Do You Over Promise and Under Deliver”?

See ya’ then,  David

Tuesday, February 08, 2011

”I’m Just A Country Girl”

I'm Just A Country Girl

”I’m Just A Country Girl”
©David A. Ziser

This image was made while I was shooting for Kelby Training a few years ago.  I selected this image for today’s post because it speaks to the tutorials I’m posting today.

This image represents a fairly normal situation we as wedding photographers find ourselves in over the course of the wedding season.  We’re shooting in an urban location – that means streets, telephone poles with wires, cars, etc. in the background.  That was the situation in this session. I was able to drop down into a gulley affording me a much lower vantage point for my shot.  That means I was able to drop the poles and wires out of the background quite easily.

Whenever I’m shooting outdoors, I always try to position the sun behind the subject.  That way I don’t get any “hatchet light” those bright specs of sunlight that sometimes fall on the subject – if the sun is behind the subject, that simply can’t happen. That was easy to do in this case as you can see by the direction of light falling on the trees in the background.

The result of my positioning the bride in this location was that I  illuminated the bride with direct sun light falling on her from behind but now her face was flatly lit by the ambient light.  Bringing my off-camera strobe in from camera right gave me the nice loop lighting on her face.

The problem when shooting outdoors is getting the sky to go dark enough to give the scene a more dramatic look.  We only have a few options to make that happen – smaller F-stops and smaller apertures.  Both of those options can be problematic mostly from the flash power stand point – you need more fire power to over come the smaller apertures when shooting outdoors.

At F10 and at 1/320 second I was able to darken the sky sufficiently for my purposes.  That meant that my strobe at full power was just out of camera range camera right. I used the faster 1/320 second shutter speed to darken the sky even more.  Since native sync speed for the Canon 40D is 1/250 second, the bottom 1/3 of the image is NOT illuminated by the flash.  No problem though – it looks like an easy vignette on the subject which draws viewers’ attention even more to her face.  Check out today’s videos below for a thorough explanation – I think you’ll enjoy them.

Camera specs: Canon 40D fitted with 10-22mm wide angle lens at 20mm, F10 @ 1/320 second, ISO 200.  Enjoy!  -David

Technique Tuesday: High Speed Flash & Revisiting How To Cheat The Sync; Super Bowl & Wedding Webcast

Good Morning Everybody,

Under The Weather2 LR I hope you are off to a great week. My week is getting off to a slow start.  Zoomtown, our ISP in Cincy, was down for over 5 hours today – hence the late post.  And yesterday I was under the weather for most of the day – no, it had nothing to do with the Super Bowl party the day before, but an on-going “bug” that just keeps trying to keep me down ;~)  That put a few projects on hold for me most of the day.

I was scheduled to do Scott Kelby’s guest blog post again tomorrow but simply felt too crummy to complete the post.  Brad gave me a reprieve till next week – Thanks a ton Brad.  The post is about complete but I want it well crafted to be a great read for Scott’s readers and our DPT readers as well. I’m adding the rest of the “spit and polish” to it today.

Feeling lousy also made for a change of plans for today’s post as well.  Not a big deal – I’ve still got some good information for you today.

High Speed Flash & Revisiting How To Cheat The Sync

I didn’t quite get a Technique Tuesday put together, but no problem  – I came across a great video showing how high speed sync works.  This video is outstanding!

I’m running that video alone with my “Cheating Flash” video I ran several months ago.  Both of these videos speak to a topic that I covered in today’s image of the day above and is quite popular with many photographers who really want to take their lighting proficiency to the next level.  I hope you enjoy them both.  Hit the PLAY buttons below and enjoy the shows.

HIGH SPEED SYNC:


CHEATING THE SYNC:

_______________________________________________________

Hey gang, that’s it for me today.  Remember, don’t forget to sign up for our FREE webcast Super Bowls & Weddings.  We’ll be talking with Lynn Michelle about how her Super Bowl Party shoot went on Sunday.

We will also be talking weddings with Lynn on Thursday.  Lynn is one of the most respected wedding photographers in Dallas [link] – I can’t wait to hear her comments.  You can still register right here.

See ya’ there,  David

Wednesday, October 20, 2010

"Autumn Nymph"

Autumn Nymph

"Autumn Nymph"
©David A. Ziser

Here is an image I made during yesterday’s Master Class on-location shoot. It illustrates just how nice a bridal portrait can look with a little off camera flash coming in from camera right. Using the wider aperture of F4.0 threw the background out of focus thereby making my subject, the bride really “pop out” of the scene.

It was a bit challenged to keep the aperture at F 4.0 because of the brighter ambient light outdoors.  I decided to “cheat the sync” to 1/320 second to make the F 4.0 aperture work.  At the higher than normal sync speed, that meant that 1/3 of left side of the image received no flash.  But, no problem, since my subject was not standing there.

I also like the contrast of the warm fall colors against the “grey” of the building in the background. The simple centered symmetry worked well for this simple, elegant bridal portrait.

Camera Specs:  Canon 7D fitted with 70-200mm IS lens at 200mm F 4.0 @ 1/320 second, ISO 200.  Enjoy!  -David

Tuesday, October 12, 2010

Technique Tuesday: My Cheatin’ Flash – Or How To Shoot Flash Photography Faster Than The Native Sync Speed

Good Morning Everybody,

CBTL Leg 5 We kicked off leg 5 of our Captured By The Light 2010 tour [link] with an enthusiastic crowd of over 200 strong in Washington D.C. last night. Everyone sure seemed like they had a good time.

This morning we head over to Philadelphia and are looking forward to seeing our good friends in that part of the country. Then it’s on to Newark and Boston for the rest of the week. 

Oversize Load I’ve mentioned that we drive to most of our cities with our Grand Caravan “loaded to the gills” as they say.  When we are hitting the biggest cities of the tour like we are this week, our mini van is loaded up and pretty packed with our gear, tour handbooks, vendor literature, and tour supplies which were all shipped in for the week.  The vehicle drives more like a boat than a car till we get some of the supplies unloaded in the upcoming cities ;~) Anyway, looking forward to the week and can’t wait to make a few new friends along the way!

My Cheatin’ Flash – Or How To Shoot Flash Photography Faster Than The Native Sync Speed

500 cm I am re-running this tutorial today because I think it is such a cool technique and has some great day to day applications especially for wedding photographers.  It’s also a little peek at what I discuss during our CBTL tour.

Back in the film days I used to shoot with a Hasselblad 500 CM [link] medium format camera.  I loved the camera – it was the de facto wedding camera for most wedding photographers.

One feature that most of us loved was the fact that it would sync up to 1/500 second with our strobes.  That was really important when shooting outdoors in bright sunlight – the higher flash sync speed made for easier control of the ambient light when trying to create a dramatic image for our clients.

With today’s digital cameras we are not so lucky.  Most only sync up to 1/250 second and some even slower than that.  That’s why I developed my “Cheatin’ Flash” technique.  It gets me pretty close to the faster shutter speeds I’d grown accustomed to with my Hasselblad. Hit the PLAY button below and see how I get by with the higher shutter speeds on today’s digital cameras.  Enjoy the show!

__________________________________________________________

Hey gang, that’s it for me today. We’ll be back in town next week for my Master Class and I’ll try for a fresh Technique Tuesday. We are pulling out for Philly in just a few minutes so how about I see  you tonight in the the City of Brotherly Love or tomorrow morning for another episode of The One That Got Away.

See ya’ soon,  David

Monday, February 22, 2010

"Art Museum Beauty"

Art Museum Beauty

"Art Museum Beauty"
©David A. Ziser

I made this image a few years ago and it's still one of my favorites.  I like it because of how quickly I was able to pull it off and still capture a great photograph. So many times photographers think it's always about the equipment.  It's not, it's about the technique.  This image looks like it was taken with studio strobes on location.  The reality is this.  I zoomed into the bride till I had the crop I wanted, turned my on-camera flash to a nearby pillar (like those you see in the background), and fired away.  The light from the flash reflected off the pillar illuminating the bride with a beautiful, dimensional loop lighting pattern.  I balanced the ambient light with the reflected flash for a stunning portrait of my bride made in only a matter of minutes with a minimum amount of lighting equipment.  Camera specs; Canon 30D fitted with 17-85mm IS lens, at 45mm, F5.6 @ 1/25 second, ISO 800.  Enjoy!  -David

Thursday, September 20, 2007

Hot News Over at Layers Magazine!

Layers TV is on the Air! The first episode was first aired yesterday and will be on iTunes very shortly. Corey Barker and Rafael Conception, two of the fastest keyboard digital gymnists on the planet are your hosts for the show. They promise "all meat, no fat" tutorials. Layers TV will feature all things Adobe. Their first episode features a Flash tip and Dreamweaver tip. Great job guys!! Here is the link - Enjoy!