Showing posts with label Technique Tuesday. Show all posts

Tuesday, November 01, 2011

Technique Tuesday: Light Bending, Pixel Pushing, Sync Cheating Lighting! A Life Of Living Dangerously!

Good Morning Everybody,

We arrived safe and sound after a short and uneventful 4 hour drive from Palm Springs to Phoenix yesterday.  During the drive we continued to listen to the Steve Jobs bio.  He’s about 30 now, worth about 250 million from Apple going public and just threw himself a birthday party for 1,000 of his closest friends. Oh, and he’s about to be ousted by John Scully and the Apple board.  Like I said yesterday, a very fascinating story.  Anyway, the listen sure makes the driving time go by quickly.

Sedona RidgeWe have a quick business meeting this morning and then its on to Sedona, AZ.  We hope to be settled in by around 3:00 p.m., catch dinner with a friend tonight, and have a complete day off tomorrow.  We love that part of the country and I hope to spend some time hiking and capturing some great photographs while we’re there.

Anyway, that’s the latest update on our travels, how about we get on with this week’s episode of Technique Tuesday.

Light Bending, Pixel Pushing, Sync Cheating Lighting!

I’m a BIG fan of “cheating the sync” on my DSLR.  Maybe it goes back to the film days when I was shooting Hasselblads.  The medium format Hasselblad had the ability to sync up to 1/500 second and that gave us Hassy shooters the ability to really work the light outdoors especially when using flash.  That 1/500 second let us create some gorgeous sunset images because of the that fast sync speed.

Check out the three images below made years ago on my Hasselblad as I increased the sync speed from 1/30 second all the way up to 1/500 second and in about 45 seconds.  What a difference the faster shutter speed makes in adding a dramatic feel to the image.

1-30 sec

1-125 second

1-500 secWhen I first transitioned to digital in 2000, one of my first cameras, a Nikon D1x synced all the way up to 1/500 second – no big deal – it made the transition from film to digital rather easy.  This next image was made at 1/500 second on my old Nikon D1x – pretty cool, don’t you think?

Early wedding pic

The only thing I had difficulty adjusting to was the rectangular format. Hassys shot square format. Nevertheless, I did enjoy that faster sync speed.

As the cameras “improved” the sync speed was reduced to about 1/250 second for most of the camera manufacturers.  Now it became a “pain in the neck” to achieve the same results I was getting at my faster sync speeds.  What was a photographer to do?  It was time to live dangerously, throw caution to the wind, totally disregard what the camera manuals said about the “native 1/250 second sync speed” and kick things up a notch!

JailShutter Sync PoliceSo what happens when you begin syncing your flash images to 1/320, 1/400, or even 1/500 second?  Are the “shutter sync police” going to arrive on the scene and throw me into the, dark “shutter sync” jail somewhere?

Do Not RemoveI thought not.  I had been down that dangerous path before, many times, as a matter of fact.  Yes, I used to routinely rip the “Do Not Remove Under Penalty Of Law” labels off of pillows and mattresses.  Since I had danced down that perilous path before, I was ready to challenge the “Shutter Sync Police” this time – bring it on!

StartrekSo what really does happen when you break the rules, push the envelope, tread where most photographers have never treaded before?  What happens is that all sorts of new lighting/photographic possibilities open up for you.

Cheating the sync gives you a brand new way to control your light on the scene.  It gives you wonderful control on how you light your subject.  Now it’s easy to create a much more dramatic look to your images with your new found understanding of how to cheat the sync on your camera.

All kidding aside, it’s a great way to stretch the boundaries of photographic possibilities and easily create images that would have required a lot more equipment and a lot more time to produce.

Why not hit the PLAY button below and enjoy the show.  I think you’ll really enjoy this week’s lighting tutorial and get a real “kick” out of the results when you see them. 

It’s not “brain surgery” or “rocket science”.  It’s just a cool way to get a really nice visual result.  Come on, walk on the wild side with me and check it out ;~)______________________________________________________

Hey gang, that’s it for me today.  We are heading out shortly for my meeting and then it’s on to Sedona, AZ.  I’ll plan to see you tomorrow for another episode of the “How Small Things Can Make  A Big Difference”. 

Have a great day, I hope to see you then,  David

Tuesday, June 29, 2010

Technique Tuesday Moved To Wednesday This Week

Because of the short notice for next week’s Fast and Easy Digital Design – Part 2 [link], I’ve moved today’s episode of Technique Tuesday until tomorrow.  It’s a good one so don’t miss it. 

I’ll see you then.  -David

Monday, December 31, 2007

Keep That Tuesday Appointment - Technique Tuesdays

This is another feature I started on a Tuesday in early September this year. Every Tuesday , or at least almost every Tuesday, I post a Photography or Photoshop Tutorial. Tuesday's posts are usually "Photographic or Photoshop" centric as well. Just hit this Technique Tuesday link right here to see all of them for 2007.

Friday, December 28, 2007

Keep On Smiling

How often do we get the shot but that one person in the group didn't smile in any of the images no matter how hard you tried. Or, what happens when somebody smiles, but it is way too big of a smile and does not flatter them . In this Technique Tuesday tutorial, I'll show you how to get a much better result for you and your client. Just hit play and see how I have my clients "Keep on Smiling."

Tuesday, December 18, 2007

Designer Portraiture or How to Fool Mother Nature

Hey gang, it's Technique Tuesday again. Here is the dilemma - what do you do when you are scheduled to do a family portrait - six family members together for the first time in three years - on a Saturday morning, but Mother Nature just gifted you 3 inches of snow and freezing rain? Well, that was my challenge this past Saturday. To cancel the shoot was out of the question. So how about Designer Portraiture? That's what we did and we got a great result! The client "loved" it. Check out the tutorial below - I think you will enjoy the lesson. Read the P.S. following the video for some more related tips and links.


Thank You to Graham r for pointing out after last week's Technique Tuesday - "Winter Wonderland Any Time of the Year", that you can drag the "Extract Highlighter" off and around the canvass space reconnecting at the other side just like the "lasso" tool. Yep, works just fine - Thanks, Graham. Here is another link showing 5 background masking techniques right here.

Tuesday, December 11, 2007

Winter Wonderland Any Time of the Year

So here was the challenge - create 8 banners showing my client frolicking in a winter wonderland - in November in Cincy - no plane fare included. I knew I could pull it off, but getting a handle on the "Extract" tool in Photoshop, thanks in part to a well timed article in the latest (December) issue of Photoshop User magazine made it pretty darn easy. So in this week's "Technique Tuesday" I'll step you through the entire process right here and show you the finished result as displayed at the party. Enjoy! --David


Tuesday, December 04, 2007

Today's Technique - The Burn and Dodge Photoshop Cha-Cha

This Photoshop Tutorial shows 3 ways to Burn and Dodge in Photoshop. Each method is discussed as to it's best application in your work flow. There are three BONUS tips along the way too. You can also click directly on the "video" to see a larger view. Enjoy! --David

Tuesday, November 27, 2007

Technique Tuesday - In the Eye of the Beholder - the Beholder's Fisheye, That Is.

OK, I've been a Fisheye lens fan for years. It started when I picked up the 30mm Fisheye for my Hasselblad - only $6000 back in 1990 - what is that in 2007 dollars - oh , about $7400 at B&H today. The digital 35mm versions are only about $750 - boy, do I love digital!!!

This lens is not about big faces and noses like you see a lot over at Flickr. The lens gave a perspective that was so unique and different, it definitely differentiated me from the competition. You had to learn a few tricks to get the best out of it though - don't put the subject too close to the corners or you would create a "Mr. Gumby" stretch effect, the curvature is OK if used creatively, and don't take a picture of your on-camera flash or your feet, just to name a few of the simple yet needed-to-know tricks. Take a look at these few images created with my old Hassy Fisheye - still pretty cool looking. There are two kinds of Fisheye lens, those that make the circle fisheye like the lens Sigma's 10mm for full frame 35mm and their 4.5mm fisheye for APS sensors just introduced last week and the cropped Fisheye's made by Canon, Nikon, and Hasselblad. The Sigma's circular fisheye lenses shows a 180 degree field of view around the entire image area while the other version shows the 180 degree field of view just from corner to corner. Nikon used to make a 220 degree fisheye, but has since been discontinued.

The cropped lenses from Nikon and Canon work really well on the APS sensor cameras because the sensor is only seeing the "sweet spot" center of the lens, plus the fisheye distortion is minimized near the center too so we have a very wide, low light lens in this case. Heck, you can even correct the distortion with several solutions out there like Photoshop and DXO optics.
I own Sigma's 10mm circular fisheye for a full frame 35mm camera and really enjoy using it on my ASP sized sensors on my Canon 40D. The effect is still quite dramatic in the right situation. If the subject matter has "curvy" lines, I think the fisheye effect adds to the "dramatics" of the images like this image of the Netherland ballroom below.

You have the choice of going with the partial circle or cropping off the circle effect and being left with what I used to get with my trusty old Hasselblad. Check out the following image. Check out these last two images - where they made with a fisheye lens - you can't really tell, can you. That's because I kept the horizon line in the center of the viewfinder and the subjects near the center of the frame. The rest of the subject matter had no point of reference from a distortion point of view so "appears" not to be distorted in the image - hence, the extremely wide angle shot without the "Fisheye" distortion. The fisheye lenses today sure don't break the bank like in the Hassy days, so they can be part of your equipment arsenal should you want a very different look to your photography. Give it a try - It opens up a entire new world of shooting possibilities. That's it for today, Gang, we are off for a day of sun and fun over at the Hilton - best views from a pool in the world. See everybody tomorrow. Adios, --David

Tuesday, November 20, 2007

The Making of "Eyes of Love"

I selected our image post today to be part of our Technique Tuesday segment mostly because the original did not look much like the final resulting image. But, I really love the finished portrait. Give the short video a look for the whole story and techniques used. Enjoy! --David

Shooting the Falls But Not in a Barrel

Last Friday, I posted an image in which I discussed how I photographed a waterfall - hand held - at 1/2 second. Here is the link to that image. Now if you would like to know the correct procedure to do it with a little nicer result, check out this article over at AlexWisePhotography. Alex has some very nice images and thoroughly describes how to get it consistent every time. I love this kind of imagery - I just wish I took more time to do it. Good info here, here is the link to the "Waterfall" article.

Tuesday, November 13, 2007

Ziser Sets New Off Camera Flash Record

That's right, David Ziser used one off-camera flash to create a record number of light directions on the scene!!! OK - already with all the hype - I just wanted to see what it looked like in print. I don't know if I set any record or not, but I did managed to light this image with only one flash! So you say - OK, Mr. Ziser, How did you get a back light on the subjects along with that very nice loop lighting pattern on their faces, and get the ambient balanced perfectly as well?? If it's only one flash, then you must have used some "Smoke and Mirrors" for the shot. Well, you would be half right if that's what you thought - smoke - NO; mirrors - YES.

Here's what happened. I was taking a back-lit image of my couple - my assistant was lined up directly behind the couple holding my Quantum T5d set to half power. My camera was set to F5.6 - my favorite aperture for this kind of shot. The shutter speed was set to a fairly slow 1/15 second in order to pick up the ambient light in the hotel. After making the first exposure, I got my desired back-lighting effect, but I noticed something else as well - light was falling on the the front of the subjects - where was it coming from? After a quick survey of my working space, I noticed all the mirrored tiles covering the wall next to me. It seems that the light from my assistant's flash not only gave me the back-lighting I wanted but from the light's point of view, it was also able to track a path that passed the bride and groom, reflect off the mirrored wall and illuminated the couple from the front via reflection. Aha!!! I thought, back-lighting and front-lighting in one easy exposure with only one off-camera light. I turned the couple back towards me, arranged them in a comfortable, pleasing position and made the final shot. I got just what I wanted - a great image of the bride and groom with a nice direction of light creating my favorite loop lighting pattern on the couple's face. No smoke, just mirrors, and a nice image.

Tuesday, November 06, 2007

Zoom-Zoom: Flash Technique

I didn't know I could do that with my flash! You know, the gear we use today is so sophisticated - heck, just look at the size of the manuals available when you purchase that loved camera. That a good understanding of all the camera/flash features can be a great benefit to us on the job. Let's talk about just one today - I call it Flash: Zoom, Zoom!

I first got the idea a few weeks ago when we were down Florida on that big wedding. I had just taken a photograph of the outdoor ceremony location with my 10-22mm lens with the on-camera flash acting as my fill light. The first image shows that the camera was reading a much further focus distance and consequently signalled the flash to deliver more light than was necessary for the foreground area.

When I checked the back of the flash, it was reading it's widest setting of 14mm, that's because the wide angle diffuser was also covering the flash head. The default setting for the flash without the diffuser is 24mm. I knew I could "zoom" the flash manually by pressing the "zoom" button and then rotating the big dial on the back of the flash. I "zoomed" it to 80mm and re-shot the space - now I had a hot spot in the middle. Dialing back the zoom a bit made the final image just right.

Now fast forward three weeks to this past weekend's wedding. I'm shooting some groups and tables with my 17-85mm lens on the 40D. I remember the Florida experience and think - hmmm "Maybe I can create a vignette look on the subjects by "zooming" the flash. I "zoomed" to about 80mm again which threw a "cone" of light right on my group creating a natural vignette on the scene with the lightest part of the image being the group itself. Check out the group image. The accent light is coming from my assistant hold his Quantum T5d at about the 10 o'clock position to the group - more on that in a future posting.

How about one more use of the "zoom" technique. I was outside photographing my subject and wanted the light to only fall on her face. One method was with my "Hollywood" lighting technique we talked about several weeks ago in our blog (here is the link right here and the update article right here.) With the "zoom" technique, I can get almost the same result. I had my assistant hold my off-camera 580EX flash in a position that gave me a nice loop lighting pattern. I set the "zoom" to 80mm to get maximum light output from the flash on this sunny day, and fired away. Look how the "cone of light" illuminated just her face against the dark sky - almost like a spotlight - which in essence, it was. The result shows the usefulness of the "zoom" technique in yet another situation. Why not post some "zoom" technique photos to our Flickr group right here - let's see what you guys and girls come up with. Remember to give the specifics of the shots, and tag them zoom-zoom.

Tuesday, October 23, 2007

Best Little Light in the World

Right before we left for the Florida trip, I picked a Canon 580 EX II flash - not an inexpensive "little puppy." I had been a fan of the 580 EX, but some of the new features of the 580EX II really intrigued me - like a real sync cable connection. I particularly liked how I could set the 580EX II's custom functions with the 40D camera too - very cool!

That's the background - here how I did it. Look at the set up again - here is the link right here. That's the 580EX II attached to the stand with the umbrella. I picked up a little shoe mount which holds the flash and attaches nicely with my adapter to the light stand. Check out the close up of the assembly.
Before I attached the flash to the stand, I set up some flash custom functions via the 40D. This is easily done by scrolling to "Flash Control" -> "External flash C.Fn. setting -> "3.External Metering: Manual" - see Diagrams.
Next, disable the auto "Power Off" function C.Fn. 1 - here is the screen grab.
Now you are almost good to go. Next I switched off the 580EX II and removed it from the 40D. I then attach it to the bracket assembly, and attach the radio receiver with Velcro to the top of the 580 flash - I prefer the Quantum FreeWire system. The next step is to drop the wide angle diffuser over the flash to spread the light path even wider for a nice broad light through the umbrella. Look at the next diagram and you can see how the light is spread out evenly across the umbrella with that little diffuser. I planned to shoot at ISO 400, so after testing, I settled on 1/4 power manual on the 590EX II flash. The back light was supplied by my Quantum T5d flash also triggered by the FreeWire radio. I just adjusted it to an output that just illuminated the background slightly - 1/64th power. For a higher key effect, I "goosed" the power to 1/32 or 1/16th power. That was about it.

The setup was easy lightweight, portable, fast, and reliable. This is getting a bit lengthy, so I'll get to a Part II with examples in the near future. But you have the mechanics to get you started.

Tuesday, October 16, 2007

Touch of Color - With a Twist

Here is a nice little tutorial I featured in my newsletter a few weeks back. It shows how to add "spot color" to an image. I know a lot of you know how to do this technique already, but I finish this short tutorial with a nice little twist at the end. I can't give it away. Just watch and see. Hey gang, got to go - make up is calling over at Photoshop TV. Have a great one and I'll check in with everyone tomorrow. Keep smilin' -- David

Tuesday, October 09, 2007

Back-lighting For Fun and Profit or How to Add Pizazz to Your Wedding Photography

Back-lighting is one of the fastest, coolest ways to add “Dramatics” to your wedding images. This image is a “money shot” every time. Our clients love it. What’s the easiest and fastest way to do get a great result? It’s not just getting the light behind them, but how you get the right behind them.

Look at the diagram – notice that when the light is too close to the subject, the light just does not adequately wrap around the subjects and most does not make it into the lens. We could get into the “physics” of light here, a concept called “refraction”, but that’s beyond the scope of this article, so let’s skip it. Let’s just say that the light needs to be far enough behind the subject so that the light will gently wrap around the subjects.

The “magic” distance is from 12 – 15 feet behind the subject about 4 feet off the ground with the flash head pointing at the subject's shoulder blades. Check out the diagram again and look at the illustration on the right – it shows how the light wraps enough to make it to the lens.

I generally use a slightly wide angle lens set to F 5.6. The shutter speed is adjusted so that the ambient light is under-exposed about 1 – 1 ½ stop so the bride and groom really pop out of the scene. The flash is set to half power, which is about 100 watt seconds. The camera is set to 800 ISO. The bottom line is that there is a medium amount of light firing behind the subjects – don’t have a powerful flash, just increase the ISO on your camera or open the aperture.

This back-lighting technique gives you different results under different settings and situations. Check out the image of the bride and groom dancing. Here I slowed down the shutter speed to about 1/15 second to pick up some of the ambient light of the room. The wide angle lens adds substantially to the impact.The next image is one of my favorites – the slower shutter speed picked up the dappling of the light as it fell on the bride’s gown. The groom dipped at at just the right moment and I got a great shot. The following image is another nice result we got when we asked the bride and groom to pause for just an instant as they came out of the church. In this case my assistant was much closer to the couple and as a result the light splashed off of them and added some illumination to the arch of the cathedral doors highlighting the couple even more. Sometimes, back-lighting is just a “kiss” a light on the veil to create some separation from the background. The following image was illuminated with my “shoot-thru” umbrella technique I’ve discussed many times here. The back-lighting was from a very small, inexpensive, “slaved” accent light I got from B&H Photo and Video for about $19. Here are a few variations on a theme from the back-lit dance shot at the wedding reception. Look at the next image. See how the light bounced off the groom's shirt and illuminated the bride’s face – I love it.
And in our final image, see how the light mostly reflected off the bride’s wedding gown and bounced back into the faces of the bride’s mom and dad as they proudly watch the couple's first dance together as husband and wife while also waving their congrats back to the couple. As you can see, there are so many possibilities to really get some great images. Now use your own imagination, add gels, smoke, whatever your heart desires to tingle those brain waves and create some amazing images for you clients. The possibilities are endless.

My equipment of choice is my Quantum T5d Flash with their 2x2 Turbo power pack. It is triggered by my Freewire FW7T transmitter hardwired into the camera via the sync cord. The Freewire FW7Q receiver is attached (Velcro) to the T5d flash.

Tuesday, October 02, 2007

Highlight Tone Priority - Image Salvation!

It's the "Whip cream and cherry on top" for the new Canon cameras. Highlight Tone Priority - it's one of those new features that get listed in the specs but receive little"real world" discussion as to how it applies to the wedding shooter. Well, let's change all that right here. This is the hottest feature of the new Canon (and Nikon) cameras just announced last month. It makes JPEG shooting pretty darn easy - almost full proof in my opinion. Even if you are a RAW shooter the benefits are unbelievable. My buddy, Denis Reggie shoots RAW but still has Highlight Tone Priority enabled all the time.

I was shooting a wedding two weeks ago with Canon's MarkIII with Highlight Tone Priority enabled. The bride came out of the house on this super bright, not to mention hot, cloudless day. I had the camera in "P" - for Professional mode - and shot away. I "chimped" the shot and could see no "blinkies" on Canon's new "all screen" "blinkie" mode. I know they call it "Highlight Alert" - but it's still the "Blinkies" to me. The full screen view of "Highlight Alert' is the second best thing about the new cameras.

Now any good wedding photographer knows that when shooting the bride leaving the house or limo or any other "inside" location moving into full sun is a bit of a problem. Shooting JPEGs in any "auto" mode always results in the dress highlights being "blown out". As a JPEG shooter, we always make the slight adjustment to exposure before she makes her exit. This is fine when we have the time, but it can be an "exposure" hassle when things are really moving. Now I know the RAW guys are going to say they don't have the problem - granted - but the RAW vs. JPEG issue for photographers is another whole discussion saved for another day.

For the JPEG wedding shooter especially, a camera with the "Highlight Tone Priority" feature (it's called Active D-Lighting on the Nikon side) is just about a must and a life saver. This feature alone will save a large percentage of the possibly overexposed images in the course of the day's coverage assuming, of course, you are "in the ball park" to begin with - and the "auto" modes get you in the "ballpark" fairly easily.

Let's take a look at some of my "hands on" shooting during last week's Master Class. I asked our bride to step out of the shadows into the sunlight. The camera was in "Program" mode. Look at the first image - the image and the histogram shows it is clearly "blown out".

Next I "enabled" the "Highlight Tone Priority" feature on the MarkIII, had the bride step out of the shadows into the sunlight again as I continued to shoot away. Check out the second image - the exposure is just about "nailed". Look at the histogram - it's right where it needs to be.
Now look at the third - full length - and fourth - close-up - images. Look how the dress detail is preserved beautifully with the the "Highlight Tone Priority" feature enabled - Amazing!!!

So just how far can you go before you go beyond the range of this "safety net" feature? I'd say about one stop. Take a look at the fifth image, which I published in my newsletter a few months ago. the difference between exposures was one stop. The overexposed photograph was still saved by the "Highlight Tone Priority" feature.

Imaging Resource had a brief discussion on Highlight Tone Priority right here. Bob Atkins Photography, a nice site to follow too, also has a more in-depth article, although not wedding related, on Highlight Tone Priority right here. Bob's site also covers some positive ISO considerations on the new Canon 40D as well.

Don't overlook these additional benefits too. When doing the "cocktail candids," we are sometimes in fairly tight quarters. We may be shooting a group only a few feet in front of us with the 17mm-85mm lens at 17mm range. The on-camera flash may over expose about 1/2 stop. We've known this and (most of the time) make the necessary adjustment, now HTP saves the day and takes the worry and "exposure fiddle" out of the picture - no pun intended. Here is a further benefit too - hot August day, outdoor shoot, bride and groom and wedding party a bit "shiny" from the busy day's activities. HTP even reduces the facial shine. This saves us in the post-production work. This is actually demonstrated in the fifth image of this article. Wedding day shooting is aways fast, uncertain, changing, and exacting. I'm glad I have one less thing to worry about. Let me say that HTP is not an excuse for sloppy exposure but, the new "Highlight Tone Priority" feature does a marvelous job! Happy Shooting!

Tuesday, September 25, 2007

Hollywood Lighting - and the Oscar Goes To...

It worked for Humphrey Bogart and Lauren Bacall - I know I showing my age here - but those old Hollywood portraits sure had something special and dramatic about them. Here is a variation of that style in a portrait we did at my Master Class yesterday. Normally, I like to light my portraits by shooting through an umbrella. This gives me a nice soft light that really flatters the subject. But, yesterday, I found myself in a situation where I really wanted the bride to "pop out" of the scene. I also wanted all the viewer's attention to go mostly to her face. I know that I can "control" how the "viewer" visually explores the image with various amounts of light, color, and detail that I incorporate into the image. In this case, I chose to light primarily the bride's face with a very strong directional light. I did it with a "snoot" light.

Here is how we did it. I pulled the reflector off of my Quantum T5d showing only the bare bulb. Next, I borrowed some notebook paper from one of the students to wrap around the flash tube as you can see in this first image.

This basically created a new light source with a very narrow beam of light. The "tricky" part was getting the "snoot" light pointed properly to create the "Hollywood" lighting pattern I wanted on my bride's face. My "Hollywood" lighting pattern is simply a variation of the classical "Rembrandt" lighting that artists and photographers have been using for years. Shellee, my assistant on the shot, positioned the flash so she could not see the far side of the bride's nose - so neither could the light she was holding, but she could still see plenty of the far side of the bride's cheek - and so could the light. Check out the second image.


Now if the light was held in the position described above, we should see an image of our bride with the dramatic, hard shadowed, directional light on her face, with the light falling off quickly over the rest of the scene to drive the viewer's attention easily to our bride's face. I think the resulting image does just that. Pretty cool, I think. --Enjoy.

Tuesday, September 18, 2007

Touch of Color - With a Twist

This "Technique Tuesday" Photoshop tutorial reviews a technique that some of you may be familiar with. I've added a nice little creative twist at the end. Hope you enjoy it. --David

Tuesday, September 11, 2007

Technique Tuesday

Good Morning Everybody,

Well here we are our first "Technique Tuesday." I want this part of the blog to give you some solid information, insights, and techniques that can really make your photographs stand out from the crowd. But hey, if everybody reads and incorporates all the techniques, maybe your work won't stand out so much. But, at least the crowd's work would look better too - and that's not a bad thing either. So off we go to:

Ziser Lighting 101 - Part 1:

There are a "million" new shooters out there thanks to the explosion of digital photography. Many of these new shooters are also trying to do wedding photography on weekends, maybe not as a full time occupation like many of us, but just as a way to bring in a little extra income - and that's a good thing, too. A little extra income never hurt anyone.

Here is the situation - the giant wave of new shooters has certainly leveled the sea in the level of "Sameness" in the wedding market - "Sameness" is on the rise in wedding photography. But, we can do something about it - each and everyone of us can, if we choose. By choosing to do so introduces a brand new way to be creative in our photography.

The "Strobist" started a blog discussing off camera flash about 18 months ago that is now off the charts. The phenomenon David Hobbie - "The Strobist" - created was the result of people wanting to be less the same, more different, and more creative. If you have never visited his site, check out his blog here - tons of info there.

I want to create the opportunity for each of our readers to be more creative in the context of Wedding Photography. I will post a series of tips over the next several weeks that hopefully will spark one's initiative to reach out for that goal of being different. Remember, "It's the Difference That Makes the Difference!"

Let's look at what is being shot, how it is being shot, and how we can easily change it for the better. Look at the following 4 images. This first one was shot with a single on-camera flash. Look how ordinary it looks. It's "blasting" right into the face. Because of the smallness of the flash head, it creates substantial and unflattering specular highlights on the subject's forehead, cheeks, nose and chin . Good morning, Uncle Harry and Aunt Mary - this is how the bulk of new photographers are lighting their subjects. Not bad for the occasional family snap, but not acceptable for the professional or "want-to-be-professional" wedding photographer.

To solve the "specular" problem, many photographers will bounce the light off the ceiling by turning the flash head skyward under the impression that the "bounced" light will give a softer look. Softer yes, but from the right direction - NO! Look at the second image here.
You might say, Hey Dave, look, no more "specular" highlights". You would be right there, but look at the brand new "raccoon eye sockets" we created on our bride's face - again, not flattering. I call this "office lighting."

OK, one more try, suppose I use the little fill flap to bounce a little more light back into her face. Sounds like a good idea at first glance, but let's look at the next image. What do you think? 
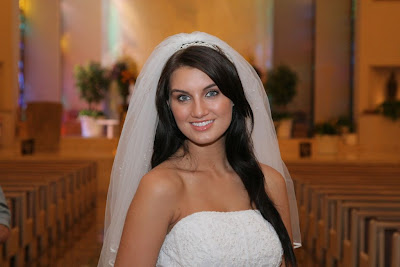
You might be inclined to say - WOW! that's a lot better, I can see her eyes again. Yes, that's true, but notice that the specularity has returned. Granted, there are flash attachments out there that are basically larger "fill flaps". My buddy Gary Fong makes one that is quite good, in fact I occasionally send my second shooter off to use his original "Lightsphere" in some "Cocktail Candid" situations. A larger light source reduces the "specularity" - it basically puts non-directional fashion lighting on the subject. Another name for this lighting is "Butterfly" lighting. This might be good for the fashion model. But my brides, while incredibly beautiful, are not typically fashion models.

How can we get a much more flattering directional light on our bride with our on camera flash? The answer is simplicity in itself. Have the on-camera flash send it's light to another location, bouncing off of the new location and returning from a direction that really flatters our bride. Take a look at the last image - it's the "Treasure Image" - the one that captures the beauty of the bride, the one that has the light coming in from a direction that places a highlight next to a shadow, creating detail, depth, dimension, and color saturation. This is the image that will produce a look that is different from the rest of the pack.


The lighting on this image was effortlessly created. I simply turned my flash about 90 degrees to the right pointing at a flat white panel that my assistant was holding to the right of the bride. That mass of little "photons" headed out of the flash head, traveled to the reflector, most of those little guys - and they are very small, just ask Einstein - pushed off (or were reflected) back into the direction of the bride, and illuminated her face beautifully. What do you think? I love the result.

Here is an image of the exact set-up.

Hope you all enjoyed the first lesson. I'll hit some news again tomorrow.

See you then, --David