Showing posts with label camera technique. Show all posts

Saturday, April 18, 2020

WOW! Eye Opening Numbers For Wildlife Photography!

Good Morning Everybody,

Last evening we had a fun Zoom meeting with our first Safari group.  Don Dickson, who runs the "Internationally" famous Texas School [link] put the whole thing together for us.  It was a "hoot" reminiscing about the great times we all had on that trip.

Yep, we do get kind of close to the animals, lion included.  That's probably the biggest surprise for first-time safari adventurers. Thanks to Kevin Dooley of Idube Photo Safaris [link] for sending this photo over to me this morning. That's me next to the driver with LaDawn behind him. We are really only a few feet away from the lions - safaris are definitely an adventure!

We joined the Dicksons on their Safari and then were to follow up with two more of our own when the bottom dropped out of our travels. No problem though, we already have them rescheduled for about the same time next year.  I put the links at the end of this post.

Anyway, I hope you all got a chance to view the YouTube video I put up just a few days ago.  It really shows what an exciting trip it was. If you missed it, here is the [link] to the video one more time - Enjoy!  Now on with the show....
________________________________________________________________________

WOW!  Eye Opening Numbers For Wildlife Photography!

Last Thursday I did a post entitled "Camera Settings for Wildlife Photography - Mostly Manual Mode and Why" [link] which really got down to the "nitty-gritty" of my wildlife shooting strategy.  Today I want to ramp up that post with some surprising statistics about the Shutter Speeds, Apertures, and ISOs I used most often.  These numbers are based on the EXIF data of 20,179 wildlife images I made two years ago during our safaris back then.

Shutter Speed
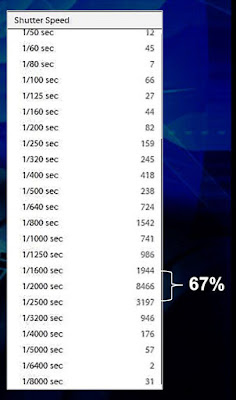
Take a look at the table to the right.  I think you will be surprised by the numbers here. As you can see, my exposures ranged from 1/50 second and lower up to 1/8000 second.  OK, how did I come up with this data?  It was easy once I really got the "hang" of some of Lightroom's EXIF data reporting features. I asked Lightroom to just report all exposure data from my Canon 5D Mk3 and my Canon 7D Mk2 and presto, the Shutter Speed info appeared!
OK, back to the numbers. Take a closer look at the chart to the right. Notice that 67% - that's 67% - of my shutter speeds were 1/1600, 1/2000, or 1/2500 second! A quick point of clarification... NOT all those exposures were made on Manual mode. A large number of them were made on Shutter Priority mode as well.  I'll cover that shooting strategy in an upcoming post next week. Needless to say, two-thirds of my photos were made at very high speeds for all the reasons stated in my post referenced above.

Keep in mind that safari shooting conditions vary widely.  Birds are flying, animals are moving, and the safari vehicle is bouncing, sometimes like crazy.  All these factors require faster shutter speeds to freeze the action.

Aperture

Now let's move on to Apertures. I used the same Lightroom reporting technique to determine my most used range of shooting apertures. Once again, check the table to the right.

In most cases, I was shooting wide open with my telephoto lenses. When shooting the Canon 5D Mk3 I mounted my Sigma 150-600mm lens with its maximum aperture of F6.3.

When shooting my Canon 7D Mk2 fitted with its 100-400mm lens (my all-time favorite wildlife shooting combo), again maximum aperture F6.3. You can see from the data that nearly 1/2 of all my exposers were at the maximum apertures of both the lenses.

If the light was bright, like at mid-day, I would stop down 1/2 to one full stop just to pick up a little more depth of field.  I found that mostly helped with my bird photography.

Still, you may be questioning my use of both lenses maximum apertures for so many of my photos.  The answer is quite simple - both of these lenses are super sharp lenses.  I never felt I was compromising the image in any way when shooting wide open.

ISO

Now on to ISOs ...  As I mentioned in my early post (referenced above), I do like to "float the ISO in these kinds of shooting conditions. I don't want the ISO to go to high, but I do want it fast enough to allow me to use the necessary shutter speeds I need for my wildlife photography. Now take a look at the ISO chart to the right. OK, OK, I did let the ISO float a little on some occasions - I'll get to that in a minute. But DO notice that 56% on my images were in the ISO 1600 - 6400 range.

The reason for the higher ISOs is accounted for by our early morning and our late afternoon/early evening shooting.  But, let's re-analyze the data differently. If you total the ISOs from ISO 400 to ISO 2000, the total number of exposures accounts for over 44% of my images.  That means that most of my images were made at very manageable ISOs.

With the use of software like Lightroom, I can easily manage the slightly higher ISOs.  Heck, back in my "wedding days"  I would routinely shoot all my reception images at ISO 3200.

Still, I think the analysis of this data is really fascinating to see.  It really shows what the Apertures, ISOs, and Shutter Speeds need to be to get the optimum photograph with the gear I was using. Had I been using a 300mm/F2.8 lens, my data would have been different, obviously.  But I was using gear that worked great for these wildlife shooting situations.  The gear is reasonably priced and gave me a great result for our Safari experiences.

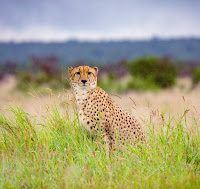
Take a look at the photo having "lunch" to the right. Notice the camera specs: Canon 7D Mk2 fitted with 100-400mm Sigma lens: 1/2000 second @ F5.6 zoomed to 123mm at ISO 2500. Anything less than the higher shutter speed and high ISO and I would have missed the photo.

I hope everyone enjoyed the discussion today and I certainly hope it will at least give you some starting points in any upcoming African adventures you may have in your future.
_______________________________________________________________________

Hey Gang,

That's it for me today.  I can't believe it's Friday already. Have a great weekend and I'll hope to see you next week for a few more ideas and discussions.

Cheers for now, David


Oh, BTW, Here are the links to our rescheduled Safaris for next year.

South Africa at Thakadu: March 30 - April 9, 2021 [link]

Botswana, Africa at Mashatu: April 9 - 19, 2021 [link]

We are sorry we couldn't continue on Safari this year but both LaDawn and I are really looking forward to next year - hope to see you there!  David and LaDawn

Friday, March 15, 2013

All Is Good In DigitalProTalk World Headquarters!

Hello Everybody,

Where is DAZThe comments have been getting a bit more serious lately and a lot of folks are wondering what is going on in my Digital ProTalk world.  The blog has been quiet, I’ve been off the radar to some extent, and photographers are beginning to wonder “What’s Up”?

OK, today I’m here to answer that question.  Things are really good at DigitalProTalk world headquarters.  I can’t say I’ve been taking it especially easy and every day seems jammed packed with activity.  But, If I had to be honest, I would have to admit that I have slowed things down i n my life.

That said, let me bring you up to date on exactly what's been happening around here.

PhotoPro Expo 2013 Was A Hit!

That’s right, I just did the numbers this week and the results are in.  PhotoPro Expo 2013 was attended by nearly 1,200 photographers from over 21 states around the country – WOW!

PhotoPro Crowd1a

PhotoPro Crowd2That’s about 20% more that last year!  PhotoPro Expo is quickly becoming the best value photographic event in the country and people are beginning to notice.

The trade-show was also 30% larger with 114 booths fully occupied by exhibitors from around the country and Canada.

I hope to have a full convention report up sometime next week so please stay tuned.

I Presented a Brand New Lighting Program For Google

DAZ-LIZ-LD GoogleThat’s right, we wrapped the convention activities on Tuesday and then LaDawn and I jumped on a jet to beautiful San Francisco on Friday of that week – 2.15.13.  We were planning to spend some time in San Jose then a few more days in the city of San Francisco.  Fortunately for us, my daughter, Elizabeth joined LaDawn and I on our week-long visit.  We certainly needed a vacation after the very busy days of PhotoPro Expo 2013 .

During our visit I presented a brand new lighting program to the good folks at 1600 Amphitheatre Way in Mountain View, CA – Google. It was Elizabeth’s first trip to Google and she really enjoyed the visit.  My program went great and we even hung around for a while to chat with some of the attendees.  My thanks to my good buddy, Mike Wiacek for setting up the program and being an extremely gracious host during our visit.

Now On To Mexico – Sunny Cabo San Lucas, Mexico That Is!

After leaving Elizabeth to enjoy the Chinese New Year celebration in San Francisco, LaDawn and I boarded an early flight to Cabo San Lucas, Mexico.  Cabo is one of LaDawn’s favorite places to visit on earth. I know we were just there last December for three weeks but Camera Craftsmen, a very esteemed group of photographers, asked LaDawn and I to join them at the annual meeting which just so happened to be in Mexico this Spring. THANS to Kent and Sarah Smith for their awesome hospitality!

Camera Craftsmen

I have to admit, I was really looking forward to the trip.  The members of Camera Craftsmen have been photographers I have looked up and admired throughout most of my career.  It was great to be able to hang with them for an entire week and renew the friendships forged so many years in the past. Want to check out some great photography from some of the members, you can find the link right here – enjoy!

I picked up a few tips from many of the morning programs I attended.  I’ll plan to share a few of them with you in some upcoming posts.

From Sunny Cabo To Snowy Park City, Utah

DAZ and AaronAfter a great time visiting with friends in Cabo for over a week, it was time for the next leg of our journey – Park City, Utah. My son Aaron moved  there about 6 months ago.  We haven’t seen him in over a year so it was good to catch up. THANKS to good friend Dennis and Sherry Walsh for their warm hospitality!!!

Aaron works a the Park City Ski Resort and set me up for a day off skiing the high peaks of Utah. I love skiing but coming in from the Cabo sunshine to the snow covered slopes of Utah was definitely a bit of a body shock ;~)  Still a good time was had by all.

Bobsled1The highlight of the trip was on Day 2 of the visit.  Aaron arranged for the three of us to ride the Olympic  bobsled run at the Olympic Park.  Yes, the REAL Olympic Bobsled run on the REAL bobsled track that they used for the 2002 Olympics and still use today for Olympic training.  It’s like the second fastest bobsled track in the world!

Bobsled2So, just how fast do the Olympians travel down that treacherous ice covered track – about 85MPH!  How fast did we travel for our hair-raising 54 seconds death defying adventure – over 80 MPH.  And, let me say – there are NO SEAT BELTS in a bobsled! You just hang on for “dear life!” as you fly through 15 turns (you lose count after 6) experiencing up to 4G forces on your body which BTW, asks why in the world you do something like that on purpose.

I have to say, it was quite the RUSH – so now I can cross that one off my bucket list ;~)  LaDawn and I were up for the Skeleton run but unfortunately we were leaving too early the next day to make that happen – maybe next time.

Finally Heading Home

We finally headed home last Friday after our three week journey/adventure.  We covered a lot of geography and had some great experiences during that time, I know I wouldn’t have traded the time for anything else.

We’re back in town for about four weeks and then it’s off to Photoshop World – also a grand adventure in itself.  So things are calm around here for a few weeks and I’m hoping to get a post or two up for our loyal DigitalProTalk readers.  I sure hope you’ll stop back.

Have a great one everybody.

See you soon,  David

Tuesday, June 05, 2012

Technique Tuesday: The Only Wide Angle Lens You’ll Ever Need!

Good Afternoon Everybody,

Just to bring you up to date, let me tell you what’s happening around here - it’s all good stuff.  Yesterday, I typed the first 2,200 words of my new book, “Make Your Lighting Exciting”.  I just started typing and the words started flowing – a very good thing for an author ;~) 

Anyway, the book in now on the “front burner” an I’m giving it TOP PRIORITY over everything else here at the studio, including daily posts to DPT.  If I’m going to finish this thing by the end of August, that’s how its’ going to have to be the next few months.  The first words I type each day will be for my book – no exceptions! 

2000FireworksiStock_000004279531XSmaDon’t worry, I’m not giving up on the blog for that time period but look for the blog posts to come later in the day.  I figure 2,000 words a day and I can have the book hammered out in no time.  Total words for my Captured By The Light book last year totaled about 65,000 words so you can see I’m on a “tear’ this time around.  Hey, they always say to write your second book first because you know what you’re doing ;~)

That’s the quick update from me today.  How about we get on with a super-cool Technique today.

The Only Wide Angle Lens You’ll Ever Need!

Canon FisheyeOK, not really but with what I’ve got to show you today you’ll be surprised to see what I pull off with my new Canon 8-15mm Fisheye lens.  The cool thing is that it has little to do with Fisheye photography.  Today it’s all about super- duper extreme wide angle lens photography.  How wide – how about 150 degrees rectilinearly corrected wide angle wonderfulness!  That makes the new Canon lens the new wide angle winner in that department.

OK, so you’re asking, “How in the world can I use a fisheye lens as a regular wide angle lens?”  It’s easy folks, Lightroom 4 and it’s built in lens correction feature. That’s the point of this week’s lesson. Today’s post answer’s the question of what the REAL “Field of View” is for a rectilinearly corrected fisheye image.  OK, I’ll let the “cat out of the box early here. 

Using the Canon 8-15mm fisheye on my Canon 5D Mark III full frame body, I will show you can achieve a true rectilinearly corrected image with a “Field of View” that ranges from 150 degrees down to a still super-wide 133 degrees depending on the zoom setting of the lens.  The studio image below is shot with the Canon fisheye at 14mm corrected in Lightroom showing a 140 degrees “Field of View”! Nothing else comes close to this wide angle feat!

Fisheye Wide angle

Hopefully I’ve got your attention with this intro.  I’ve spent a lot of today developing and organizing the data and the images for this post.  Why not hit the PLAY button below and enjoy one of my favorite Technique Tuesdays ever.  OK, on slight word of caution – I did get little carried away on today’s tutorial and it does run a little long – about 34 minutes long.  But it’s still worth every minute of you time.  I think (and hope) you get a kick out of the video today.  Enjoy!!

_________________________________________________________________

Hey gang, that’s it for me today.  I’ve still got to get my 2,000 words under my belt for today – yes, I gave DPT first billing today because I got so wrapped up into putting things together this morning so now I’ve got to get moving.  I’ll plan to see everybody here again real soon.

Adios for now,  David

Tuesday, April 24, 2012

Technique Tuesday: Understanding The Right Gear To Use For Weddings & Tamron 28-300 VC Lens Review

Good Afternoon Everybody,

CS6It’s a two-for-one post today but before I begin I hope everybody's off to a great start for the week. We just had Adobe CS6 announced and it is looking like one hot upgrade – I can't wait. Want to check out 10 of CS6’s coolest features – you can find the 10 videos right here at photographer, Colby Brown’s site. 

Things are getting busy for us, as usual, as we get ready for our trip to Dallas, Texas.  After just coming off of my Digital Master Class we’ve got to re-organize all the gear for our week long class at Texas School. So prepping for that trip,  getting ready for our free Extreme Digital Design Webcast on Thursday (REGISTER HERE), and our regular studio production items are certainly keeping us busy once again.

I spent most of yesterday organizing the content and images for today's post. I know today is supposed to be our normal Technique Tuesday complete with video  but, I'm changing it up because I have some more important news that I want to discuss with you. ImagesToday's post is a combination of gear discussion and equipment discussion for today's wedding photographers.

I think it's always interesting to read the latest, greatest equipment reviews online and to check out the latest new lenses for our cameras. Little is said in the overall scheme of things about what gear combinations might be the best  for certain shooting situations. That's my topic for today.

Understanding The Best Gear To Use For Weddings

I've been a wedding photographer for a long time and a digital wedding shooter for over 12 years. Over those years I've worked with many different combinations of cameras and lenses. Now, here we are 2012 and I’m finding myself once again reconsidering the best camera/lens combinations for shooting a wedding. Let me be clear – every photographer has their own style and technique when photographing a wedding, myself included. Some photographers prefer the fast glass and medium to long telephotos for capturing the essence of the wedding day. Others newer to the field, unfortunately, may prefer the Canon rebel with the kit lens.

I myself have gone through many equipment combinations and transitions since switching to digital so many years ago. Heck, back in the film days, you bought one camera and used it for 20+ years – not so today.

Canon 7D with 18-200mmFor the last two years my favorite camera/lens combination has been the Canon 7D fitted with the Canon 18-200mm IS lens.  Now before anyone has a conniption fit because I'm not using fast, L-series glass – please hear me out. When I’m shooting the majority of the candid, spontaneous images I’ve always found this camera/lens combo to be a very efficient combination. I found it to be particularly efficient when photographing a wedding reception. If I spotted grandma dancing with one of the groomsmen across the dance floor I can easily zoom out and capture that special moment. No need to run back to my gear bag to grab a longer telephoto lens. The entire shooting process was quick and efficient.

I think a common misconception many photographers have about gear is that they need a whole slew of lenses to get the job done.  Again, don't get me wrong. I do own a whole slew of lenses and use just about all of them on a typical wedding event.  But typically, over these last two years, it's been my Canon 7D/18-200mm IS lens combo that has been my work-horse, been the combo I’ve used most often and has provided for me some really outstanding results.

Lens Meta DataTo give you an example I checked a recent wedding exposing nearly  3800 images over the two day event. Look at the metadata from that event.  Clearly two thirds of those images were taken with the 7D fitted with the 18-200mm IS lens. 800 more of those images were photographed with the Canon 24-105mm IS lens.  I’ve always felt this is one of the sharpest lenses in my gear bag and always reserve it for portraits of the bride and the groom, family groups, and the larger wedding party groups. For many of my wide-angle images I liked using the Sigma 8-16mm lens, and as you can see from the above chart, for about 200 of the images.  So, as you can see, the big favorite was the extremely versatile 18-200mm IS zoom lens.

Again, I know several of you are probably rolling your eyes at my remarks in today's post. But, let me say, for me it's about getting the image, capturing the moment, not taking a chance missing something important as I juggle with my lenses - that's not my style. For me it's ALWAYS about getting the shot!

Another thing I think a lot of photographers fail to realize is that the largest print that's going into a wedding album, particularly with candid images, is typically no larger than a 5x7 or maybe a 8x10 image – and, on the rare occasion, an 10x10. The 18-200mm lens is just fine for many of those images.  Don’t get me wrong – I’ve still made prints up to 24x36 inches from that lens –and they look GREAT!

Wedding Page2

Several times during LaDawn’s design process she will include images that are 10x15 and occasionally even larger in the album. But in most cases those images would've been taken with the much sharper 24-105mm IS L-series lens that I like using for just such photographs.

Wedding Page

The sharper glass is going to be reserved for the top, #1 priority images. The more versatile and faster piece of glass, the 18-200mm IS lens I'll use for the second and third tier images. As I mentioned before, this allows for extreme versatility and fast speed for me with my style of photographing a wedding.

Now please continue reading the following post [link] for the complete low-down on Tamron’s new 28-300mm VC lens.

Updated: Test Driving the New Tamron 28-300mm VC Lens; Is It the Best Wedding Lens Available?

Tamron lens2
It’s a long read but I think worth every word. I gave you the rundown of why I been using the gear I’ve been using  over these last two years in the previous post [link].  But things changed when Canon began delivering the 5D Mark III camera just a few weeks ago.
I photographed my first wedding with the 5D Mk3 and loved it, particularly the high ISO aspects of the camera.  The problem was that I didn’t have a comparable lens to my 18-200mm IS lens I loved on my 7D to shoot with on the new 5D. I set about finding a replacement lens.  I wasn’t interested in Canon’s $2700 six lb. lens in that same focal length so I opted to hit the NET and see what I could find.  The Tamron 28-300mm VC looked to fill the bill and my good buddies at Tamron were gracious to loan me the lens for a month. My report below is based on my experience from my first week shooting hundreds of images with that lens.
Test Driving the New Tamron 28-300mm VC Lens; Is It the Best Wedding Lens Available?
After working with the Tamron 28-300mm VC lens on my Canon 5D Mark 3 for the last week,  I’m finding this gear combo is going to be my favorite wedding gear, camera/lens combination from this point forward. Let me explain why. First, the superior image quality, quiet shooting, and super high ISO's have made the Canon 5D Mark III the most exciting camera I have ever photographed with.
5D w-Tamron lensNow add to that the Tamron 28-300mm VC lens and I’m thinking I may just have the ultimate gear combination for photographing weddings. Having said that - let's discuss the different features of the Tamron 28-300mm VC lens  Since the 5D Mark III is a full frame sensor camera versus the APS sized sensor on the Canon 7D, the Tamron 28-300mm VC lens is the equivalent focal length lens on the full frame 5D Mk3 considering the 7D’s 1.6x magnification factor which is exactly what I was looking for at a non-wallet busting price of only ($600) for my 5D Mk3.
Okay, your wanting to know, “Just how good is this new Tamron lens?” My first impressions signaled me that it is significant step up in image quality when compared to the images I was getting off of my 7D/18-200mm lens combination. What I’d like to do in today's post is walk you through several images taken with the Tamron lens at the various focal lengths from 300mm all the way down to 28mm and at pretty wide apertures to boot and then let you draw your own conclusions.
Focal Lengths Compared
300mm:  Look at the first image. It was taken with the Tamron lens racked out to 300mm and shot at F8. Looking at it in full frame mode it looks just fine. But now let's zoom in and look at it at a 2:1 magnification. You can see, upon very close inspection of this image, that we have plenty of detail in this image.
0001 - Tamron-1867
0002 - Tamron-1867
Tamron 28-300mm VC lens at 300mm, F8.0 @ 1/250 second, ISO 800
Now let's look at the next wedding image along with their 2:1 magnification view. The important thing to notice on these next two images is that they were made at the lens’s widest aperture and at its longest focal length. It's with this focal length/f-stop combination that we would expect the worst performance from the lens. From my subjective observation I find the results to be amazingly good.
0003 - Tamron-
0004 - Tamron-
Tamron 28-300mm VC lens at 300mm, F6.3 @ 1/200 second, ISO 200
During my Master Class last week, I actually printed a 24 x 36" print  from this image series and it looked fabulous. So even using the Tamron lens and what many would consider the worst-case F-stop scenario, I am getting beautiful portraits of my bride.
DAZ with Print
I have to admit I found the results surprising. You can see that were holding plenty of detail in the bodice of the wedding gown.  Surprisingly I had  the lens fully extended to the full 300mm focal length.
250mm:  Now look at the next image. It was made it at F5.6 handheld a 1/13th of the second and even in the close-up of this image you can see that we have plenty of detail in her facial features and in her pearl necklace.
0009 - Tamron-
0010 - Tamron-
Tamron 28-300mm VC lens at 249m, F5.6 @ 1/13 second handheld, ISO 800
200mm:  The next image at 200 mm could be argued to look even better. You can clearly see the texture of the skin and, see plenty of detail in the pearl necklace even under the extreme 2:1 magnification.
0011 - Tamron-1641
0012 - Tamron-1641
Tamron 28-300mm VC lens at 200m, F5.6 @ 1/80 second handheld, ISO 200
150mm:   The next image, the bride leaning against the piano, still continues to exude a high level of image quality zoomed to 154mm. Notice once again that the aperture was nearly wide open at 5.6 handheld at 1/50 of the second.
0013 - Tamron-
0014 - Tamron-
Tamron 28-300mm VC lens at 154mm, F5.6 @ 1/50 second handheld, ISO 800
100mm:  As I continue to shorten the focal length of the lens – look at this next image at 100 mm at F5 .0. You can see that the quality is still just as strong as in the previous images. I think the key point that I’m trying to make is that these images are made at the lens’ very wide apertures.  That's telling me that we have excellent optics attached to the camera.
0015 - Tamron-
0016 - Tamron-
Tamron 28-300mm VC lens at 100mm, F5.0 @ 1/60 second handheld, ISO 200
Sure, stopping down the lens even further could give us even greater sharpness but what I'm seeing is that is not necessary. And, the larger aperture allows us to separate the subject from the background very effectively.
Take a look at this next image. Once again it was made at the 100mm setting at F5 .6 handheld at 1/60th of a second. It’s a very exciting image to view capturing the beauty of our subject against the dramatic Cincinnati skyline.
0017 - Tamron-2103
Tamron 28-300mm VC lens at 100mm, F5.6 @ 1/60 second handheld, ISO 1600
But now check it out at the one zoom magnification. You can see that even at this  magnification we are looking at an extremely sharp image. And, once again it was made at nearly the full aperture of the Tamron lens.
0018 - Tamron-2103
Tamron 28-300mm VC lens at 100mm, F5.6 @ 1/60 second handheld, ISO 1600
This next image of our bride leaning against the piano was made at a slightly wider 92 mm setting of the lens. I did absolutely no retouching on this image and even under close inspection you can see that it is tack sharp throughout.
0019 - Tamron-2527
0020 - Tamron-2527
Tamron 28-300mm VC lens at 92mm, F5.6 @ 1/30 second handheld, ISO 800
50mm:  The next three images were captured at the zoom range between 55 – 39mm. These images corroborate the results we saw in the longer zoomed photographs. In the tight 2:1 close-ups we are maintaining superior detail at this wider zoom range.
0021 - Tamron-1447
0022 - Tamron-1447
Tamron 28-300mm VC lens at 55mm, F6.3 @ 1/160 second, ISO 200
 
0023 - Tamron-
0024 - Tamron-
Tamron 28-300mm VC lens at 50mm, F11 @ 1/200 second, ISO 200
 
0025 - Tamron-1986
0026 - Tamron-1986
Tamron 28-300mm VC lens at 39mm, F8.0 @ 1/200 second, ISO 100
28mm:  At the Tamron's widest setting, 28 mm, we can easily identify that the lens is exceedingly sharp. I guess the main point I'm trying to make  is I would have no hesitation at all in using this lens throughout its full focal length at my next wedding.
0029 - Tamron-2160
0030 - Tamron-2160
Tamron 28-300mm VC lens at 28mm, F5.6 @ 1/80 second, ISO 6400
 
0031 - Tamron-
0032 - Tamron-
Tamron 28-300mm VC lens at 28mm, F5.6 @ 1/80 second, ISO 6400
Chromatic Aberration:  Many times, at the extreme range of super zoom lenses you will see some chromatic aberration in the brightest parts of the scene.  Take a look at this next image.
0033 - Tamron-2347
Yes, it's Barry Manilow. I'm smiling as I'm writing this because you're all probably wondering what am I doing at a Barry Manilow concert. Well, I happen to like Barry Manilow and I've sadly never been to any of his concerts.
After we wrapped the Master Class last Friday LaDawn and I wanted a little R&R so we checked to see what was showing around town. Low and behold there it was - a Barry Manilow concert just 10 minutes away from our home. On top of that, some decent tickets were available for only $10 each!  We decided, heck, let's give it a try and enjoy a $10 concert. We actually spent more money on refreshments and parking than we did on our two tickets. It was certainly a was a nice diversion, an excellent concert and most importantly we had a good time;~)
But I digress. The topic here is chromatic aberration. When we look at this image under extreme 2:1 magnification you can see the chromatic aberration quite clearly around Mr. Manilow’s jacket. Notice the red and green halos on the left and right of the jacket.
0034 - Tamron-2347
Is this a big problem? For me, it's not. Why? Because I'm using Lightroom 4 as my image processor. And, in the Lens Correction Module, by simply profiling the lens and telling Lightroom 4 to remove the chromatic aberration we really make this issue disappear easily and quickly so it's really a non-issue.
0035 - Tamron-2347
Tamron 28-300mm VC lens at 300mm, F8.0 @ 1/160 second, ISO 6400
VC - Vibration Compensation:   Okay, I know what you're thinking next, “The lens sure looks good throughout it’s complete zoom range from 28 to 300 mm but how good is the built-in image stabilization of the lens?”   I have to tell you, I never carry a tripod with me to a wedding. That means I am essentially relying on the lens’ built in image stabilization to save the day for me.
Tamron calls their image stabilization VC for Vibration Control. They claim their VC to give you three f-stop safe range when shooting at the slower shutter speeds. That means that you can shoot at a 3 stop slower shutter speed than what  would normally be needed to capture a  sharp photograph with their lens at a certain focal length.
After Mass on Sunday, LaDawn and I headed to the Cincinnati Art Museum. In the dim surrounds of the Art Museum I decided to check out the vibration control characteristics of the new Tamron lens. Take a look at the Gainsborough painting below. It was shot at the 160mm setting at 7.1 at 1/10 of a second handheld. In my quick test it looks like Tamron vibration and roll is working just fine.
0036 - Tamron-2617
0037 - Tamron-2617
Tamron 28-300mm VC lens at 60mm, F7.1 @ 1/10 second handheld, ISO 6400
Take a look at the zoomed in image. I don't see any motion blur whatsoever even under very close inspection.
Later in the evening, after we returned, LaDawn grabbed the camera with the Tamron lens attached and started shooting a few photographs of me standing in our living room. I did hear that the shutter speed was quite slow so I asked her to take her time and just click off a few images and let's see what we could capture.
In the following image - you can see that I look quite sharp – easily sharp enough for a 4 x 6 print. Now prepare to be amazed! Look at the shooting specs on this image.
0038 - Tamron-2648
Tamron 28-300mm VC lens at 109mm, F7.1 @ 0.6 second handheld, ISO 6400
About 2/3’s second at 7.1 –  that's over half of a second handheld, by LaDawn who is truly not a professional photographer, and I think the image captured looks pretty darn good. I have to admit I was really amazed when I saw this image. I'm not suggesting that you routinely go out and shoot at exposures longer than a half a second counting on them the be tack sharp. But, that there are times when, in a pinch, you could get away with it using Tamron's new lens.
Shooting Macro Shots:  Another really nice feature of the Tamron lens that really surprised me was just how close it could focus. I racked out the lens to 300mm and proceeded to take some close-up photographs of some flowers in our garden. The lens was only about 10 inches away from the subject but, as you can see both in the full view and the super close view, there is plenty of detail in the image. That's an indication to me that we could also use this lens to do a great series of scene setters as part of our wedding coverage.
0039 - Tamron-2680
0040 - Tamron-2680
Tamron 28-300mm VC lens at 300mm, F8.0 @ 1/320 second handheld, ISO 1600
 
0041 - Tamron-2207
0042 - Tamron-2207
Tamron 28-300mm VC lens at 300mm, F9.0 @ 1/500 second handheld, ISO 1600
I even clicked off a quick photograph of LaDawn and my wedding and engagement bands. I had no idea my wedding ring was so beat up – a wedding photographer’s hands take such a beating you know ;~)
0044 - Tamron-2690
Tamron 28-300mm VC lens at 300mm, F16 @ 1/50 second handheld, ISO 1600
HDR:  And finally, during last week's Master Class I did decided to give the HDR feature on my Canon 5D Mark III a try. I framed up the city and clicked off the image you see below of the city skyline. The camera captures three sequential shots and then matches up the pixels of each of those photographs, works it’s HDR magic, and gave me this final result. Even handheld at 1/80 second and once again at F5 .6 - a fairly high ISO 6400 we have one of my favorite images I've taken so far this year.
0045 - Tamron-2134
Tamron 28-300mm VC lens at 42mm, F5.6 @ 1/80 second handheld, ISO 6400
How About On A Canon 7D or Any Other APS-C Sized Sensor?
Good question – let’s think it through.  Take a look at the diagram below I put together showing the actual field of view of the camera lens and then compared the field of view of a full frame vs. APS-C size sensored camera.   If you're shooting a full frame camera you need to be using a lens that will cover the full 24 x 36 area of frame. That's what the Tamron 28-300mm VC lens was designed to do.
Full Frame vs APS-C
We’ve discussed the sharpness of the Tamron lens throughout its full zoom range of 28 to 300mm. Many times, in lens reviews, the reviewer will discuss light fall off and less-than-perfect sharpness at the corners of the lens particularly at the longer focal lengths of these all-in-one zoom lenses. 
As a wedding photographer, this is not so an important consideration for me.  We’re not shooting scenics or architectural objects.  I don’t necessarily need perfect sharpness in the corner of my lens.  Please, no nasty emails here – when I do need that perfect sharpness, I choose a lens that gives me just that. 
But, as a wedding photographer I’m pointing my camera at people. Corner sharpness and vignetting are less of a consideration for me. Hence, the reason I put less than heavy emphasis on this aspect of lens reviews when considering a lens for my wedding photography. Nevertheless, the Tamron lens ranges from excellent at the center to good at the edges throughout its range in the tests I've seen online. This makes it a good all-in-one lens and a good choice for a full frame sensor camera like the Canon 5D Mark III when shooting weddings and events.
So what about the smaller sized sensors? If what I indicated above is true then the only conclusion you can draw is that the Tamron 28-300mm VC lens will do even better on a smaller size sensor like the one on the Canon 7D camera.  Look at the diagram above one more time – we’re using the sharper, center part of the lens’ field of view so the easy conclusion is that you will get very good image quality and a great result.
One thing to remember though is that your effective focal length changes when shooting with the smaller sensor cameras. The Tamron 28-300mm VC lens will give you an effective range of 43-465mm on the 7D – quite a long throw on the long end but not so wide on the short end.  Hey, there are always trade-offs, but you do pick up that added center sharpness when using the lens on a Canon 7D and wow, what a focal length on the long end!
In Conclusion:  The conclusion for me is that this is a great lens to be married to the Canon 5D Mark III especially for the wedding photographer. It gives me a superior shooting range I like along with good to great sharpness throughout it’s entire range.  That along with good VC - vibration control this lens will allow me to continue to shoot handheld at all my future events.
Would I marry it to my Canon 7D – I sure would when I wanted the added center sharpness and the longer much focal length. But remember, I give up the wide angle versatility I get with the Tamron lens on the Canon 5D Mark III.  It’s all about choices. I’ll keep this post updated as I continue to work with the camera.
This camera/lens combo is been on my shoulder every day for the last week and as I continue to shoot with it, I'm continually amazed by the results I'm getting.
Tamron specsThe results I'm seeing with the new camera-lens combination – Canon 5D Mark III /Tamron 28-300mm VC lens is giving me results that I find at least two notches above the quality that I was obtaining previously with my older shooting combination. I'm sold on this lens. I plan to use it throughout our shooting sessions at Texas School next week.  Plan to stop by my blog to see some more images.
Over the next few weeks and throughout June we have several weddings on the books. I can't wait to shoot with this camera-lens combo.   I'll continue giving you feedback on how the camera and lens combo works for me.
Candid shooting at a wedding reception is a different beast. I'm generally shooting at F6.3 ranging the focal length from 28mm to the full 300mm range of the lens. I suspect, based on my results so far,  I’ll be extremely pleased with the images.  .
Once again, let me say that I'm not discouraging people from buying the fast glass, and expensive lenses. It comes down to what floats your boat. Those lenses just aren't my style.  I’m most interested in maximum versatility and an image stabilization kind of a guy. When shooting one image every nine seconds for 9 hours,  you have to be quick on your feet and quick on your trigger finger to bring home the best images for your clients.
Sure, I'll also be using my Sigma 12-24 ultra wide-angle lens, my 8-15mm zoomable Canon fisheye lens, my Canon 24-105mm image stabilized lens for most of my bridal portraits and group photographs, and my 85mm F1.8 Sigma telephoto when I really want to isolate on the subject or work in extremely low light conditions. These optics are a few of my favorite optics in my gear bag.. With this gear combination I think we’re able to capture more moments most efficiently and creatively than ever before.  I’m more excited than ever before to be photographing weddings and Mitzvah events in this extremely exciting digital age.

Links to this post: 
Tamron 28-300mm VC lens
Canon 5D Mark III
Sigma 12-24 ultra wide-angle
Canon 18-200mm IS lens
Canon 8-15 Fisheye
Canon 24-105mm IS lens
_________________________________________________________________
Hey gang, that's it for me today. I knew it was going to be a long post and if you've read this far, congratulations for hanging in there. I’d certainly like to hear your remarks about the conclusions I'm drawing about my favorite gear combination fo event shooting. If you've got your own thoughts on the matter, why not share with our DigitalProTalk readers below in the Comment section following this post. I would love to hear from you.
On that note gang, I'm out here. Enjoy the rest of the day and I'll see you soon.
– David