
Well here we are our first "Technique Tuesday." I want this part of the blog to give you some solid information, insights, and techniques that can really make your photographs stand out from the crowd. But hey, if everybody reads and incorporates all the techniques, maybe your work won't stand out so much. But, at least the crowd's work would look better too - and that's not a bad thing either. So off we go to:
Ziser Lighting 101 - Part 1:
There are a "million" new shooters out there thanks to the explosion of digital photography. Many of these new shooters are also trying to do wedding photography on weekends, maybe not as a full time occupation like many of us, but just as a way to bring in a little extra income - and that's a good thing, too. A little extra income never hurt anyone.
Here is the situation - the giant wave of new shooters has certainly leveled the sea in the level of "Sameness" in the wedding market - "Sameness" is on the rise in wedding photography. But, we can do something about it - each and everyone of us can, if we choose. By choosing to do so introduces a brand new way to be creative in our photography.
The "Strobist" started a blog discussing off camera flash about 18 months ago that is now off the charts. The phenomenon David Hobbie - "The Strobist" - created was the result of people wanting to be less the same, more different, and more creative. If you have never visited his site, check out his blog here - tons of info there.
I want to create the opportunity for each of our readers to be more creative in the context of Wedding Photography. I will post a series of tips over the next several weeks that hopefully will spark one's initiative to reach out for that goal of being different. Remember, "It's the Difference That Makes the Difference!"
Let's look at what is being shot, how it is being shot, and how we can easily change it for the better. Look at the following 4 images.
 This first one was shot with a single on-camera flash. Look how ordinary it looks. It's "blasting" right into the face. Because of the smallness of the flash head, it creates substantial and unflattering specular highlights on the subject's forehead, cheeks, nose and chin . Good morning, Uncle Harry and Aunt Mary - this is how the bulk of new photographers are lighting their subjects. Not bad for the occasional family snap, but not acceptable for the professional or "want-to-be-professional" wedding photographer.
To solve the "specular" problem, many photographers will bounce the light off the ceiling by turning the flash head skyward under the impression that the "bounced" light will give a softer look. Softer yes, but from the right direction - NO! Look at the second image here.
 You might say, Hey Dave, look, no more "specular" highlights". You would be right there, but look at the brand new "raccoon eye sockets" we created on our bride's face - again, not flattering. I call this "office lighting."
OK, one more try, suppose I use the little fill flap to bounce a little more light back into her face. Sounds like a good idea at first glance, but let's look at the next image. What do you think?
 You might be inclined to say - WOW! that's a lot better, I can see her eyes again. Yes, that's true, but notice that the specularity has returned. Granted, there are flash attachments out there that are basically larger "fill flaps". My buddy Gary Fong makes one that is quite good, in fact I occasionally send my second shooter off to use his original "Lightsphere" in some "Cocktail Candid" situations. A larger light source reduces the "specularity" - it basically puts non-directional fashion lighting on the subject. Another name for this lighting is "Butterfly" lighting. This might be good for the fashion model. But my brides, while incredibly beautiful, are not typically fashion models.
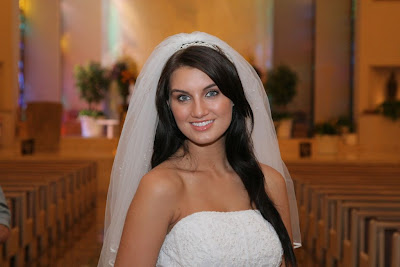
How can we get a much more flattering directional light on our bride with our on camera flash? The answer is simplicity in itself. Have the on-camera flash send it's light to another location, bouncing off of the new location and returning from a direction that really flatters our bride. Take a look at the last image - it's the "Treasure Image" - the one that captures the beauty of the bride, the one that has the light coming in from a direction that places a highlight next to a shadow, creating detail, depth, dimension, and color saturation. This is the image that will produce a look that is different from the rest of the pack.
The lighting on this image was effortlessly created. I simply turned my flash about 90 degrees to the right pointing at a flat white panel that my assistant was holding to the right of the bride. That mass of little "photons" headed out of the flash head, traveled to the reflector, most of those little guys - and they are very small, just ask Einstein - pushed off (or were reflected) back into the direction of the bride, and illuminated her face beautifully. What do you think? I love the result.
Here is an image of the exact set-up.
Hope you all enjoyed the first lesson. I'll hit some news again tomorrow.
See you then, --David